Dots And Dashes… On A Roll!

morse code device

Morse code was once a staple of the communications industry, but with advancing technology it has become relegated almost exclusively to movies and a niche group of ham radio operators. [Jan] has created a device which might not put a stop to this trend, but will at least educate children on the basics of how Morse code works by visually displaying Morse code as it’s generated.

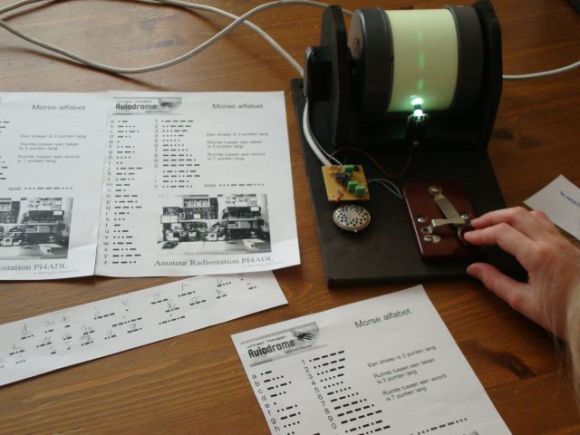
The setup is fairly simple. An old momentary switch (which could easily be used in an actual Morse code setup) activates two pieces of circuitry. The first is a 555 timer circuit that creates an audible tone when the switch is pressed so the user can hear exactly what an operator would hear when decoding a real Morse code message.

The second piece of circuitry is where the real genius lies: a continuously spinning roll of glow-in-the-dark tape is placed in front of a white LED. When the switch is pressed, the LED turns on, which produces dots and dashes on the roll of tape as it passes by. This eliminates the need for rolls of paper or a more complicated moving pen/pencil setup to draw on the paper which might also be less child-proof.

While [Jan] built this as a toy, the children who used it thoroughly enjoyed it! They even decoded some Morse code messages and used the device to practice on it. After a while they’ll easily be able to master the Morse code trainer!

Raspberry Pi Spies On Your Front Door

doorbell pictures

One of [Sander]’s first projects with a Raspberry Pi was to get it to send messages to his iPhone. From there he decided to take it a step further and wire the tiny computer up to his doorbell, creating a system that can send push messages to his phone whenever someone is at the front door.

[Sander]’s doorbell is wireless, and he decided to keep all of its original functionality. All it took to signal the Pi was a simple circuit tied to the doorbell’s status LED which turns off whenever the doorbell is pushed.

The Raspberry Pi runs a python program that handles the GPIO pin which is wired to the doorbell. When the doorbell is pushed, the program processes and sends the push notification while taking pictures of the visitor with an attached webcam. The pictures are included in the message so [Sander] can see who is at the front door. The code for the project is included on his project page.

This project rang a bell for us since we’ve seen projects using a Raspberry Pi and push notifications. None of them so far have included a webcam or utilized an existing wireless doorbell though, and this is a great step forward!

Supersonic NERF Dart Speedometer

ATtiny Chronograph

[John] was faced with an interesting problem: after he built his own air cannon, how could he tell exactly how fast his NERF darts were moving? Luckily he had some spare parts on hand and hacked together a fully functional projectile speedometer for less than the cost of an Arduino.

A device is essentially two detectors spaced a precise distance apart from one another. When something passes the first detector, a timer is activated which measures how long it takes the object to reach the second detector. From this, the device calculates the speed. [John] used infrared emitter/detector pairs spaced exactly three inches apart and wired them to an ATtiny2313. After a little bit of coding, he now knows just how fast he can fire those squishy ballistic missiles.

The infrared emitter/detector pairs are mounted to a PVC pipe through which the projectile travels. [John] notes that in theory this could be used to measure almost anything that could fit through the pipe, although this particular device might be damaged by muzzle flash or a pressure wave from an actual gun.

We’ve seen other NERF dart air cannons before, and we wonder if maybe there should be some sort of competition to see who can shoot a NERF dart the fastest now that there’s an easy way to measure speed?


Repurposed Laptop Batteries With A Twist

Arduino with lithium ion battery

Lithium ion batteries are becoming more and more common these days, but some of the larger capacity batteries can still carry a pretty hefty price tag. After finding Acer’s motherboard schematics online and doing a little reverse-engineering, [Tiziano] has found a way to reuse batteries from his dead laptop, not only saving the batteries from the landfill but also cutting costs on future projects.

These types of batteries have been used for many things in the past, but what makes this project different is that [Tiziano] is able to monitor the status of the batteries and charge them using I2C with an Arduino and a separate power supply, freeing the batteries from the bonds of the now-useless laptop.

With this level of communication between the microcontroller and the battery pack, there is little chance of the batteries catching on fire when they’re used in another project. Since the Arduino can also monitor the current amount of charge in the batteries, there is also a reduced risk that they will be damaged from under- or over-charging.

This wasn’t just as simple as hooking up the positive and negative leads of a power supply to the battery. [Tiziano] also had to model the internal resistance of the motherboard that the battery expects to see, and get the supply voltage just right so the battery’s safety protocols wouldn’t kick in to prevent them from charging. After a few other hurdles were jumped, [Tiziano] now has a large capacity lithium ion battery at his disposal for any future projects.

Laser Projected Christmas Lights

It’s August, and of course that means that it’s time for retail stores to put up their Christmas decorations! But seriously, if you’re going to do better than the neighbors you need to start now. [Joey] already has his early start on the decorations, with a house-sized light show using LED strips and a laser projector that he built last Christmas.

What started off as a thought that it would be nice to hang a wreath over the garage soon turned into a laser projector that shows holiday-themed animations on the front of the house. The project also includes a few RGB LED strips which can match the colors displayed by the projector. The LEDs are powered from a custom-built supply that is controlled by a laptop, and the program that runs on the computer averages the colors from the video signal going to the projector which lights up the LED strips to match the projected image. This creates an interesting effect similar to some projects that feature home theater ambient lighting.

The only major problem [Joey] came across was having to account for the lasers’ motion in the projected patterns, which was causing the computer to read false values. This and a few other laser-related quirks were taken care of with a bit of programming to make sure the system was functioning properly. After that it was a simple matter of attaching the projector to the roof and zip-tying the LED strips to the eaves of the house.

The projector is weatherproof, has survived one harsh winter already, and can be up and running for any holiday. With Halloween right around the corner, this could be a great way to spice up some trick-or-treating. Check out the video after the break to see this setup in action.

Continue reading “Laser Projected Christmas Lights”