Star Trek Tap Controller, Take Two

Engineering student and DIY enthusiast [Xasin] thought that the usual ways of controlling various home devices, such as phone apps and web interfaces, were too boring. Instead, he developed the wearable Tap interface which is a cross between a Star Trek comms badge and mobile holo-emitter. The basic idea is to control stuff by tapping the pendant. But things got a little out of hand since this project started two years ago.

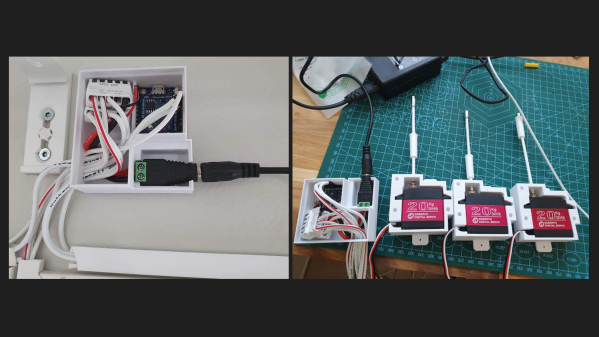
[Xasin] began with Tap version 1 back in 2019, and learned all about coding for BLE, making 3D printed cases, and eventually working out all the kinks in the system. Tap v1 used capacitive touch sensing, but the current version detects physical taps using an accelerometer and also can detect gestures. Feature creep along the way brings a sensor array, an array of emotive LEDs, an OLED screen, and a speaker. The whole thing is powered by a dual-core ESP32 Pico MCU. [Xasin] has published his project on GitHub in case you want to explore some of these other features on your own.

The project is only partially up and running because a few critical components are unavailable due to the global parts shortage. But it will soon be able to control smart home devices, such as [Xasin]’s standalone Dragon’s Home smart home system that we wrote about earlier this year. If you want to learn more about tap controlling in general, check out this article from 2018. You can see the Tap introduce itself and its features in the short video below the break.

Continue reading “Star Trek Tap Controller, Take Two”

C Is The Greenest Programming Language

Have you ever wondered if there is a correlation between a computer’s energy consumption and the choice of programming languages? Well, a group of Portuguese university researchers did and set out to quantify it. Their 2017 research paper entitled Energy Efficiency across Programming Languages / How Do Energy, Time, and Memory Relate?  may have escaped your attention, as it did ours.

Abstract: This paper presents a study of the runtime, memory usage and energy consumption of twenty seven well-known soft- ware languages. We monitor the performance of such lan- guages using ten different programming problems, expressed in each of the languages. Our results show interesting find- ings, such as, slower/faster languages consuming less/more energy, and how memory usage influences energy consump- tion. We show how to use our results to provide software engineers support to decide which language to use when energy efficiency is a concern.

While we might take issue with some of the programming languages selected as being “well known”, the project was very thorough and quite well documented. Most people would take for granted that a computer program which runs faster will consume less energy. But this might not always be true, as other factors enter into the power consumption equation besides speed. The team used a collection of ten standard algorithms from the Computer Language Benchmarks Game project (formerly known as The Great Computer Language Shootout) as the basis for their evaluations.

Last year they updated the functional language results, and all the setups, benchmarks, and collected data can be found here. Check out the paper for more details. Have your choice of programming language ever been influenced by energy consumption?

South Korean KSLV-2 Nuri Rocket Almost Orbits

There was a bit of excitement recently at the Naro Space Center on Outer Naro Island, just off the southern coast of the Korea Peninsula. The domestically developed South Korean Nuri rocket departed on its inaugural flight from launch pad LB-2 at 5pm in the afternoon on Thursday, 21 Oct. The previous launch in the KSLV-2 program from this facility was in 2018, when a single-stage Test Launch Vehicle was successfully flown and proved out the basic vehicle and its KRE-075 engines.

This final version of the three-stage Nuri rocket, formally known as Korean Space Launch Vehicle-II (KSLV-2), is 47.2 m long and 3.5 m in diameter. The first stage is powered by a cluster of four KRE-075 sea-level engines having 3 MN of thrust. The second stage is a single KRE-075 vacuum engine with 788 kN thrust, and the final stage is a KRE-007 vacuum engine with 69 kN thrust (all these engines are fueled by Jet-A / LOX). In this maiden flight, the first two stages performed as expected, but something went wrong when the third stage shut off prematurely and failed to gain enough velocity to put the 1400 kg dummy satellite into orbit.

A committee formed to investigate the flight failure convened this week, and issued a statement after a preliminary review of the collected telemetry data. So far, all indications point to a drop in oxidizer tank pressure in the third stage. This could be the result of a leak in the tank itself or the associated plumbing. They will also investigate whether a sensor or other failure in the tank pressurization control system could be at fault. A second launch is currently scheduled for May of next year. Check out [Scott Manley]’s video below the break, where he discusses the launch itself and some history of South Korea’s space program.

Continue reading “South Korean KSLV-2 Nuri Rocket Almost Orbits”

Flip-Chip KiCad Templates

We like retro-computing and we like open source standards that allow easy project sharing. Vintage DEC computer enthusiast [Jay Logue] combines both of these in his recent project on GitHub, where he shares several KiCad templates for making your own Flip-Chip modules. Although named after the semiconductor packaging technique we are familiar with today, DEC Flip-Chips were introduced in 1964 as a modular electronics packaging system. These were used in many of DEC’s Programmable Data Processor (PDP) computers, beginning with the PDP-8 in 1965. DEC also had a Digital Laboratory Module family, which was a roll-your-own custom electronic system. The 1968 Digital Logic Handbook shows the available modules, and has the look and feel of the TTL Cookbook book which would come along six years later.

Flip-Chips came in a variety of sizes over the years: single-, double-, and quad-, and hex-height boards having standard- and extended-length. The PCB’s have 18 gold-plated fingers on one edge, later extended to 36 fingers double-sided, which plug into a backplane. Interconnections were typically wire-wrapped. A single height board is 127 x 62 mm (5 x 2-7/16 inches) with a labeled extractor bracket on one end. [Jay]’s repository has templates for five of the most popular variations, and making other sizes should be straightforward using these templates as a starting point.

Continue reading “Flip-Chip KiCad Templates”

Decoding SMD Part Markings

You’ve probably encountered this before — you have a circuit board that is poorly documented, and want to know the part number of a tiny SMD chip. Retro computer enthusiast [JohnK] recently tweeted about one such database that he recently found, entitled The Ultimate SMD Marking Codes Database. This data base is only a couple of years old judging from the Wayback Machine, but seems to be fairly exhaustive and can be found referenced in quite a few electronics forums.

Unlike their larger SMD siblings, these chips in question are so small that there is no room to print the entire part number on the device. Instead, the standard practice is for manufacturers use an abbreviated code of just a few characters. These codes are only unique to each part or package, and aren’t necessarily unique across an entire product line. And just because it is standard practice does not imply the marking codes themselves follow any standard whatsoever. This seemingly hodgepodge system works just fine for the development, procurement and manufacturing phases of a product’s lifecycle. It’s during the repair, refurbishment, or just hacking for fun phases where these codes can leave you scratching your head.

Several sites like the one [JohnK] found have been around for years, and adding yet another database to your toolbox is a good thing. But none of them will ever be exhaustive. There’s a good reason for that — maintaining such a database would be a herculean task. Just finding the part marking information for a known chip can be difficult. Some manufacturers put it clearly in the data sheet, and some refer you to other documentation which may or may not be readily available. And some manufacturers ask you to contact them for this information — presumably because it is dynamic changes from time to time. Continue reading “Decoding SMD Part Markings”

Picture of the automatic blind controller and three servo motors, all in their enclosures, displayed on a table.

Automated Window Blinds Using MQTT And Home Assistant

Finnish software engineer [Toni] is on a quest to modernize his 1991 house, and his latest project was to automate the window blinds and control them using Home Assistant. Unless your blinds have built-in motors, most of the effort of such a project centers around how to integrate and attach the motor — and as [Toni] points out, there are tons of different blinds with all kinds of operating mechanisms. But once you solve that issue, half the battle is over.

These particular blinds require less than one turn of the control rod to go from fully open to fully closed, and [Toni] selects a 270-degree range-of-motion, 20 kg*cm torque servo motor to drive them. He really wanted to install the motor inside the window, but it just wouldn’t fit. Instead, each servo motor is mounted in a custom 3D-printed case installed on the window frame just below the operating rod. An ESP8266-based controller box is installed above the window, hidden behind curtains, and operates all three servos.

On the software side of things, the project is coded in C++ and uploaded using the Ardiono IDE. The blinds communicate to [Toni]’s Home Assistant network using MQTT. All the software is available on the project’s GitHub repository, and the 3D-printed case design is posted on Thingiverse. Even though your blinds may be of a completely different design, we think many parts of [Toni]’s project are still useful — do check out this project if you’re thinking about doing something similar. The notion of motorized window blinds has been around for a some time — we covered one project way back in 2013 and another in 2016. If you have added automation to your window blinds, let us know how it went down in the comments section.

Continue reading “Automated Window Blinds Using MQTT And Home Assistant”

front view of a purple acrylic slide rule with white ink scale markings.

Design And Build Your Own Circular Slide Rule

You have to really like slide rules to build your own, including the necessary artwork. Apparently [Dylan Thinnes] is a big fan, based on this project he began working on a few months back. The result is a set of algorithms that automatically generates most of the scales that were common on slide rules back in the day. For example:

K       Cubic scale, x^3
A,B     Squared scale, x^2
C,D     Basic scale, x
CI,DI   Inverted scale, 1/x
CF,DF   Folded scale, x*pi
LLn     Log-log scales, e^a*x
LL0n    Log-log scales, e^-a*x
L       Log scale, log10(x), linear
S       Sine and cosines scale, sin(x)
T       Tangent scale, tan(x)

If you’ve ever tried to manually draw an axis using a computer program — attempting to automatically set reasonable tick marks, grids, and labels — you can appreciate that this is a non-trivial problem. [Dylan] tackled things from the bottom up, developing several utility functions that work in concert to iteratively build up each scale. One advantage of this approach, he says, is that you can quite easily build almost any scale you want. We’re going to take his word on that, because the project is not easily accessible to the average programmer. As [Dylan] notes:

At the moment it’s still a library w/ no documentation, and written in a relatively obscure language called Haskell, so it’s really only for the particularly determined.

The project is published on his GitHub repository, and sample scales and demo program are available. Without knowledge of obscure languages and being only mildly determined, one can at least generate some sample scales — just downloading the Haskell environment, a few dependencies, and clone [Dylan]’s repository. The output is an SVG file which can be scaled to any desired size. In this follow-up Reddit post he discusses the fabrication techniques used for the acrylic circular slide rule shown in the lead photo.

It’s always been possible to make your own slide rules using pre-generated artwork — for example, the Slide Rule Museum website has a slew of various scales available in graphic format. But if you want to make a custom scale, or make one of that’s meters long, check out [Dylan]’s project and give it a whirl. For another take on making slide rules, check out this project that we covered last year.