Cellular Automata Explorer

Well all know cellular automata from Conway’s Game of Life which simulates cellular evolution using rules based on the state of all eight adjacent cells. [Gavin] has been having fun playing with elementary cellular automata in his spare time. Unlike Conway’s Game, elementary automata uses just the left and right neighbors of a cell to determine the next cell ahead in the row. Despite this comparative simplicity, some really complex patterns emerge, including a Turing-complete one.

[Gavin] started off doing the calculations by hand for fun. He made some nice worksheets for this. As we can easily imagine, doing the calculations by hand got boring fast. It wasn’t long before his thoughts turned to automating his cellular automata. So, he put together an automatic cellular automator. (We admit, we are having a bit of fun with this.)

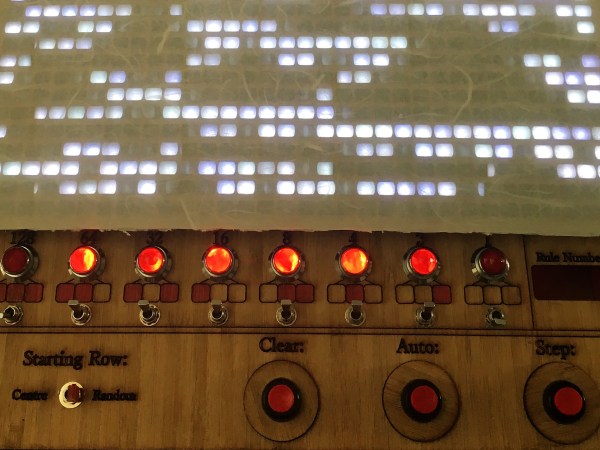
This could have been a quick software project but half the fun is seeing the simulations on a purpose-built ecosystem. The files to build the device are hosted on Thingiverse. Like other cellular automata projects, it uses LED matrices to display the data. An Arduino acts as the brain and some really cool retro switches from the world’s most ridiculously organized electronics collection finish the look of the project.

To use, enter the starting condition with the switches at the bottom. The code on the Arduino then computes and displays the pattern on the matrix. Pretty cool and way faster than doing it by hand.

Homebrew Powerwall Sitting At 20kWh

Every now and then a hacker gets started on a project and forgets to stop. That’s the impression we get from [HBPowerwall]’s channel anyway. He’s working on adding a huge number of 18650 Lithium cells to his home’s power grid and posting about his adventures along the way. This week he gave us a look at the balancing process he uses to get all of these cells to work well together. Last month he gave a great overview of the installed system.

His channel starts off innocently enough. It’s all riding small motor bikes around and having a regular good time.  Then he experiments a bit with the light stuff, like a few solar panels on the roof.  However, it seems like one day he was watching a news brief about the Powerwall (Tesla’s whole-home battery storage system) and was like, “hey, I can do that.”

After some initial work with the new substance it wasn’t long before he was begging, borrowing, and haggling for every used 18650 lithium battery cell the local universe in Brisbane, Australia could sell him. There are a ton of videos documenting his madness, but he’s all the way up to a partly off-grid house with a 20kWh battery bank, for which he has expansion plans.

There’s a lot of marketing flim flam and general technical pitfalls in the process of generating your own non-grid electricity. But for hackers in sunny areas who want to dump those rays into local storage this is an interesting blueprint to start with.

Continue reading “Homebrew Powerwall Sitting At 20kWh”

Songbird, A Mostly 3D Printed Pistol That Appears To Actually Work

[Guy in a garage] has made a 3D printed gun that not only appears to fire in the direction pointed, it can also do it multiple times. Which, by the standard of 3D printed guns, is an astounding feat. He started with .22 rifle cartridges but has since upgraded and tested the gun with .357 rounds. The link above is a playlist which starts of with an in-depth explanation of the .22 version and moves through design iterations

This gun prints on a standard FDM printer. Other 3D printable guns such as the infamous Liberator or the 3D printed metal gun need more exotic or precise 3D printing to work effectively. The secret to this gun’s ability is the barrel, which can be printed in nylon for .22 cartridges, or in ABS plus a barrel liner for .22 and .357 caliber.

A barrel liner is one way to repair a gun that has aged and is no longer shooting properly. Simply put, it is a long hardened metal tube with rifling on the inside. Some guns come out of the factory with one, and a gunsmith simply has to remove the old one and replace it. Other guns need to be bored out before a liner can be installed.

The metal liner surrounded by plastic offers enough mechanical strength for repeat firings without anyone losing a hand or an eye; though we’re not sure if we recommend firing any 3D printed gun as it’s still risky business. It’s basically like old stories of wrapping a cracked cannon in twine. The metal tries to expand out under the force of firing, but the twine, which would seem like a terrible material for cannon making, is good in tension and when wrapped tightly offers more than enough strength to hold it all together.

This is also how he got the .357 version to work. The barrel slots into the gun frame and locates itself with a rounded end. However, with the higher energy from a .357 round, this rounded end would act as a wedge and split the 3D printed frame. The fix for this was simple. Glue it back together with ABS glue, and then wrap the end of the assembly with a cable tie.

This is the first 3D printed gun we’ve seen that doesn’t look like a fantastic way to instantly lose your hand. It’s a clever trick that took some knowledge of guns and gunsmithing to put together. Despite the inevitable ethical, moral, and political debate that will ensue as this sort of thing becomes more prevalent, it is a pretty solid hack and a sign that 3D printing is starting to work with more formidable engineering challenges.

Putting Sand, Water, And Metal Into A 3D Print

[Adam] over at Makefast Workshop writes about some of the tests they’ve been running on their 3D printer. They experimented with pausing a 3D print midway and inserting various materials into the print. In this case, sand, water, and metal BBs.

The first experiment was a mixture of salt and water used to make a can chiller for soda or beer (the blue thing in the upper right). It took some experimentation to get a print that didn’t leak and was strong. For example, if the water was too cold the print could come off the plate or delaminate. If there was too much water it would splash up while the printer was running and cause bad layer adhesion.

They used what they learned to build on their next experiment, which was filling the print with sand to give it more heft. This is actually a common manufacturing process — for instance, hollow-handled cutlery often has clay, sand, or cement for heft. They eventually found that they had to preheat the sand to get the results they wanted and managed to produce a fairly passable maraca.

The final experiment was a variation on the popular ball bearing prints. Rather than printing plastic balls they designed the print to be paused midway and then placed warmed copper BBs in the print. The printer finished its work and then they spun the BB. It worked pretty well! All in all an interesting read.

The Hackaday Prize: An Open Electric Wheelchair

[Irene Sans] and [Alvaro Ferrán Cifuentes] feel that electric wheelchairs are still too expensive. On top of that, as each person’s needs are a little different, usually don’t exactly fit the problems a wheelchair user might face. To this end they’ve begun the process of creating an open wheelchair design which they’ve appropriately dubbed OpenChair.

As has been shown in the Hackaday Prize before, there’s a lot of things left to be desired in the assistive space. Things are generally expensive. This would be fine, but often insurance doesn’t cover it or it’s out of the range of those in developing nations.  As always, the best way to finish is to start, so that’s just what [Irene] and [Alvaro] has done.

They based their initial design on the folding wheel chair we all know. It’s robust enough for daily use and is fairly standard around the world. They designed a set of accessories to make the wheelchair more livable for daily use as well as incorporating the controls.

The next problem was locomotion. Finding an off-the-shelf motor that was powerful enough without breaking the budget was proving  difficult, but they had an epiphany. Why not use mass production toy crap to their advantage. The “hoverboards” that were all the rage this past commerical holiday season were able to roll a person around, so naturally a wheelchair would be within the power range.

They extracted the two 350 watt hub motors, batteries, and control boards. It took a bit of reverse engineering but they were able to get the hub drive motors of the hoverboard integrated with the controls on their wheelchair.

In the end they were able to cut the price of a regular electric wheelchair in half with their first iteration and set the foundation for future work on an open electric wheelchair system. Certainly more work could bring even better improvements.

Shop Made Squareness Comparator

[Stefan Gotteswinter] has a thing for precision. So it was no surprise when he confessed frustration that he was unable to check the squareness of the things he made in his shop to the degree his heart desired.

He was looking enviously at the squareness comparator that [Tom Lipton] had made when somone on Instagram posted a photo of the comparator they use every day. [Stefan] loved the design and set out to build one of his own. He copied it shamelessly, made a set of drawings, and got to work.

[Stefan]’s videos are always a trove of good machine shop habits and skills. He always shows how being careful, patient, and doing things the right way can result in really astoundingly precise work out of a home machine shop. The workmanship is beautiful and his knack for machining is apparent throughout. We chuckled at one section where he informed the viewer that you could break a tap on the mill when tapping under power if you bottom out. To avoid this he stopped at a distance he felt was safe: 0.5 mm away.

The construction and finishing complete, [Stefan] shows how to use the comparator at the end of the video, viewable after the break.

Continue reading “Shop Made Squareness Comparator”