Believe it or not, building a tiny compiler from scratch can be as fun as it is accessible. [James Smith] demonstrates by making a tiny compiler for an extremely simple programming language, and showing off a hello world.
Here’s what happens with a compiler: human-written code gets compiled into low-level machine code, creating a natively-executable result for a particular processor. [James]’ compiler — created from scratch — makes native x64 Linux ELF binary executables with no dependencies, an experience [James] found both educational and enjoyable. The GitHub repository linked below has everything one needs, but [James] also wrote a book, From Source Code to Machine Code, which he offers for sale to anyone who wants to step through the nitty-gritty.
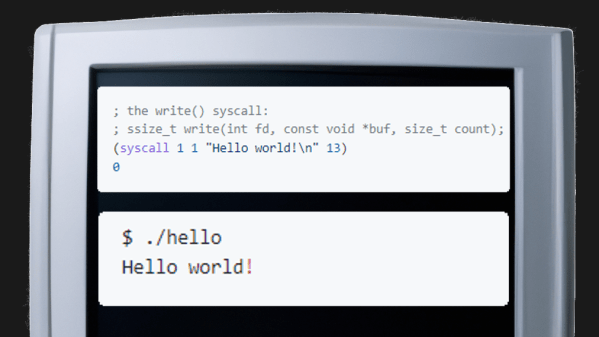
The (very tiny) compiler is on GitHub as The Pretty Laughable Programming Language. It’s tiny, the only data types are integers and pointers, and all it can do is make Linux syscalls — but it’s sufficient to make a program with. Here’s what the code for “Hello world!” looks like before being fed into the compiler:
; the write() syscall:

; ssize_t write(int fd, const void *buf, size_t count);

(syscall 1 1 "Hello world!\n" 13)

0
Working at such a low level can be rewarding, but back in the day the first computers actually relied on humans to be compilers. Operators would work with pencil and paper to convert programs into machine code, and you can get a taste of that with a project that re-creates what it was like to program a computer using just a few buttons as inputs.