Putting Lasers To Work Hack Chat

Join us on Wednesday, March 3 at noon Pacific for the Putting Lasers to Work Hack Chat with Jonathan Schwartz!

Laser cutting equipment runs the gamut in terms of cost, with low-end, almost disposable units that can be had for a song to high-power fiber lasers that only big businesses can afford. But the market has changed dramatically over the years, and there’s now a sweet-spot of affordable laser cutters that can really do some work. And while plenty of hobbyists have taken the plunge and added such a laser cutter to their shops, still others have looked at these versatile tools and realized that a business can be built around them.

For the next Hack Chat, we’ll be sitting down with Jonathan Schwartz. He started with laser cutters at his maker space, and quickly became the “laser guy” everyone turned to for answers. With about 10 years of experience, Jon set up American Laser Cutter in Los Angeles, to provide bespoke laser engraving and cutting services. He has built a business around mid-range laser cutters, and he’s ready to share what he’s learned. Join us as we talk about the machines, the materials, and the services that are part of a laser cutting business, and find out some of the tricks of the laser-jockey’s trade.

join-hack-chatOur Hack Chats are live community events in the Hackaday.io Hack Chat group messaging. This week we’ll be sitting down on Wednesday, March 3 at 12:00 PM Pacific time. If time zones have you tied up, we have a handy time zone converter.

Click that speech bubble to the right, and you’ll be taken directly to the Hack Chat group on Hackaday.io. You don’t have to wait until Wednesday; join whenever you want and you can see what the community is talking about.


Continue reading “Putting Lasers To Work Hack Chat”

Hackaday Links Column Banner

Hackaday Links: February 28, 2021

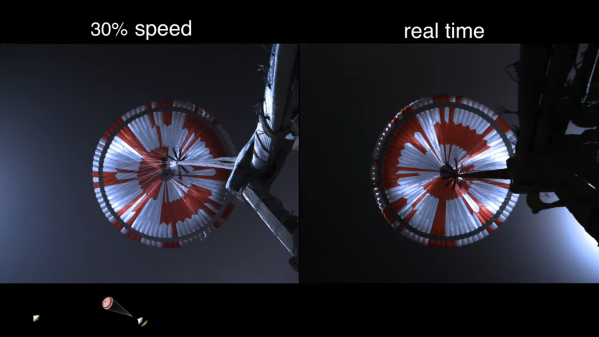
In an announcement that came as a surprise to few, NASA now says that landing humans on the Moon by 2024 is no longer likely. Acting administrator Steve Jurczyk lays the blame at the feet of Congress, for failing to provide the funds needed for Human Landing Systems development, a critical step needed to meet the aggressive overall timeline. The announcement doesn’t mark the end of the Artemis program; in fact, NASA is continuing to work on a realistic timeline for getting boots back on the lunar surface, and a decision on which of the three submitted proposals for a lunar lander will be further developed should be coming in the next few months. As far as we can see, this is simply an adjustment to the original timeline for a landing, but given the stunning recent success of Perseverance showing just what robots can do, we’d expect pushback from some quarters on the need for human exploration.

The entry-level 3D design market was thrown into considerable turmoil last year when Autodesk changed the licensing terms for its flagship Fusion 360 package. Hobbyists who had been enjoying relatively unfettered access to the powerful suite chafed at the new restrictions, leaving many to threaten to jump ship, apparently without much thought given to the dearth of alternative products. That may be changing now that Dassault Systèmes has announced two new versions of SolidWorks aimed at the maker and student segments. The Makers offer is intended for hobbyists who want to design for benchtop manufacturing methods like 3D-printing. The Students offer is aimed at engineering and design students looking to gain experience with the tools they’ll be expected to have mastered by the time they enter the job market. It looks like the Makers offer will be at least partly contingent on the interest expressed by the community, so you might want to make your feeling know on the subject. If the Makers edition comes to pass in the second half of this year, it will likely target a $99/year price point.

We stumbled upon an interesting YouTube series the other day that stirred the creative juices. We all probably remember the first time we learned about the Mandelbrot set, the fractal number set that looks something like a lumpy kidney bean and continues to do so no matter how far you zoom into it. The image may be complex but the math behind it is simple enough to implement in software that it’s often done as an exercise for CS students and other unfortunates. But implementing a Mandelbrot set generator in logic is possible too, which WildEngineering did in this video series. Rather than implement this as discrete logic gates, he used a neat logic simulator called Digital, which looks like a handy tool to learn all by itself. The Mandelbrot generator concepts are really instructive too, and it sure seems like the next logical step would be to gather the needed 74xx-series chips and start breadboarding. We’d love to give it a whirl ourselves, but won’t be heartbroken if someone beats us to it.

If it sometimes appears that we at Hackaday get a little frustrated with the comments section of the articles we write, rest assured that we know that we have the best readers on the planet, hands down. Where the toxicity of other corners of the Internet is often unbearable, our readers truly do make this a fabulously collaborative environment, on the whole.

In fact, some commenters even go so far as to basically write their own articles in response to one of ours, and when that happens we like to point it out. The article that spawned the effort was Kristina Panos’ excellent “What If I Never Make Version Two?”, a recent piece that dips a toe into the psychology of hacking. Peter Walsh picks up on the theme with his Hackaday.io page entitled “The Psychology of Version Two”, which we really enjoyed. After a brief look at the neurochemistry of happiness, Peter dives into some “brain hacks” to assess the need for a version 2. There are some great tips, and we really enjoyed both the original article and Peter’s response.

Homebrew Metrology The CERN Way

We won’t pretend to fully grok everything going on with this open-source 8.5-digit voltmeter that [Marco Reps] built. After all, the design came from the wizards at CERN, the European Organization for Nuclear Research, home to the Large Hadron Collider and other implements of Big Science. But we will admit to finding the level of this build quality absolutely gobsmacking, and totally worth watching the video for.

As [Marco] relates, an upcoming experiment at CERN will demand a large number of precision voltmeters, the expense of which led to a homebrew design that was released on the Open Hardware Repository. “Homebrew” perhaps undersells the build a bit, though. The design calls for a consistent thermal environment for the ADC, so there’s a mezzanine level on the board with an intricately designed Peltier thermal control system, including a custom-machined heat spreader blocker. There’s also a fascinatingly complex PCB dedicated solely to provide a solid ground between the analog input connector — itself a work of electromechanical art — and the chassis ground.

The real gem of this whole build, though, is the vapor-phase reflow soldering technique [Marco] used. Rather than a more-typical infrared process, vapor-phase reflow uses a perfluropolyether (PFPE) solution with a well-defined boiling point. PCBs suspended above a bath of heated PFPE get bathed in inert vapors at a specific temperature. [Marco]’s somewhat janky setup worked almost perfectly — just a few tombstones and bridges to fix. It’s a great technique to keep in mind for that special build.

The last [Marco Reps] video we featured was a teardown of a powerful fiber laser. It’s good to see a metrology build like this one, though, and we have a feeling we’ll be going over the details for a long time.

Continue reading “Homebrew Metrology The CERN Way”

Hacking A Non-Dimmable LED Fixture

For most of us, the solution to having a non-dimmable LED light bulb but needing a dimmable one is a simple as a drive to the store to get the right kind of bulb. But that seems downright boring, not to mention wasteful, so when [Leo Fernekes] was faced with this problem, he looked for a way to make a non-dimmable bulb dimmable.

To be fair, there was a financial aspect to this hack, too. [Leo] had a bunch of cheap non-dimmable light fixtures he wanted to put to use. He started with a teardown and reverse-engineering of a light strip, which contains little more than LEDs and a small buck converter. His analysis of the circuit led him to a solution for dimming the light: inserting a MOSFET as a shunt around the LEDs. That and the addition of a diode to isolate the LEDs from the current regulator would allow for simple PWM-control of the lights via a microcontroller.

As is typical with these things, there were complications. [Leo] found that a timing problem resulted in flickering LEDs; the fix came from adding a sync circuit that cleverly leveraged a flip-flop inside the PIC16 microcontroller he chose for the circuit. His prototype incorporates these modifications, plus an interface that supports the DALI protocol for architectural lighting control. As always, [Leo] is quick to point out that mixing line voltage into your projects is not without risks, which he takes pains to mitigate. And as is also typical for his projects, [Leo] gives just the right amount of detail to understand the theory behind his design.

Continue reading “Hacking A Non-Dimmable LED Fixture”

Capstan Winch Central To This All-Band Adjustable Dipole Antenna

The perfect antenna is the holy grail of amateur radio. But antenna tuning is a game of inches, and since the optimum length of an antenna depends on the frequency it’s used on, the mere act of spinning the dial means that every antenna design is a compromise. Or perhaps not, if you build this infinitely adjustable capstan-winch dipole antenna.

Dipoles are generally built to resonate around the center frequency of one band, and with allocations ranging almost from “DC to daylight”, hams often end up with a forest of dipoles. [AD0MZ]’s adjustable dipole solves that problem, making the antenna usable from the 80-meter band down to 10 meters. To accomplish this feat it uses something familiar to any sailor: a capstan winch.

The feedpoint of the antenna contains a pair of 3D-printed drums, each wound with a loop of tinned 18-gauge antenna wire attached to some Dacron cord. These make up the adjustable-length elements of the antenna, which are strung through pulleys suspended in trees about 40 meters apart. Inside the feedpoint enclosure are brushes from an electric drill to connect the elements to a 1:1 balun and a stepper motor to run the winch. As the wire pays out of one spool, the Dacron cord is taken up by the other; the same thing happens on the other side of the antenna, resulting in a balanced configuration.

We think this is a really clever design that should make many a ham happy across the bands. We even see how this could be adapted to other antenna configurations, like the end-fed halfwave we recently featured in our “$50 Ham” series.

Plasma Discharges Show You Where The Radiation Is

Depending on the context of the situation, the staccato clicks or chirps of a Geiger counter can be either comforting or alarming. But each pip is only an abstraction, an aural indication of when a particle or ray of ionizing radiation passed through a detector. Knowing where that happened might be important, too, under the right circumstances.

While this plasma radiation detector is designed more as a demonstration, it does a pretty good job at localizing where ionization events are happening. Designed and built by [Jay Bowles], the detector is actually pretty simple. Since [Jay] is the type of fellow with plenty of spare high-voltage power supplies lying around, he took a 6 kV flyback supply from an old build and used it here. The detector consists of a steel disk underneath a network of fine wires. Perched atop a frame of acrylic and powered by a 9 V battery, the circuit puts high-voltage across the plate and the wires. After a substantial amount of tweaking, [Jay] got it adjusted so that passing alpha particles from a sample of americium-241 left an ionization trail between the conductors, leading to a miniature lightning bolt.

In the video below, the detector sounds very similar to a Geiger counter, but with the added benefit of a built-in light show. We like the way it looks and works, although we’d perhaps advise a little more caution to anyone disassembling a smoke detector. Especially if you’re taking apart Soviet-era smoke alarms — you might get more than you bargained for.

Continue reading “Plasma Discharges Show You Where The Radiation Is”

Stunning Footage Of Perseverance Landing On Mars

The much-anticipated video from the entry descent and landing (EDL) camera suite on the Perseverance rover has been downlinked to Earth, and it does not disappoint. Watch the video below and be amazed.

The video was played at the NASA press conference today, which is still ongoing as we write this. The brief video below has all the highlights, but the good stuff from an engineering perspective is in the full press conference. The level of detail captured by these cameras, and the bounty of engineering information revealed by these spectacular images, stands in somewhat stark contrast to the fact that they were included on the mission mainly as an afterthought. NASA isn’t often in the habit of adding “nice to have” features to a mission, what with the incredible cost-per-kilogram of delivering a package to Mars. But thankfully they did, using mainly off-the-shelf cameras.

The camera suite covered nearly everything that happened during the “Seven Minutes of Terror” EDL phase of the mission. An up-looking camera saw the sudden and violent deployment of the supersonic parachute — we’re told there’s an Easter egg encoded into the red-and-white gores of the parachute — while a down-looking camera on the rover watched the heat shield separate and fall away. Other cameras on the rover and the descent stage captured the skycrane maneuver in stunning detail, both looking up from the rover and down from the descent stage. We were surprised by the amount of dust kicked up by the descent engines, which fully obscured the images just at the moment of “tango delta” — touchdown of the rover on the surface. Our only complaint is not seeing the descent stage’s “controlled disassembly” 700 meters away from the landing, but one can’t have everything.

Honestly, these are images we could pore over for days. The level of detail is breathtaking, and the degree to which they make Mars a real place instead of an abstract concept can’t be overstated. Hats off to the EDL Imaging team for making all this possible.

Continue reading “Stunning Footage Of Perseverance Landing On Mars”