High-Quality Film Transfers With This Raspberry Pi Frame Grabber

Untold miles of film were shot by amateur filmmakers in the days before YouTube, iPhones, and even the lowly VHS camcorder. A lot of that footage remains to be discovered in attics and on the top shelves of closets, and when you find that trove of precious family memories, you’ll be glad to have this Raspberry Pi enabled frame-by-frame film digitizer at your disposal.

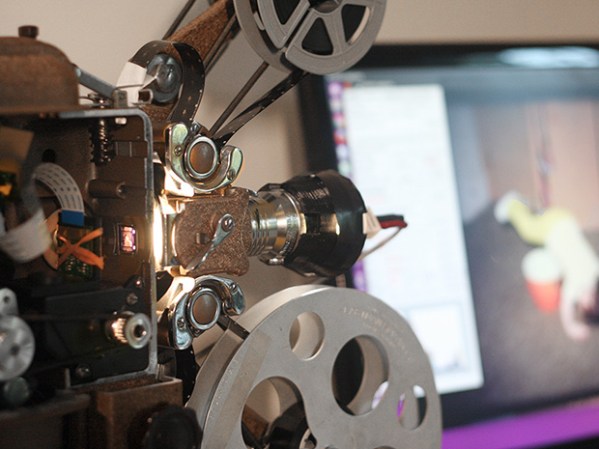
With a spare Super 8mm projector and a Raspberry Pi sitting around, [Joe Herman] figured he had the makings of a good way to preserve his grandfather’s old films. The secret of high-quality film transfers is a frame-by-frame capture, so [Joe] set about a thorough gutting of the projector. The original motor was scrapped in favor of one with better speed control, a magnet and reed switch were added to the driveshaft to synchronize exposures with each frame, and the optics were reversed with the Pi’s camera mounted internally and the LED light source on the outside. To deal with the high dynamic range of the source material, [Joe] wrote Python scripts to capture each frame at multiple exposures and combine the images with OpenCV. Everything is stitched together later with FFmpeg, and the results are pretty stunning if the video below is any indication.

We saw a similar frame-by-frame grabber build a few years ago, but [Joe]’s setup is nicely integrated into the old projector, and really seems to be doing the job — half a million frames of family history and counting.

Continue reading “High-Quality Film Transfers With This Raspberry Pi Frame Grabber”

Measuring Spurious Emissions Of Cheap Handheld Transceivers

If you buy an amateur transceiver cheap enough to make a reasonable grab bag gift or stocking stuffer, you get what you pay for. And if this extensive analysis of cheap radios is any indication, you get a little more than you pay for in the spurious emissions department.

Amateur radio in the United States is regulated by the FCC’s Part 97 rules with special attention given to transmitter technical specifications in Subpart D. Spurious emissions need to be well below the mean power of the fundamental frequency of the transmitter, and [Megas3300] suspected that the readily available Baofeng UV-5RA dual-band transceiver was a little off spec. He put the $20 radio through a battery of tests using equipment that easily cost two orders of magnitude more than the test subject. Power output was verified with a wattmeter, proper attenuators were selected, and the output signal scanned with a spectrum analyzer. Careful measurements showed that some or all of the Baofeng’s harmonics were well above the FCC limits. [Megas3300] tested a few other radios that turned out to be mostly compliant, but however it all turned out, the test procedure is well documented and informative, and well worth a look.

The intended market for these radios is more the unlicensed crowd than the compliant ham, so it’s not surprising that they’d be out of spec. A ham might want to bring these rigs back into compliance with a low pass filter, for which purpose the RF Biscuit might prove useful.

[via r/AmateurRadio]

My Beef With Ham Radio

My amateur radio journey began back in the mid-1970s. I was about 12 at the time, with an interest in electronics that baffled my parents. With little to guide me and fear for my life as I routinely explored the innards of the TVs and radios in the house, they turned to the kindly older gentleman across the street from us, Mr. Brown. He had the traditional calling card of the suburban ham — a gigantic beam antenna on a 60′ mast in the backyard – so they figured he could act as a mentor to me.

Mr. Brown taught me a lot about electronics, and very nearly got me far enough along to take the test for my Novice class license. But I lost interest, probably because I was an adolescent male and didn’t figure a ham ticket would improve my chances with the young ladies. My ham ambitions remained well below the surface as life happened over the next 40 or so years. But as my circumstances changed, the idea of working the airwaves resurfaced, and in 2015 I finally took the plunge and earned my General class license.

The next part of my ham story is all-too-familiar these days: I haven’t done a damn thing with my license. Oh, sure, I bought a couple of Baofeng and Wouxun handy-talkies and lurked on the local repeaters. I even bought a good, solid HF rig and built some antennas, but I’ve made a grand total of one QSO — a brief chat with a ham in Texas from my old home in Connecticut on the 10-meter band. That’s it.

Continue reading “My Beef With Ham Radio”

Animatronic Head Responds With Animated GIFs

[Abhishek] describes Peeqo as a “personal desktop robotic assistant” that looks like “the love child of an Amazon Echo and a Disney character.” We’re not sure about that last part — we’re pretty sure [Bender Bending Rodriquez] would fail a paternity suit on this one. Just look at that resemblance.

vkwnaidWhatever Peeqo’s parentage may be, it’s a pretty awesome build, and from the look of [Abhishek]’s design notes, he put a lot of thought into it, and a lot of work too. The build log reveals 3D-printed parts galore, custom-etched PC boards, and a hacked Raspberry Pi to both listen for voice commands and play responses in the form of animated GIFs on Peeqo’s ‘face’. The base has six modified RC servos to run the Gough-Stewart platform that lets Peeqo emote, and the head contains pretty much all the electronics. Beyond the hardware, a ton of programming went into giving Peeqo the ability to communicate through head gestures and GIFs that make sense for the required response.

Whether it’s bopping along to the tunes on your playlist or motivating you to lay off the social media with [Will Ferrell]’s flaming angry eyes, Peeqo looks like a ton of fun to build and use. Conveniently enough, [Abhishek] has shared all his files so you can build one too.

We haven’t seen anything like Peeqo before, but we have seen a lot of Amazon Echo hacks and even a few Stewart platform builds. But did we inadvertently feature a project starring Peeqo’s dad way back in 2009?

[Thanks to Aaron Cofield for the tip]

This Old Mouse Keeps Track Of Filament Usage

Keeping track of your 3D-printer filament use can be both eye-opening and depressing. Knowing exactly how much material goes into a project can help you make build-versus-buy decisions, but it can also prove gut-wrenching when you see how much you just spent on that failed print. Stock filament counters aren’t always very accurate, but you can roll your own filament counter from an old mouse.

[Bin Sun]’s build is based around an old ball-type PS/2 mouse, the kind with the nice optical encoders. Mice of this vintage are getting harder to come by these days, but chances are you’ve got one lying around in a junk bin or can scrounge one up from a thrift store. Stripped down to its guts and held in place by a 3D-printed bracket, the roller that used to sense ball rotation bears on the filament on its way to the extruder. An Arduino keeps track of the pulses and totalizes the amount of filament used; the counter handily subtracts from the totals when the filament is retracted.

Simple, useful, and cheap — the very definition of a hack. And even if you don’t have a 3D-printer to keep track of, harvesting encoders from old mice is a nice trick to file away for a rainy day. Or you might prefer to just build your own encoders for your next project.

Continue reading “This Old Mouse Keeps Track Of Filament Usage”

Homebrew Dash Cam Enables Full Suite Of Sensors

You heard it here first: dash cams are going to be the next must-have item for your daily driver. Already reaching market saturation in some parts of the world but still fairly uncommon in North America, we predict that car makers will soon latch onto the trend and start equipping cars with dash cams as standard equipment. And you can just bet that whatever watered-down, overpriced feature set they come up with will be sure to disappoint, so you might want to think about building your own Raspberry Pi dash cam with an accelerometer and lots of LEDS.

Still very much in the prototyping phase, [CFLanger]’s project is at its heart a dash cam, but it looks like he wants to go far beyond that. Raspivid and a PI NoIR camera take care of the video streaming, but the addition of a Pi SenseHAT gives [CFLanger] a bunch of options for sensing and recording the car’s environment. Not content with the SenseHAT’s onboard accelerometer, he added an ADXL345 to the sensor suite. The 64-pixel LED display is just for fun – it displays pitch and roll of the platform – and a yet-to-be-implemented bar-graph display will show acceleration in the X-axis. He figures the whole thing is good for a couple of days of video, but we hope he adds audio capture and perhaps ECU data from an OBDII-Bluetooth adapter.

We’ve seen surprisingly few DIY dash cams on Hackaday, at least so far. There has been a dash cam teardown and retasking, and there are plenty of dashboard computer builds, though. Seems like most hackers want that DIY self-driving car first.

Continue reading “Homebrew Dash Cam Enables Full Suite Of Sensors”

For Your Binge-Watching Pleasure: The Clickspring Clock Is Finally Complete

It took as long to make as it takes to gestate a human, but the Clickspring open-frame mechanical clock is finally complete. And the results are spectacular.

If you have even a passing interest in machining, you owe it to yourself to watch the entire 23 episode playlist. The level of craftsmanship that [Chris] displays in every episode, both in terms of the clock build and the production values of his videos is truly something to behold. The clock started as CAD prints glued to brass plates as templates for the scroll saw work that roughed out the frames and gears. Bar stock was turned, parts were threaded and knurled, and gear teeth were cut. Every screw in the clock was custom made and heat-treated to a rich blue that contrasts beautifully with the mirror polish on the brass parts. Each episode has some little tidbit of precision machining that would make the episode worth watching even if you have no interest in clocks. For our money, the best moment comes in episode 10 when the bezel and chapter ring come together with a satisfying click.

We feature a lot of timekeeping projects here, but none can compare to the Clickspring clock. If you’re still not convinced, take a look at some of our earlier coverage, like when we first noticed [Chris]’ channel, or when he fabricated and blued the clock’s hands. We can’t wait for the next Clickspring project, and we know what we’re watching tonight.

Continue reading “For Your Binge-Watching Pleasure: The Clickspring Clock Is Finally Complete”