What is hacking and what is network engineering? We’re not sure where exactly to draw the lines, but [Artem]’s writeup of pivoting is distinctly written from the (paid) hacker’s perspective.
Once you’re inside a network, the question is what to do next. “Pivoting” is how you get from where you are currently to where you want to be, or even just find out what’s available. And that means using all of the networking tricks available. These aren’t just useful for breaking into other people’s networks, though. We’ve used half of these tools at one time or another just running things at home. The other half? Getting to know them would make a rainy-day project.
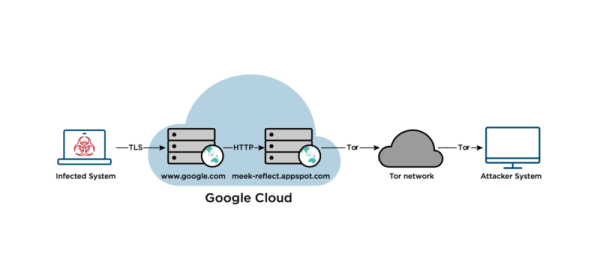
Is there anything that ssh and socat can’t do? Maybe not, but there are other tools (3proxy and Rpivot) that will let you do it easier. You know how clients behind a NAT firewall can reach out, but can’t be reached from outside? ssh -D will forward a port to the inside of the network. Need to get data out? There’s the old standby iodine to route arbitrary data over DNS queries, but [Artem] says dnscat2 works without root permissions. (And this code does the same on an ESP8266.)
Once you’ve set up proxies inside, the tremendously useful proxychains will let you tunnel whatever you’d like across them. Python’s pty shell makes things easier to use, and tsh will get you a small shell on the inside, complete with file-transfer capabilities.
Again, this writeup is geared toward the pen-testing professional, but you might find any one of these tools useful in your own home network. We used to stream MP3s from home to work with some (ab)use of netcat and ssh. We keep our home IoT devices inside our own network, and launching reverse-proxies lets us check up on things from far away without permanently leaving the doors open. One hacker’s encrypted tunnel is another man’s VPN. Once you know the tools, you’ll find plenty of uses for them. What’s your favorite?
Thanks [nootrope] for the indirect tip!