Never Miss A Doorbell With This Notifier

[PatH] tells us that he tragically missed a craft beer delivery to his home, and vowed never to let this happen again. His problem was that he’d missed the doorbell, resulting in one of those annoying notes from the delivery guy. His solution? An ESP8266-driven doorbell detector, that both sends him an SMS and records each doorbell press to a Google Sheet.

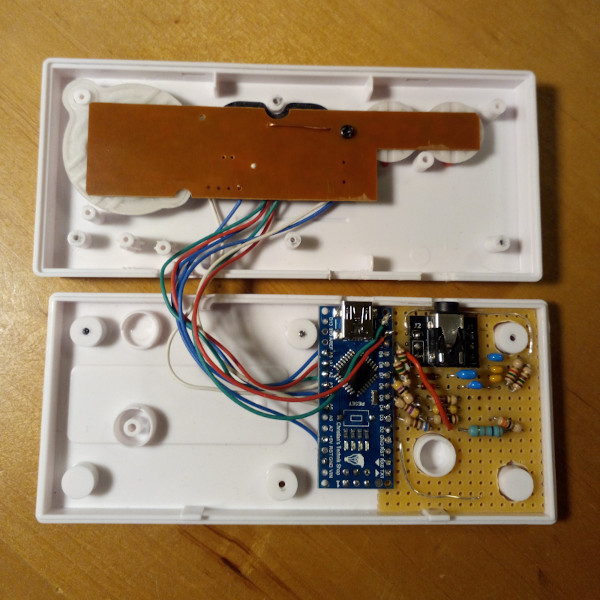
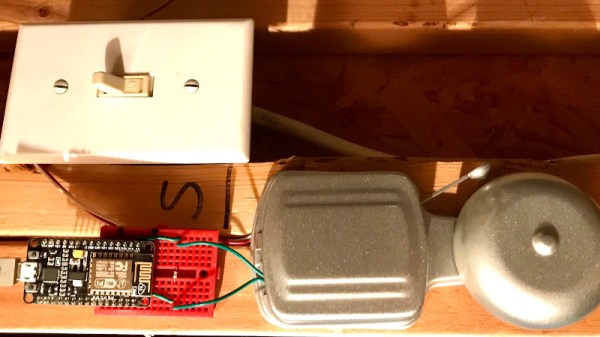
The doorbell detection is surprising but simple and non-intrusive, instead of running a GPIO line through some kind of interface to the button itself he’s added a reed switch to his ESP8266 board and used that to detect the magnetic field of the bell solenoids. It’s a convenient method, but one that only works with an old-style bell.

When the bell rings the magnetic field triggers the reed switch, and in turn the sketch running on the ESP calls out to IFTTT which triggers both an SMS and a write to a Google Sheets document that records each doorbell activation.

The ESP8266 seems to be a popular choice with doorbell automatprs probably because of its built-in networking and low price, but it’s not the only option. This optocoupler-sensed effort for example uses a Particle Xenon.

A Patch Antenna Is Just A Rectangle, It Should Be Easy To Design, Right?

If a grizzled RF engineer who bears the soldering-iron scars of a thousand projects could offer any advice, it would be that microwave antennas are not a field to be entered into lightly. Much heartache is to be saved by using an off-the-shelf design, and only the foolhardy venture willingly down the stripline into the underworld of complex microwave resonances.

But every would-be microwave designer has to start somewhere, and for [Adam Gulyas] that start came with a 2.4 GHz patch antenna. His write-up is a fascinating tale of the challenges and pitfalls of creating something which is deceptively simple at first sight but which becomes significantly more complex as he characterizes his design made real as a PCB.

The process started with a set of calculations to derive the patch dimensions and a bit of PCB work adding a stripline feed. This was produced on a PCB, a normal 1.6mm thick FR4 fiberglass board. When hooked up to a VNA its impedance was all wrong. Further, it had a resonance at the required frequency but also unexpected ones at 3.7 and 4.6 GHz. Simulation of the design also yielded a different resonance from the one calculated, and discussing it with others yielded the conclusion that the feed might be at fault. He ended up using an inset feed, with a co-axial cable emerging away from the edge of the patch, and was able to achieve a far better result.

We can all learn something from [Adam]’s write-up, and we salute him for staying the course to get the design to a usable point. It would be interesting to see the same antenna produced from a more consistent dielectric material than generic FR4. Meanwhile, if you are interested in microwave RF design, take a look at Michael Ossmann’s primer on the subject.

Assistive Specs Help Jog Your Memory

It’s something that can happen to all of us, that we forget things. Young and old, we know things are on our to-do list but in the heat of the moment they disappear from our minds and we miss them. There are a myriad of technological answers to this in the form of reminders and calendars, but [Nick Bild] has come up with possibly the most inventive yet. His Newrons project is a pair of glasses with a machine vision camera, that flashes a light when it detects an object in its field of view associated with a calendar entry.

At its heart is a JeVois A33 Smart Machine Vision Camera, which runs a neural network trained on an image dataset. It passes its sightings to an Arduino Nano IoT fitted with a real-time clock, that pulls appointment information from Google Calendar and flashes the LED when it detects a match between object and event. His example which we’ve placed below the break is a pill bottle triggering a reminder to take the pills.

We like this idea, but can’t help thinking that it has a flaw in that the reminder relies on the object moving into view. A version that tied this in with more conventional reminding based upon the calendar would address this, and perhaps save the forgetful a few problems.

Continue reading “Assistive Specs Help Jog Your Memory”

Watch Linux Boot On Your Hackaday Superconference Badge

Last year’s Hackaday Superconference badge was an electronic tour de force, packing an ECP5 FPGA shoehorned into a Game Boy-like form factor and shipping with a RISC-V core installed that together gave an almost infinite badge hacking potential. It did not however run Linux, and that’s something [Greg Davill] has addressed, as he’s not only running Linux on his badge, but also a framebuffer that allows him to use the badge screen as the Linux terminal screen. Finally you can watch Linux boot on your Superconference badge itself, rather than over its serial port.

He’s achieved this by changing essentially everything: from the new VexRiscv CPU core, to new video drivers and a VGA terminal courtesy of Frank Buss, now part of the LiteVideo project. It’s not quite a fully fledged Linux powerhouse yet, but you can find it in a GitHub repository should you have a mind to try it yourself. Paging back through his Twitter feed reveals the effort he’s put into this work over the last few months, and shows that it’s been no easy task.

For those keeping score at home, this is an open hardware design, running an open CPU core, with community-designed open-source peripherals, compiled by an open-source toolchain, running an open-source operating system. And it’s simply a fantastic demo for the badge, showing off how flexible the entire system is. One of the best parts of writing for Hackaday is that our community is capable of a huge breadth of amazing pieces of work, and this is an exemplar of that energy. We can’t wait to see what Greg and any other readers tempted to try it will come up with.

If you’d like to refresh your memory over the 2019 Supercon badge, here’s our write-up at the time.

A 3D-Printed Bass Guitar

A visit to the hardware hacking area of the recent Hacker Hotel hacker camp in the Netherlands would bring plenty of interesting pieces of hardware to delight the eye. Among them though was one to delight the ear, and on hearing it we asked whether its creator could put it online so we could share it with you. [XDr4g0nX]’s bass guitar is 3D printed, and while it still contains some non-3D-printed parts it’s still a very effective musical instrument.

This is not the first model he’s produced, he told us, an earlier guitar was entirely 3D-printed but proved not to be rigid enough. Tuning such an instrument merely resulted in its bowing out of shape and becoming unplayable as well as out of tune. This one has hefty steel bars for rigidity, though it uses a Yamaha neck rather than 3D-printing the whole instrument.  The main body of the instrument has to be printed in multiple parts and epoxied together, which he’s done without some of the ugly seams that sometimes disfigure prints of this nature.

Having heard it, we’d be hard pressed to tell it wasn’t a more traditional guitar, but then again since people have made guitars from all kinds of scrap it’s not the first home build we’ve encountered.

A Mini USB Keyboard That Isn’t A Keyboard

A useful add-on for any computer is a plug-in macro keyboard, a little peripheral that adds those extra useful buttons to automate tasks. [Sayantan Pal] has made one, a handy board with nine programmable keys and a USB connector, but the surprise is that at its heart lies only the ubiquitous ATmega328 that you might find in an Arduino Uno. This isn’t a USB HID keyboard, instead it uses a USB-to-serial chip and appears to the host computer as a serial device. The keys themselves are simple momentary action switches, perhaps a deluxe version could use key switches from the likes of Cherry or similar.

The clever part of this build comes on the host computer, which runs some Python code using the PyAutoGui library. This allows control of the keyboard and mouse, and provides an “in” for the script to link serial and input devices. Full configurability is assured through the Python code, and while that might preclude a non-technical user from gaining its full benefit it’s fair to say that this is not intended to compete with mass-market peripherals. It’s a neat technique for getting the effect of an HID peripheral though, and one to remember for future use even if you might not need it immediately.

More conventional USB keyboards have appeared here in the past, typically using a processor with built-in USB HID support such as the ATmega32u4.

A Tetris To Be Proud Of, With Only A Nano

Tetris may have first arrived in the West on machines such as the PC and Amiga, but its genesis at the hands of [Alexey Pajitnov] was on an Electronika 60, a Soviet clone of an early-1970s DEC PDP-11. Thus those tumbling blocks are hardly demanding in terms of processor power, and a game can be implemented on the humblest of hardware. Relatively modern silicon such as the Atmega328 in [c0pperdragon]’s Arduino Nano Tetris console should then have no problems, but to make that assumption is to miss the quality of the achievement.

In a typical home or desktop computer of the 1980s the processor would have been assisted by plenty of dedicated hardware, but since the Arduino has none of that the feat of creating the game with a 288p video signal having four gray scales and with four-channel music is an extremely impressive one. Beside the Nano there are only a few passive components, there are no CRT controllers or sound chips to be seen.

The entire device is packaged within a clone of a NES controller, with the passives on a piece of stripboard beside the Nano. There is a rudimentary resistor DAC to produce the grey scales, and the audio is not the direct PWM you might expect but a very simple DAC created by charging and discharging a capacitor at the video line frequency. The results can be seen and heard in the video below the break, and though we’re sure we’ve heard something like that tune before, it looks to be a very playable little game.

Continue reading “A Tetris To Be Proud Of, With Only A Nano”