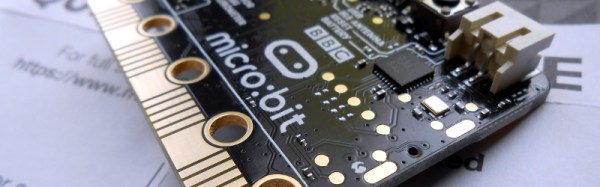
A Quickly-Hacked-Together Avalanche Pulse Generator

There are times when you make the effort to do a superlative job in the construction of an electronic project. You select the components carefully, design the perfect printed circuit board, and wait for all the pieces to come together as they come in the mail one by one. You then build it with tender care and attention, printing solder paste and placing components by hand with a fastidious attention to detail. There follows an anxious wait by the reflow oven as mysterious clouds of smoke waft towards the smoke detector, before you remove your batch of perfect boards and wait for them to cool.

Alternatively, there are other times when you want the device but you’re too impatient to wait, and anyway you’ve only got half of the components and a pile of junk. So you hack something a bit nasty together on the copper groundplane of a surplus prototype PCB in an evening with ‘scope and soldering iron. It’s not in any way pretty but it works, so you use it and get on with your life.

Our avalanche pulse generator schematic. The pulse generator itself is the single 2N3904 on the right.

When you are a Hackaday writer with some oscilloscope bandwidths to measure, you need a picosecond avalanche pulse generator, and you need one fast. Fortunately they’re a very simple circuit with only one 2N3904 transistor, but the snag is they need a high voltage power supply well over 100 V. So the challenge isn’t making the pulse generator, but making its power supply.

For our pulse generator we lacked the handy Linear Technologies switcher used by the avalanche pulse generator project we were copying. It was time for a bit of back-to-basics flyback supply creation, robbing a surplus ATX PSU for its base drive transformer, high voltage diode and capacitor, and driving it through a CRT line output transistor fed by a two-transistor astable multivibrator. Astoundingly it worked, and with the output voltage adjusted to just over 150V the pulse generator started oscillating as it should.

We’ve looked at avalanche pulse generators once before here at Hackaday, and very recently we featured one used to measure the speed of light. We’ll be using this one tomorrow for a ‘scope comparison.

An Atari 600XL Talks Composite Video

When we write about the 8-bit era of home computers there is a list of manufacturers whose names are frequently mentioned. Apple, Commodore, Texas Instruments, maybe Acorn and Sinclair if you are British, and of course Atari. But when we mention the last of those names it is invariably in reference to their iconic 2600 games console, it almost passes unnoticed that they also produced a line of 8-bit home computers based upon that success.

[ModPurist] was lucky enough to secure one of the Atari 8-bit computers through bartering with a local game store, an Atari 600XL from around 1983 or 1984, complete with its original box, manuals, cartridges, and a data cassette recorder. But on powering the system up and connecting to a TV a problem emerged. There was something there, but through a lot of noise and very blurry indeed. The solution after a bit of investigation turned out to be quite simple, to bypass the Astec video modulator and apply a composite video modification. Further investigation revealed that the original problem had in part been caused by the unit’s 5V power supply falling short of its voltage, so a further modification was to make a USB lead to allow it to be powered from a modern 5V charger.

This is a relatively simple piece of work, so you might be asking “Where’s the hack?”. The answer lies not in the mod itself, but in the detailed look [ModPurist] gives us at the inner workings of the 600XL, since it’s not a machine we see very often. Having the benefit of 30 years of hindsight and knowing the Atari’s competition quite well, we’d say that compared to some other machines of the era it’s a surprisingly well-designed computer both aesthetically and mechanically.

If your appetite for old Ataris has been whetted by this mod, can we draw your attention to this Atari 800 laptop? Or how about this 800 whose 6502 has been replaced with a 6809?

Stacking Voltage References To High Voltage Extremes

As children, we all probably had our ideal career paths. As an adult do you still harbor a secret desire to be an astronaut, or to drive a railroad train? Or have holders of other jobs become the people you envy?

As a Hackaday writer it’s probably not too controversial to admit a sneaking envy for the writers of semiconductor application notes. True, often their work consists of dry demonstrations of conventional uses for the products in question, but every once in a while they produce something off the wall and outside the device’s intended use, so out of the ordinary that you envy them their access for experimentation to the resources of a large semiconductor company.

Take Texas Instruments’ Application Report SBAA203, from May 2013. “Stacking the REF50xx for High-Voltage References” (PDF). A laboratory specialising in accurate measurement of high voltages had the problem that the stacks of Zener or avalanche diodes they were using as voltage references lacked both precision and stability, so investigated the properties of the REF5010 10V precision voltage reference.

You'll never be satisfied with a mere Zener diode again.
You’ll never be satisfied with a mere Zener diode again.

They found that by ignoring the device’s data sheet and directly connecting its output pin to its power pin, the REF5010 became equivalent to an ideal Zener diode. In this mode multiple references could be stacked in the same way as a real Zener diode, and very stable and high-precision voltage references could be created with very high voltages. They made a PCB with ten stacked REF5010s for a 100V reference, and then stacked ten of them for a 1000V reference. Leaving it for 24 hours to settle, they achieved a precision of +/- 2.5ppm, and after 3.5 months their average reading for the ten 1000V references they built was 1000.022V.

The 1000V reference would be impressive enough, but they weren’t finished. They built a series of boards holding 500 REF5010s for a 5KV reference, and stacked 20 of them to make a 100KV reference. These boards were mounted in a tower looking not unlike the Tesla coils we sometimes feature here. They note that it probably hits the record of simultaneous use of TI parts in a single device.

This may well be the first extremely high voltage precision reference to feature here at Hackaday, but we’ve certainly had our share of HV articles. Earlier this year we had a trio from [Steven Dufresne]: A conucopia of high voltage sources looking at ways to make your EHT, High voltage please, but don’t forget the current looking at selecting the right HV power supply for an application, and Wrangling high voltage looking at construction techniques.

Thanks [Nathan] for the tip.

The Fastest Rise Time In The West: Making A Truly Quick Pulse Edge

When we are taught about oscillators as newbie engineers, we are shown a variety of waveforms on an oscilloscope or in a textbook. This is a sine wave, they say, this is a sawtooth, this is a square wave, and so on. We’re taught to look at the lines on the screen as idealised, a square wave is truly square, and the transition from low to high voltage and back again is instantaneous.

In most cases this assumption is harmless. If we look into the subject a little deeper we learn that what seemed an instantaneous cliff-face is in fact a very steep slope, but when a circuit does its business in milliseconds there is usually no harm in ignoring a transition time measured in nanoseconds. The glue logic for your Arduino project can take its time.

Sometimes though, the rise time of a logic transition is important. The application that prompted this article was the measurement of oscilloscope bandwidth by looking at how quickly the ‘scope catches up with a pulse that exceeds its bandwidth, for example. When the instrument can happily measure the transition times of all your usual  pulse generators, something out of the ordinary is called for. So it’s worth taking a look at the rise times you’d expect from everyday circuitry, examining a few techniques for generating rise times that are much faster.
Continue reading “The Fastest Rise Time In The West: Making A Truly Quick Pulse Edge”

A Desk Lamp Solder Fume Extractor

Those of us who have spent a lifetime building electronic projects have probably breathed more solder smoke than we should. This is not an ideal situation as we’ve probably increased our risk of asthma and other medical conditions as a result.

It has become more common over the years to see fume extraction systems and filters as part of the professional soldering environment, and this trend has also started to appear in the world of the home solderer. As always, where commercial products go the hardware hacker will never be far behind. We’ve seen people producing their own soldering fume filters using computer fans.

A particularly neat example comes via [Engineer of None], who has posted an Instructable and the YouTube video shown below the break for a filter mounted on a desk lamp. A toaster is used to heat a piece of acrylic. The softened plastic is then shaped to fit the contours of the lamp. The lamp’s articulated arm is perfect for placing light and fume extraction exactly where it is needed. It’s not the most complex of hacks, but we’d have one like it on our bench without a second thought. We would probably add an activated carbon filter to ours though.

Continue reading “A Desk Lamp Solder Fume Extractor”

Hack An 8085 Like It’s 1985

If you have been building electronic hardware for several decades, do you still have any projects from your distant past? Do they work? An audio amplifier perhaps, or a bench power supply.

[Just4Fun] made a rather special computer in the 1980s, and it definitely still works. Describing it as “An 8085 single board computer with an EPROM emulator” though, does not convey just how special it is. This is not the modern sense of a single board computer with an SoC and a few support components. Instead it is a full system in the manner of the day in which processor, memory and peripherals are all separate components surrounded by 74 series glue logic. The whole system is wire-wrapped on a piece of perfboard and mounted very neatly in a rack. The EPROM emulator is a separate unit in a console case with hexadecimal keyboard and 7-segment display.

As the video below the break of an LED flashing demo shows, the EPROM emulator allows 8085 machine code to be entered byte by byte instead of having to be burned into a real EPROM.

[Just4Fun] leaves us with plans to replace the period EPROM emulator with a modern alternative, an EEPROM on a PCB designed to fit in the original bank of EPROM sockets. In this he suggests he might fit a bootloader and a BASIC interpreter, something entirely possible back in the day with conventional EPROMs, but probably not as cheaply.

Continue reading “Hack An 8085 Like It’s 1985”

A Beautiful Turntable With A Heart Of Concrete

On the face of it, playing a vinyl record is a simple process. You simply mount it on a turntable rotating at the right speed, and insert a needle into the groove. A learning exercise for youngsters used to be a passable attempt at a record player on the kitchen table with a pencil, a large cork, a sharpened matchstick, and a piece of paper. It sounded awful, but it demonstrated well how the audio was recorded.

If you have ever looked into the operation of a more conventional turntable though you’ll know that a little more care and attention is needed. There are many factors which affect the quality of the sound, and you quickly become obsessive about tracking, and sources of the tiniest vibration. Someone who has followed this path is [Mjhara], who has made a very high quality turntable. There is an unusual choice in this project: the tonearm is part of the build rather than fitting a commercial item like most turntable projects.

balanced-with-shotThe platter is machined from a piece of rosewood, weighted and balanced with lead shot, and laminated between two sheets of brass. It sits on a bearing aided by a ring of opposing magnets, and is belt driven by a two-phase induction motor. The base of the turntable is cast as a single piece of concrete, the idea being that the extra weight will aid the damping of vibrations. The tonearm is machined from a piece of wood, and its pivot from brass. The tonearm bearing is a ballpoint pen, a surprising yet inspired choice .

Sometimes audiophiles take their quest for better sound to extremes, and justification for their expenditure can be very subjective. But [Mjhara] assures us that this turntable has an exceptionally good sound, and it is certainly a thing of beauty. Full details are in the Imgur gallery embedded below the break.

Continue reading “A Beautiful Turntable With A Heart Of Concrete”