
P2P networks have long been a legal gray area, used for various spam schemes, illegal filesharing, and lots and lots of adware. Last year, though, the first botnet created by a worm distributed via P2P software surfaced, the work of 19-year-old [Jason Michael Milmont] of Cheyenne, Wyoming, who distributed his Nugache Worm by offering free downloads of the P2P app Limewire with the worm embedded. He later began distributing it using bogus MySpace and Photobucket links shared via chats on AOL Instant Messenger. The strategy proved effective, as the botnet peaked with around 15,000 bots. [Milmont] has plead guilty to the charges against him. Per his plea agreement, he will pay $73,000 in restitution and may serve up to five years in prison.
Author: Juan Aguilar160 Articles
Anti-paparazzi Sunglasses
UPDATE: Video can also be found here.
Ah, the life of the work-a-day hacker: sure, it’s glamorous, but all the paparazzi dogging your every step can get unbearably stressful. Thankfully, you have a recourse with these anti-paparazzi sunglasses. They work by mounting two small infrared lights on the front. The wearer is completely inconspicuous to the human eye, but cameras only see a big white blur where your face should be.
Building them is a snap: just take a pair of sunglasses, attach two small but powerful IR LEDS to two pairs of wires, one wire per LED. Then attach the LEDs to the glasses; the video suggests making a hole in the rim of the glasses to embed the LEDs. Glue or otherwise affix the wires to the temples of the glasses. At the end of the temples, attach lithium batteries. They should make contact with the black wire, but the red wires should be left suspended near the batteries without making contact. When you put them on the red wire makes contact, turning the lights on. It’s functional, but we’re thinking that installing an on/off switch would be more elegant and it would allow you to wear them without depleting the batteries.
[via BoingBoing]
Logic Probe Kit

Logic probes can be anything from useful to critical depending on the project, but if you don’t have one already, why not try building one? Instructables has a guide to building a logic probe using a PCB, an assorted lot of resistors, capacitors, regulators, DIP sockets, a 9V battery clip (and 9V battery), and a hex inverter. Instead of using an LED like other simple logic probes, though, this kit uses a 7 segment LED display to show whether logic high (H) or low (L). The schematic makes putting this together only slightly more complicated than snapping Legos together. Of course, the resulting device is not as versatile as a LogicPort logic analyzer, but it is still useful.
AirPiano: Touch Free IR Piano
[youtube=http://www.youtube.com/watch?v=Gh4Ovsh2DZY&hl=en&rel=0&color1=0x3a3a3a&color2=0x999999]
We were excited to learn of [Omer Yosha]’s AirPiano, but being the persnickety nerds we are, we think its more like a theremin than a piano. The device lets users play 24 different notes with a wave of the hand over the AirPiano. The “keys” are arranged in a matrix of three tiers with eight notes per tier; if the user sustains his or her hand over the AirPiano, the corresponding note is sustained.
It’s construction is relatively simple: an Arduino, several infrared sensors, and LEDs corresponding to the notes make up the device. It doesn’t have any built-in audio hardware at all, so it’s most basic use is as a MIDI controller. Still, it is essentially an unspecified input device, so it could theoretically be used for other purposes. For us, it’s fun to just watch the AirPiano in action.
Eye-Fi Explore Review
[flickr video=http://www.flickr.com/photos/pauls/2611298593/]
The WiFi uploading Eye-Fi SD card made a big splash when it was first introduced, but now Eye-Fi has a whole line of different products. The top of the line is the Eye-Fi Explore, which supports geotagging without using a GPS. Instead of GPS hardware, it uses the Skyhook Wireless Wi-Fi Postitioning System, which correlates the position of the Eye-Fi’s access point to GPS locations, creating virtual GPS functionality. This allows photos taken with the Eye-Fi to be be geotagged. Of course, the accuracy of the system is noticeably lower than true GPS and seems to be affected by a number of external factors, but it is still accurate enough to tag the photo within the immediate vicinity of where it was taken.
WiFi positioning is great feature, but certainly not limited to photography. Since the Eye-Fi is at its core SD storage media, you could probably have it geotag data saved to the card, even if it wasn’t created by a digital camera..
DuinoStamp
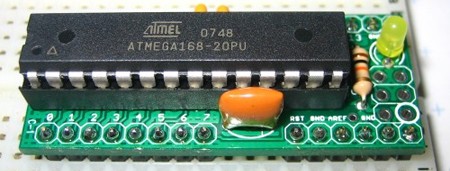
We think that in honor of the DuinoStamp’s small size and big power, the post about it should also be small and powerful. About the size of 34-pin DIP, the DuinoStamp is a breakout board that fits in DIP sockets and is Arduino compatible. It features an ATmega 168-20PU chip, a 16MHz resonator, decoupling capacitors and more. It doesn’t come with the necessary 5V power supply or any kind of interface cable, but what do you expect for under $10?
Wii Fit Balance Board Controls Robot
More Wii Fit Balance Board hacks keep rolling in from Europe. We’re not sure we agree with [Juan Gonzales]’s assertion that the Wii Fit Balance board is the best way to control robots, but we can’t deny how fun it looks. [Gonzales] managed to control a robot of his own design with the balance board, making it turn when he leans to the sides and moving forward and back when he leans in those directions.
The robot, which he calls SkyBot, is fairly impressive in its own right, built from a PIC microcontroller and featuring various infrared sensors and 6 contact sensors. The robot’s OS can be controlled from Windows, OS X, or Linux, but for this project, they used Debian. The balance board interfaces with a laptop connected to SkyBot; custom software (tar.gz file) to make this work was written in python, and is available on [Gonzales]’s robot wiki, as well as instructions on how to build a SkyBot. It is in Spanish, however, so fire up Google Translate and get to work.
[via Balance Board Blog]


