Atari 800 EPROM Cartridge Hack

atari-800-eeprom-hack

[FozzTexx] had an old Atari 800 collecting dust and decided to pull it out and get to work. The problem is that it’s seen some rough storage conditions over the years including what appears to be moisture damage. He’s read about a cartridge called SALT II which can run automatic diagnostics. Getting your hands on that original hardware can be almost impossible, but if he had a flashable cartridge he could just download an image. So he bought the cheapest cartridge he could find and modified it to use an EPROM.

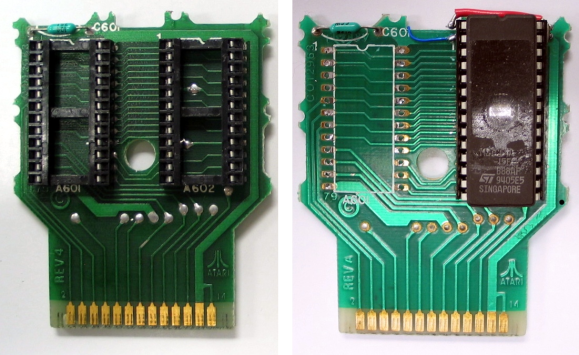
When he cracked open his new purchase he was greeted with the what you see on the left. It’s a PCB with the edge connector and two 24-pin sockets. These are designed to take 4k ROMs. He dropped in an EPROM of the same size but the pin-out doesn’t match what the board layout had in mind. After following the traces he found that it is pretty much an exact match for an Intel 2764 chip. The one problem being that the chip has 28-pins, four too many for the footprint. The interesting thing is that the larger footprint (compared to the 2732) uses all the same pins, simply adding to the top and moving the power pins. A small amount of jumper wire soldering and [FozzTexx] is in business.

Low-resolution Toaster Prints On Slices Of Bread

low-resolution-bread-toaster

Why toast your bread evenly when you can burn low-resolution images instead? Meet the Super Mega Mega Toaster, a University project created by [Scott van Haastrecht] for his Creative Technology course.

Now you may be thinking that this has been done before. And indeed, a bit of searching will lead you to a post about toasting Jesus.  But that is a one-shot toaster hack which simply used a stencil to block heat to create a certain pattern. This is a mechanical overhaul for the toaster concept. It uses one row of six heating elements. Each is connected to a servo motor which moves the element next to the bread or away from it based on the pattering being printed. A stepper motor then moves the bread up so that the next row can be printed. All of this is mounted in a laser-cut wood frame which makes us just a bit nervous because the purpose of the elements is to burn stuff.

See a demo of the toaster, as well as its internal components in the clip after the jump.

Continue reading “Low-resolution Toaster Prints On Slices Of Bread”

Analog Input Expansion Boards For Raspberry Pi

analog-input-rpi-add-on

[Ken Olsen] needed a bunch of analog inputs for his model railroad project. He wanted to use the Raspberry Pi board, but alas there are no analog inputs available on the GPIO header. But there is SPI. So he used an online service to design his on Analog input expansion boards.

He mentions that Eagle can be a bit of a pain to work with. For this project he decided to give circuits.io a try. This is an in-browser PCB layout tool which we looked at in a links post some time ago. The service lets you order directly from your in-browser design without the need to run gerber files or the like (boards are made using the OSH Park service). He’s very happy with the boards he got back. They feature a footprint for a connector to interface with the RPi.

The design uses MCP3008 Analog to SPI chips. Each has eight channels but [Ken] needed more than that. Since the service provides three copies of the board he made them modular by adding end connectors which chain the SPI and power rails from one board to the next. Don’t miss his full demo in the video after the break.

Continue reading “Analog Input Expansion Boards For Raspberry Pi”

Bluetooth Headset Garage Door Opener Update

bluetooth-headset-garagedoor-opener-update

[Lou Prado] sent in a link to his new video on using a Bluetooth headset as a garage door opener for your Android device. This isn’t a new hack, and we’ve actually seen him pull it off once before back in 2011. But we’re running this as an update for a couple of reasons. First off, we had forgotten about the hack and it’s worth revisiting. Secondly, the headset which he used with the initial hack has gone out of production. He chose a new model, and the assembly video (embedded after the break) which he made is a treasure trove of best practices to use when hacking consumer electronics.

Here’s how the hardware part of the hack goes. He removes the speaker from the headset and solders the base of a transistor in-line with a resistor to the red wire. The emitter connects to the grounded frame of the USB charging cable which is plugged into an outlet next to your garage door opener. The collector of the transistor is then connected to the garage door opener, along with a common ground connection, allowing audio from the headset to trigger the transistor to open the door.

The systems is secure based on Bluetooth pairing, which was done with his phone before starting the hardware hack.

Continue reading “Bluetooth Headset Garage Door Opener Update”

Remote Control Command Center Includes RF And IR Functions

all-in-one-remote-relay-includes-RF

We’re still not quite sure what to call these projects, but as we’ve said before, it’s a pleasure to see what people are doing to use one remote control to rule them all. The project being developed by [Kalle Löfgren] seeks to simplify the remote controlled items in his home by combining all control into one smart phone app. The linchpin of the system is this command center which lets a smart phone send IR and RF commands to various devices (translated).

We’ve seen this done with pretty beefy microcontrollers, like this project that uses a PIC32. But the communications going on between the smartphone and the base station are very simple, as are the remote control commands which are being relayed. So we’re not surprised to find that this setup just uses an ATmega88, IR LED, Bluetooth Module, and RF module. There is no connection to a computer (the USB simply provides power via a cellphone charger). If you’re interested in how [Kalle] sniffed the protocol for each remote he wrote two other articles which you can find in the write-up linked above.

NANDputer Is Mostly Wiring

We would wager that by weight this project is mostly wiring. We might go as far as betting that the wire outweighs the rest of the components 2 to 1. We’ll keep our fingers crossed that there’s never a loose connection, but for now it seems that [Kevin Horton’s] NAND-based computer project is up and running. Very nearly ever part of the build is based on NAND gates, which is why the point-to-point wiring is so crazy. There is one peripheral board which uses some non-NAND components, but he eventually plans on replacing that to make the system…. pure?

Now get ready for the crazy part. This is just one half of the program counter! There’s another board that looks just like it. The two join at least a half-dozen other boards of similar size and complexity to make a functioning computer. Crazy! The post shares a ton of details, but you can also just skip down after the break to see a video of it running a program.

If you’re wondering how a NAND-based computer works you should make your way through this online course.

Continue reading “NANDputer Is Mostly Wiring”

WSPR Transmitter Shows True Value Of Raspberry Pi For Hacking

wspr

Don’t get us wrong, we love our Raspberry Pi. But if you’re merely running a Linux image without adding a hardware hack into the mix you’re missing out on part of the power for which the platform was developed. This project is a great example of how to embrace the Raspberry Pi’s ability to deliver both low-level hardware access, and solid embedded Linux performance. [Dan Ankers] and [Threeme3] have developed a program which turns the RPi in to a WSPR transmitter. The GitHub readme shares many of the details on how it was done. But you’ll also want to dig through the .c file to see how they’re making use of the GPIO header pins.

[William Meara] sent in the tip for this. He’s been featured on Hackaday previously for his work with WSPR (Weak Signal Propagation Report). It’s an amateur radio protocol which lets you communicate over very long distances using relatively weak transmitters. The trick is to use computing power to find the signal hidden in all the noise. Be warned that you do need a HAM license to try this out, but otherwise all you need to connect to the board is a low-pass filter and an antennae.

[via SolderSmoke]

[Photo credit: WSPR hompage]