Super Pixel Bros Now With Manufactured PCB And Rewritten Software

[Retro Brad] has come a long way with his 8×8 gaming device which he calls Super Pixel Bros. The newest rendition has a fab house PCB and freshly rewritten code. The game is still played on an 8×8 LED matrix, but it looks like he’s sourced a version with square pixels, which is a nice touch since he was inspired by the block-based Super Mario games. Also new in this version is the character LCD screen which displays score, level, and life information. But it’s not just the shiny new hardware that’s different, he’s rewritten the software in Swordfish Basic to run on the PIC 18F4550. The new code allowed him to tweak how levels are loaded and stored. He’s even written a level editor and has finished 20 levels thus far.

The demo after the break does a great job of showing off the hardware and the game play. He’s added a lot, including enemies, the ability to shoot fire, and of course the common moves of jumping and breaking blocks is all there. He mentioned that the fab house he used is selling boards for around $5 and he’s looking into the possibility of getting a kit service up and running.

His progress since we last checked in on the project is quite impressive.

Continue reading “Super Pixel Bros Now With Manufactured PCB And Rewritten Software”

[Dino’s] JFET Guitar Preamp With Piezo Pickup

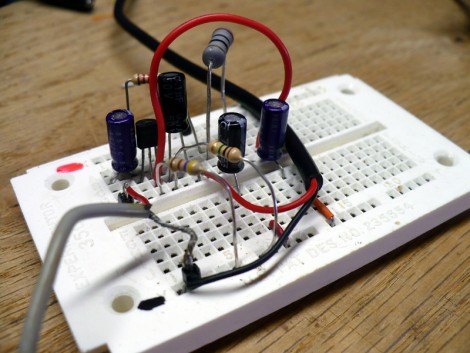
This week, with a little help from a Roomba, [Dino] built a guitar pickup and preamp that sounds marvelous. A pickup takes vibrations from the guitar and turns them into an electrical signal which can then be amplified and broadcast. He grabbed a long-dead Roomba which has slowly but surely been donating its organs for his weekly projects. After plucking out a piezo element he grabbed a bag of Junction gate Field-Effect Transistors (JFET) and built a preamp circuit around one of them.

JFETs operate in much the same way as MOSFETs (which we took a look at last week). [Dino’s] design adds a few resistors and capacitors to tune the gain and decouple the circuit from the input and power rails. He epoxied the piezo element inside the guitar and connected leads between it and a jack mounted in the body. As always, he does an excellent job of explaining the concepts behind the design and outlining the build techniques that he used. We’ve embedded his video after the break.

Continue reading “[Dino’s] JFET Guitar Preamp With Piezo Pickup”

Inkjet Print Head Driver Shield

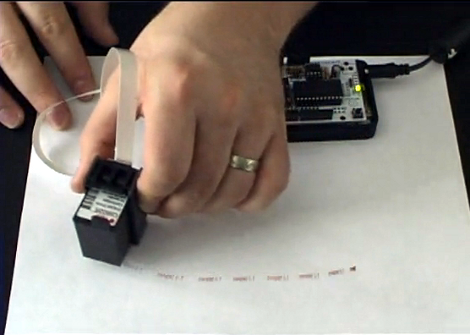
[Nicolas C Lewis] is churning out inkjet print head shield kits for Arduino. If you’ve always wanted to label or brand objects as part of a project this greatly simplifies the process. Using his all through-hole design, an Arduino can print at 96 dpi. At first we had trouble figuring out what we could use this concept for, but [Nicolas] has the answer. In is FAQ he links to a couple of his own flat-bed inkjet printer builds based on earlier prototypes, but he also links to other projects using the same concepts like the Nickel-O-Matic, or the ping-pong ball printer (we’ve embedded video of that one after the break).

The shield only requires five connections with a microcontroller. We love the jumper-based connection system that [Nicolas] chose which lets you use several print heads at once by selecting different drive pins. The project is still in the funding stage but is already over funded. Schematic and code will be posted as soon as the first production run is complete.

Continue reading “Inkjet Print Head Driver Shield”

Update: Bluetooth Super Nintendo Controller For Android

[Rich’s] newest version of a Bluetooth connected Super Nintendo controller takes what was already good and makes it better. We looked at the original version back in May, which is built into a knockoff controller  — [Rich] mentions that he got a lot of flack for defacing retro equipment and wants to set the record straight. The most notable difference between the two controllers is that the batteries are now housed inside the case. He switched over to an 850 mAh Lithium Ion battery, which takes much less room than the four AA batteries did. There is an integrated charger which connects via a mini USB jack as seen in the image above. Bother versions of the controller can be used to play emulators without rooting your Android device.

Unfortunately you won’t get to look inside the case. What we can tell you is that the build no longer uses a BlueSMiRF board , opting for a less expensive Bluetooth solution. We also know that the build is still Arduino compatible, sporting an ATmega328 chip running the bootloader. The lack of detail is because [Rich] is working to market the controller with a limited-quantity preorder. Check out his video presentation of the new version after the break.

Continue reading “Update: Bluetooth Super Nintendo Controller For Android”

Dippy Bird Binary Clock

This Dippy Bird clock display is simple to build and it’s just waiting to be scaled up for use as a full clock. As shown there are only enough birds in this rendition to read out the hours. More tiers can be added for minutes and you could even add your own temperature readout function using a separate bird as the thermometer.

Other than the fact that there are only four bits of resolution, the first thing you should notice is that these birds have nothing to drink. They’re intended to dip their beaks into a glass of water, leading to evaporation that changes the temperature of the dichloromethane inside to start their teeter-tottering. Water isn’t used because the birds would be in constant motion. Instead a resistor has been placed in the base of each, which heats up when current is passed through it. A bird in motion is a digital 1, and bird at rest is a digital 0. A set of transistors protects the microcontroller from sourcing too much current. In this case an mbed is keeping time but any microcontroller will do. We’ve embedded a quick clip of the dippy bird clock after the break.

Continue reading “Dippy Bird Binary Clock”

Laser Trip Wire In An Easy-to-use Form Factor

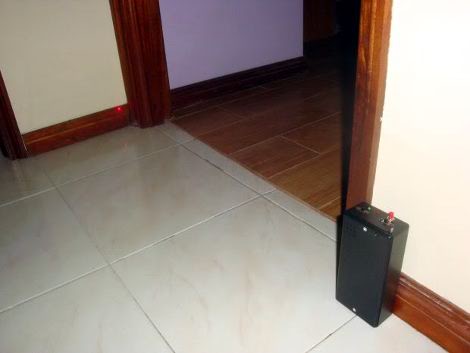
[Rul] built a nice laser trip wire alarm for use in Airsoft matches. Just place the enclosure so that the beam crosses a doorway and it will sound an alarm when the beam is broken. The only problem with this setup is that you need a reflective surface on the opposite side that can be positioned to direct the beam of light back to a photoresistor. But wait, there’s a second option. [Rul] also added a leaf switch that can be connected to an actual trip wire instead of using the laser.

A PIC 16F688 controls the laser module and monitors the photoresistor and leaf switch. When power is first switched on the box goes into a setup mode where it waits until the laser is detected by the photoresistor, switching on an LED to signal that you’ve got the beam aimed correctly. One press of the push-button puts it in activate mode which will sound the hacked window-alarm inside when the beam is broken. A toggle switch lets the operator chose between laser or wire operation.

You certainly won’t miss the alarm when it’s set off. Watch it scare the life out of a poor house cat in the clip after the break.

Continue reading “Laser Trip Wire In An Easy-to-use Form Factor”

High Efficiency Solar Charger Circuit Tops Off Those Lead-acid Batteries

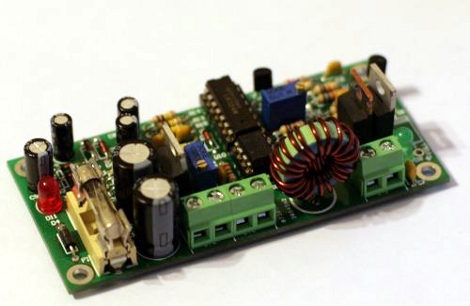
Make your next project solar-powered with this charging circuit. It’s completely through-hole, and there are no microcontrollers that need to be flashed. If you can source parts and are handy with a soldering iron building this will be a breeze.

Both the maximum system voltage and the low voltage drop out are configurable. After assembly, you just need to attach a regulated power supply to the load terminals. Tune the power supply to the max voltage and turn a potentiometer until an LED comes on, then repeat the process for the drop out voltage. Board artwork for the two-sided PCB and a schematic are available from the page linked at the top. If you’re not into etching your own circuit boards you can buy one for around $10.

[Thanks Murray]