Simulating VHDL Of An AVR8 Soft Processor

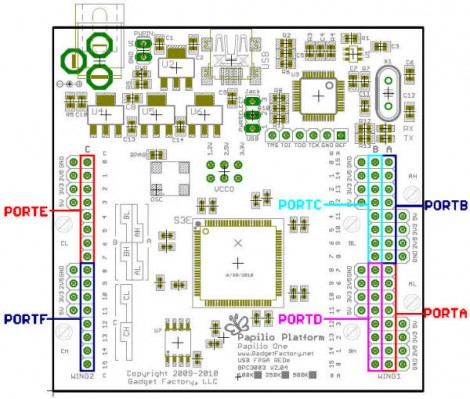
Okay, now we’re beginning to feel a bit like [Alice]. This tutorial shows you how to simulate VHDL code. This code is intended to run on an FPGA and includes a software-only version of the AVR 8-bit microcontroller core. Essentially, you’ll simulate VHDL code that simulates AVR hardware. Wrap your mind around that!

The code is intended to run on a Papilio Field Programmable Gate Array development board. We saw an early version of this board running the AVR8 core about a year ago. However, you don’t need to have any hardware to follow along and recreate this simulation yourself. It might be a great way to get your feet wet with FPGA programming before making that first hardware buy. Five different screencasts take you through the process of getting the AVR8 code, using an altered Arduino IDE for it, setting up a free version of Xilinx ISE to run the simulation, then setting it free and interpreting the data that the simulator spits out the other end.

15-digit Nixie Clock Contains Mostly Non-useful Information

[Jarek Lupinski] is at it again, this time building a clock using 15 Nixie tubes. Just look at the time…. wait, how do you read this now? It’s not seconds since the epoch, but an homage to a very expensive New York City art piece. [Jarek] took his inspiration from the Metronome art installation in Union Square.

We hadn’t heard of it before and were shocked to learn that this art was commissioned at $4.2 million. It belches steam and confuses passersby with its cryptic fifteen digits. It seems that the eight digits on the left mark the current time – two digits for hours, two for minutes, two for seconds, and the final digit for hundreths of a second. The seven remaining digits count down the time left in the day. So when you watch it, you see the significant digits of the display increasing, and the insignificant half decreasing.

The Nixie version rests snuggly on a 15″x4″ PCB. We’re sure it doesn’t number in the millions, but that couldn’t have been cheap to have manufactured. Each tube has its own driver chip, removing the need for multiplexing. An ATmega168 controls the clock (along with some shift registers to expand the I/O count), reading time from a DS1307 RTC chip. It looks fancy, but where’s the belching smoke on this version?

AVR HVSP On A Tiny Breadboard

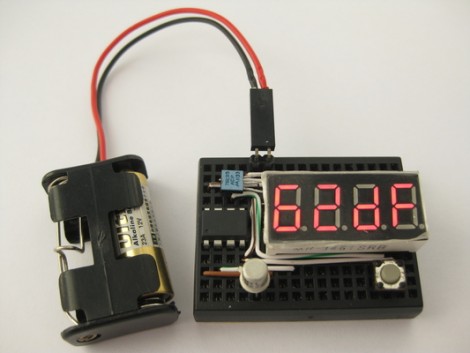
AVR chips are convenient because you can program them in circuit at their operating voltage. That is, unless you screw up the fuse settings and they’ll no longer listen to an In System Programmer. If you find yourself facing this problem, just build this circuit on a breadboard and ‘unbrick’ by holding down the button.

The circuit seen above is a High Voltage Serial Programmer. This is one of two high voltage protocols used by AVR chips; HVSP is for chips that don’t have enough pins to use High Voltage Parallel Programming. This rendition uses a 12V power source, which is the level necessary for the high voltage method. A 7805 linear regulator joins the mix to provide operational voltage, along with one transistor, an ATtiny2313 to control the circuit, a four-digit 7-segment display for feedback, and one button for control.

Watch the video after the break to see an ATtiny13 programmed to disable the reset pin using a breadboarded programmer. That chip is then easily rescued, having been automatically recognized by using its device signature.

Continue reading “AVR HVSP On A Tiny Breadboard”

Alternate Keyboard Layouts – For Geekiness And Other Reasons

[BiOzZ] wanted to try a different keyboard layout than the ubiquitous Qwerty, so he grabbed an old keyboard and converted it to the Dvorak setup. This was accomplished by first popping off all of the keys from the black keyboard seen above, and boy did he find a mess underneath. It was nothing that a trip through the dishwasher (for the case only) wouldn’t fix, and the next step was to replace the keys in a different order. He found that a couple of them wouldn’t just go back in a different place, but had to be rotated 90 degrees to fit. Not a huge problem, you can see that he overcame the visual speedbump of letters facing the wrong way by adding his own letter labels. From there he walks us through the process of getting Windows to switch to the Dvorak layout.

I went through a similar process at the end of last year. I was experiencing a lot of pain in my hands from my prolific feature writing here at Hackaday so I chose to try out the Colemak keyboard. The white keyboard above is the one I repurposed using that layout. I found it quite easy to switch between two keyboard layouts using Ubuntu. After you’ve set it up in the keyboards dialog a layout icon appears on the panel. It wasn’t hard to pick the new key locations up, but it did reduce my typing speed by a factor of 8. In the end I found that adjusting my chair height and keeping my hands warm did the trick and I’m back on the Qwerty where I belong.

Blu-ray Laser Plotter Writes On Glow-in-the-dark Screen

This laser display is persistent thanks to a glow-in-the-dark screen. [Daniel] built it using a Blu-ray laser diode. As the laser dot traverses the screen, it charges the phosphors in the glow material, which stay charged long enough to show a full image.

The laser head is simple enough, two servo motors allow for X and Y axis control. A Micro Maestro 6-channel USB servo controller from Pololu drives the motors, and switches the diode on and off. This board offers .NET control, which [Daniel] uses to feed the graphics data to the unit. Check out the video demonstration below the fold to see a few different images being plotted. It’s shot using a night-vision camera so that you can really see where the laser dot is on the display. It takes time to charge the glow material so speeding up the plotting process could actually reduce the persistent image quality.

This is yet another project that makes you use those geometry and trigonometry skills.

Continue reading “Blu-ray Laser Plotter Writes On Glow-in-the-dark Screen”

Chill Your Phone For Longer Battery Life?

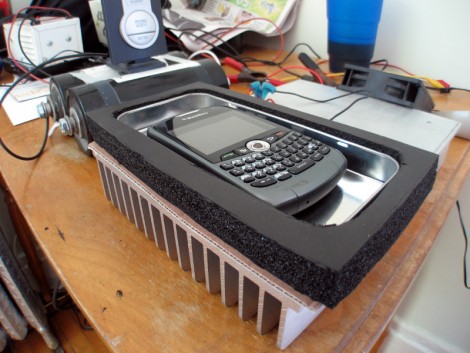
The first specs we look at when choosing a cellphone are the battery life numbers. We know that eventually we’re going to see performance loss, and [Dr. West] wanted to see if there’s a way to delay the inevitable. What he found is that ambient temperature affects the battery throughout its life. He set out to build a phone chiller to slow the degradation of the battery.

The research that he points to shows that at room temperature, a Lithium battery will lose 20% of its capacity each year. This seems like a dubious number so do share links to studies that state otherwise in the comments. Whether that 20% is right or not, the point is that cooling the battery will preserve it. With that in mind, [Dr. West] put together a pod that uses a peltier cooler and a heat sink to host his Blackberry while he sleeps. He figures he can reduce the capacity lost per year from 20% down to 14%. This of course comes at the expense of running that cooler every night (in addition to charging the phone when it needs it). But perhaps this solution will spark an idea that leads to a better one.

TI Adds Some Linux Support For Evalbot – We’ve Got Hardware Coupon Codes For You!

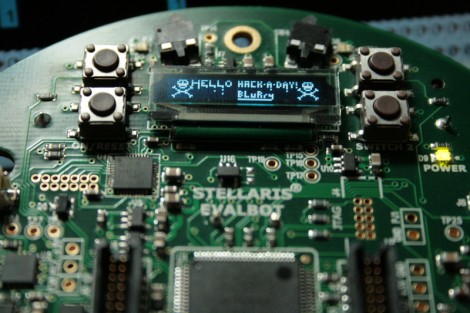
In case you missed it, Texas Instruments sells a little robot called the Evalbot as a development platform for ARM Cortex-M3 microcontrollers. Since its release we’ve seen a few hacks on the hardware; the image above is a proof of concept for developing for the device under Linux. We have criticized TI in the past for not natively supporting Linux with their IDEs. We’re not sure how it will play out, but they have added new software package options to go along with the hardware. You’ll notice on their PR page that there is now an option to use CodeSourcery. It is a trial of the full version, but at least it is a step in the GNU direction from their previous offering.

The Hackaday team has been talking off and on with TI about the hardware. We’re happy to say that they’ve been listening to the Internet community about their likes and dislikes; following various online groups that have sprouted up to talk about Evalbot projects. It sounds like they’re thinking about hosting a contest using the hardware. So maybe you want to get your hands on one so that you can familiarize yourself and hit the ground running if/when that contest starts. You’re in luck, we can help save you a few bucks.

The first time that Texas Instruments tried out a $125-off coupon code the deal got away from them. It had been meant for attendees of the ESC Boston conference. They honored the deals that went through before the proverbial run-on-the-bank got shut down. This time around they’re using serialized deal codes to limit the number of give-aways. We’ve got 200 of them just waiting for our loyal readers to use. One code will let you purchase one Evalbot for just $25 (instead of $150).

Please take a moment to decide if you actually want (and will use) one of these robots, and decide if you are willing to shell out the $25 to order it. You see, we don’t want this deal going to waste. If you decide this is for you, send an email requesting a code to:We’re all out! We’ll dish out the deal on a first-emailed-first-served basis. We will update this post when all 200 have been claimed.

We will not tolerate anyone gaming the system and so we reserve the right to disqualify any email submission for any reason in an attempt to maintain some semblance of fairness. Also… if you’re planning to pick this up just to resell it for cash you’re a loser.

[update: Those who emailed us requesting a code should begin receiving replies this evening or tomorrow.]

[Update 2: here is the specific bot you should be trying to buy. ]