Aesthetic DIY Bluetooth Speakers

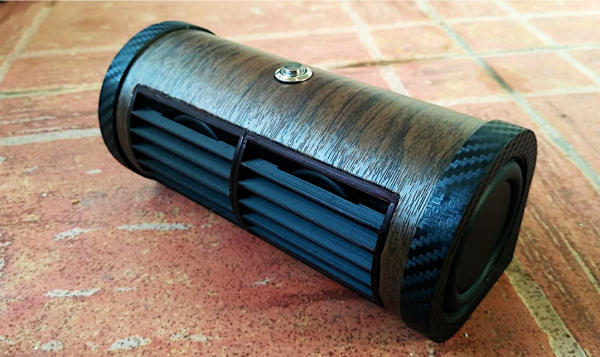
DIY Bluetooth speaker projects are always a staple here at Hackady. In our latest feature of DIY audio builds, we have [Patrick’s] vinyl cylindrical speaker.

He found a pretty inexpensive Bluetooth audio amplifier on AliExpress. However, the amplifier module oddly enough had a few missing components that were critical to its operation, so he had to do a little bit of re-work. Not something you generally expect to do when you purchase a pre-made module, but he was certainly up to the task.

He noticed the board amp module was missing a battery protection circuit even though there was space on the board laid out for those components (maybe an older board revision?). To remedy this problem, he added his own battery protection circuit to prevent any unwanted catastrophes. Secondly, he noticed a lot of distortion at high volumes and figured that some added capacitance on the power supply would help fix the distortion. Luckily, that did the trick.

Finally, and not quite a mistake on the manufacturer’s part this time, but an improvement [Patrick] needed for his own personal use. He wanted the amp module’s board-level LED indicator to be visible once the enclosure was fitted around the electronics. So, he used the built-in status trigger as a digital signal for a simple transistor circuit powering a much brighter ring LED that could be mounted onto the enclosure. That way, he could utilize the firmware for triggering the board-level status indicator for his own ring LED without any software modifications to the amp module.

Now, all that was left was to construct the enclosure he had 3D-printed and fit all the electronics in their place. We’ve gotten pretty used to the always impressive aesthetics of [Patrick’s] designs, having covered a project of his before, and this build is certainly no exception. Great job!

While you’re here, take a look at some other DIY Bluetooth speaker projects on Hackaday.

Continue reading “Aesthetic DIY Bluetooth Speakers”

The Swiss Army Knife Of Bench Tools

[splat238] had a ton of spare sensors laying around that he had either bought for a separate project or on an impulse buy, so he knew he had to do something with them. He decided to build his own digital multi-tool focusing on sensors that would be particularly useful in a workshop setting. Coincidentally, he was inspired by a previous hack that we covered a while back.

He’s equipped his device with a bubble level, tachometer, IR thermometer, protractor, laser pointer, and many, many more features that would make great additions to any hacker’s workspace. There’s a good summary of each sensor, making his Instructable somewhat of a quick guide to common sensing modalities for hardware designers. The tachometer, thermometer, laser pointer, and a few other capabilities are notable upgrades from the project we highlighted previously. We also appreciate the bigger display, allowing for more detailed user feedback particularly in using the compass and bullseye digital level among other features.

The number of components in [splat238’s] build is too extensive to detail one-by-one in this article, so please see his Instructable linked above for all the details. [splat238] made his own PCB for mounting each sensor and did a good job making the design modular so you wouldn’t need to add certain components if you don’t need them. Most of the components take some through-hole soldering with only a handful of 0805 resistors required otherwise. The housing was designed such that the user can handle the tool with one hand and can switch between each function with a push of a button.

Finally, the device is powered using a rechargeable lithium-polymer battery making it very reusable. And, if there weren’t enough features already, the battery can be charged via USB or through two solar panels mounted into the housing unit. Okay, solar charging might be a case of featuritis, but still a cool build either way.

Check out some other handy DIY tools on Hackaday.

Continue reading “The Swiss Army Knife Of Bench Tools”

A Face Mask That’s Functional And Hacker-Certified

[splat238] needed a mask for going out in public, but wanted something that fit his personal style a bit better than the cloth masks everyone else was wearing. So, he upcycled his old airsoft mesh mask using an impressive 104 NeoPixels to create his NeoPixel LED Face Mask.

The NeoPixels are based on the popular WS2812b LEDs. These are individually addressable RGB LEDs with a pretty impressive glow. [splat238] purchased a 144 NeoPixel strip to avoid having to solder each of those 104 NeoPixels one-by-one. He cut the 144-LED strip into smaller segments to help fit the LEDs around the mask. He then soldered the power and data lines together so that he could still control the LEDs as if they were one strip and not the several segments he cut them into. He needed a pretty bulky battery pack to power the whole thing. You can imagine how much power 104 RGB LEDs would need to run. We recommend adding a battery protection circuit next time as these LEDs probably draw a hefty amount of current.

He designed his own controller board featuring an ESP8266 microcontroller. Given its sizable internal memory, the ESP8266 makes it easy to store a variety of LED patterns without worrying about running out of programming space. He’s also hoping to add some WiFi features in later revisions of his mask, so the ESP8266 is a no-brainer. Additionally, his controller board features three pushbuttons that allow him to toggle through different LED patterns on the fly.

Cool project [splat238]! Looking forward to the WiFi version.

Continue reading “A Face Mask That’s Functional And Hacker-Certified”

3D Printed Doggie Braces

[Tye’s] dog Lucifur unfortunately has degenerative arthritis causing her a lot of pain in her feet. The vet suggested orthotic carpal braces to help alleviate the pain, but they come at a price tag of at least $1600. Given her current budgetary limitations, [Tye] decided to try the DIY route.

The first task was to cast Lucifur’s paws in plaster to make a mold of her feet in both the weight-bearing and non-weight-bearing orientations. According to [Tye], the non-weight-bearing orientation is more representative of the shape of a “normal” paw, but she also needed to model the weight-bearing orientation to better design the braces for walking.

Then it was time to print a PLA-based dog splint from a design she found on Thingiverse. Since PLA softens when it’s in boiling water, the splint can be easily molded to Lucifur’s paw. This is where the paw molds [Tye] made earlier come in handy, since nobody would want Lucifur wearing a PLA splint fresh out of boiling water. Finally, she added a bit of super glue to the heel of the splint in hopes that it will hold up better over time.

We certainly can’t recommend DIY solutions to medical problems and [Tye] made sure she stressed the importance of following the recommendations of your vet if you’re ever in her position. Either way, we hope Lucifur finds some momentary reprieve, and that she can eventually receive those $1600 braces she desperately needs.

DIY Stress Meter

Stress monitoring has always been a tricky business. As it turns out, there is a somewhat reliable way of monitoring stress by measuring how much cortisol, the so-called “stress hormone,” the human body produces. With that in mind, bioengineering researchers at the University of Texas at Dallas decided to make CortiWatch, a wearable device for continuously monitoring cortisol excreted in sweat, as a sort of DIY stress meter.

They made their own potentiostat, a device for measure small amounts of current produced by electrochemical reactions, similar to the glucometer. We’ve talked about these types of measurements before. Simply put, the potentiostat contains a voltage reference generator which biases the sensing electrodes at a preset potential. The voltage bias causes local electrochemical reactions at the sensing electrodes (WE in the image above), stimulating electron flow which is then measured by a transimpedance amplifier or “current-to-voltage” converter. The signal is then analyzed by an onboard analog-to-digital converter. Simply put, the more cortisol in the system, the higher the transimpedance amplifier voltage.

To validate their system a bit more thoroughly than simple benchtop studies, the researchers did some “real-life” testing. A volunteer wore the CortiWatch for 9 hours. The researchers found a consistent decrease in cortisol levels throughout the day and were able to verify these measurements with another independent test. Seems reasonable, however, it’s not quite clear to us what cortisol levels they were expecting to measure during the testing period. We do admit that it takes quite a bit of calibration to get these systems working in real-life settings, so maybe this is a start. We’ll see where they go from here.

Maybe the CortiWatch can finally give us a proper lie detectorWe’ll let you be the judge.

Bringing Back The Fidget Toy Craze With The Magic Microcontroller Cube

[Rickysisodia] had a few dead ATmega128 chips laying around that he didn’t want to just throw away, so he decided to turn them into his own light-up fidget toy. The toy is in the form of a six-sided die so small that you can hang it on a keychain. He soldered an ATmega128 on each side of the cube and added a few dot circles to give his toy the look of a functional dice. We were pretty amazed by his impressive level of dexterity. Soldering those 0.8 mm-pitch leads together seems pretty tedious if you ask us.

Then he wired a simple, battery-powered tilt switch LED circuit on perfboard that he was able to sneakily place inside the cube. He used a mercury switch, which, as you may figure, uses a small amount of mercury to short two metal contacts inside the switch, completing the circuit and lighting the LED. We would suggest going with the non-mercury variety of tilt switches just to avoid any possible contamination. You know us, anything to mitigate unnecessary disasters is kind of a good route. But anyway, the die lights up a different color LED based on the orientation of the cube and it even blinks.

This is a pretty cool hack for wowing your friends at your next PCB art meet-up. We’ll probably put this in the electronics art category, so it doesn’t get lumped in with those other ever-beloved fidget toys.

Continue reading “Bringing Back The Fidget Toy Craze With The Magic Microcontroller Cube”

Quickly Mute And Unmute Yourself Using The Physical Mute Button

With many conferences moving to fully virtual this year, video conferencing will continue to be a mainstay in our lives for the foreseeable future. [Elliot] wanted to spice up his video conferencing experience just a bit and make his experience a bit more ergonomic. We’ve all had the problem of looking for our Zoom window buried behind any number of other applications, desperately searching for the mute button. Furthermore, when we get called on, we’re desperately trying to give the impression that we’ve been paying attention the entire time, even when we haven’t been.

To solve all these problems, he built a physical mute button to easily toggle the mute option on and off during Zoom calls. The device takes advantage of the native USB feature of his Digispark board, and a few built-in keyboard shortcuts in Zoom. With native USB, the Digispark board can act like a keyboard, making it really simple to emulate keyboard presses using the microcontroller. Throw in an arcade-style button and do a bit of handcrafting and you have yourself your own physical mute button.

We were really impressed by the simplicity of the design as well as the elegance of the mechanical assembly. [Elliot] even made a revamped version with a second button allowing him to control his video as well. Cool button(s) [Elliot]!

What’s your favorite work-from-home hack? Check out some of our favorites here on Hackaday.

Continue reading “Quickly Mute And Unmute Yourself Using The Physical Mute Button”