Postage Scale

Fixing A Broken Postage Scale

[Starhawk] had an old Pitney Bowes G799 postage scale that wasn’t working as it should. After years of faithfully measuring packages and cooking ingredients, the scale stopped working. At first it fell out of calibration. Then the power up sequence stopped working. The scale normally would turn on, light up the entire display, then change to dashes, and finally set itself to 0.0 lbs. In this case, it would get stuck at the dashes and never change to 0.0.

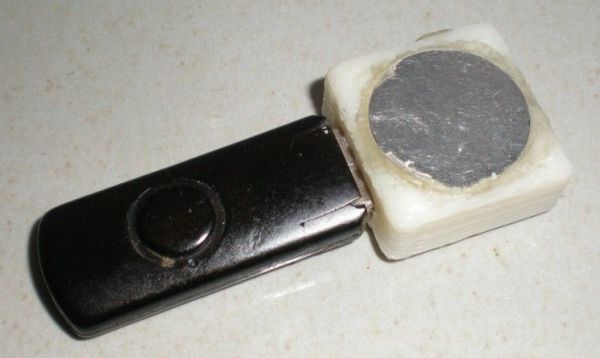
[Starhawk] ended up purchasing another duplicate scale from eBay, only to find that when it arrived it had the exact same power up problem. Using deductive reasoning, he decided that since the scale was broken during shipping the problem would likely be with a mechanical component. He turned out to be correct. The cheap momentary power button was at fault. When pressing the button, the contact would get stuck closed preventing the scale from zeroing out properly. [Starhawk] easily fixed his problem by replacing the switch.

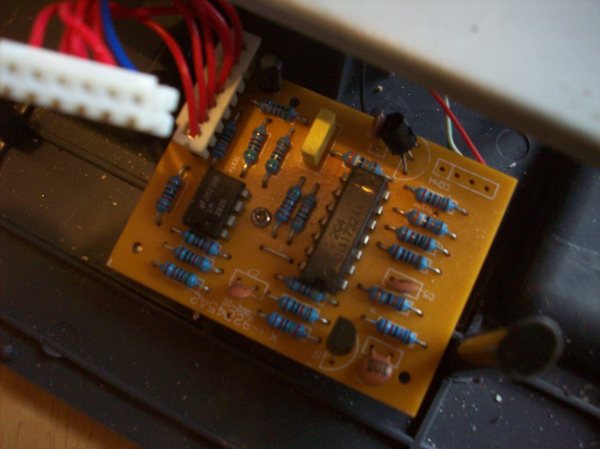
Next [Starhawk] replaced the old scale’s LCD module with one from the new scale, since the old one looked to be on its way out. The scale still had a problem correctly measuring weight. [Starhawk] tried swapping the load cell from the new scale to the old one, but he found that the new load cell had some kind of problem that prevented the scale from zeroing out properly. The solution ended up being to use the newer “analog board” as [Starhawk] calls it.  The end result was the old scale with two newer circuit boards, an older load cell, and a new power switch. Next time it might be easier to just build his own scale.

Alarm1

Adding WiFi And SMS To An Alarm System

[Don] wanted to bring his alarm system into the modern age. He figured that making it more connected would do the trick. Specifically, he wanted his alarm system to send him an SMS message whenever the alarm was tripped.

[Don] first had to figure out a way to trigger an event when the alarm sounds. He found a screw terminal that lead to the siren. When the alarm is tripped, this screw terminal outputs 12V to enable the siren. This would be a good place to monitor for an alarm trip.

[Don] is using an Arduino nano to monitor the alarm signal. This meant that the 12V signal needed to be stepped down. He ran it through a resistor and a Zener diode to lower the voltage to something the Arduino can handle. Once the Arduino detects a signal, it uses an ESP8266 WiFi module to send an email. The address [Don] used is the email-to-SMS address which results in a text message hitting his phone over the cell network.

The Arduino also needed power. [Don] found a screw terminal on the alarm system circuit board that provided a regulated 12V output. He ran this to another power regulator board to lower the voltage to a steady 5V. This provides just the amount of juice the Arduino needs to run, and it doesn’t rely on batteries. [Don] provides a good explanation of the system in the video below. Continue reading “Adding WiFi And SMS To An Alarm System”

Ice Clock

Binary Clock Fit For Queen Elsa’s Ice Palace

When life gives you lemons, you make lemonade. When life gives you freezing cold temperatures and a yard full of snow, you make binary clocks out of ice. At least that’s what [Dennis] does, anyway.

[Dennis’] clock is made from several cylindrical blocks of ice stacked on top of one another. There are six columns of ice blocks. The blocks were made by pouring water into empty margarine containers and freezing them. Once they were frozen, [Dennis] bore a 5/16″ hole into the bottom of each block to house an LED. Wires ran from the LEDs back into the drainage port of a cooler.

The cooler housed the main electronics. The LED controller board is of [Dennis’] own design. It contains six TLC59282 chips allowing for control of up to 96 LEDs. Each chip has its output lines running to two RJ45 connectors. [Dennis] couldn’t just use one because one of the eight wires in the connector was used as a common power line. The main CPU is an Arduino. It’s hooked up to a DS3234 Real Time Clock in order to keep accurate time. The oscillator monitors temperature in order to keep accurate time even in the dead of winter. Continue reading “Binary Clock Fit For Queen Elsa’s Ice Palace”

Power Meter

Electricity Usage Monitor Is Linked To Google Spreadsheets

If you want to make your home more energy-efficient, chances are you will need a way to monitor your electricity usage over time. There are off-the-shelf solutions for this of course, but hackers like us tend to do things our own way. Take [Karl] for example. He recently built himself a solution with only a few smart components. We’ve seen similar projects in the past, but none quite like this.

[Karl’s] home has a power meter that blinks an LED to indicate the current amount of used electricity in Watt-hours. He knew all he needed was a way to electronically detect the blinking LED and he’d be able to accurately track his usage without modifying the meter.

The primary components used in this project were a CC3200 development kit and a photoresistor module. The dev kit contained a WiFi module built-in, which allows the system to upload data to Google spreadsheets as well as sync the built-in clock with an accurate time source. The photoresistor module is used to actually detect the blinking LED on the power meter. Everything else is done easily with code on the dev kit.

USB Cap

Never Forget Your USB Stick Again

USB sticks are very handy. They are a very portable and relatively inexpensive means of storing data. Possibly the most annoying part about using one of these devices is when you inevitable leave it behind somewhere by accident. This is especially true if it contains sensitive information. [Eurekaguy] feels your pain, and he’s developed a solution to the problem.

[Eurekaguy] designed a custom cap for USB sticks that beeps approximately every minute after the USB stick has been plugged in for five minutes. The cap is 3D printed and then slightly modified with four 1mm holes. Two wires are routed between these holes to make contact points for the VCC and GND pins of the USB stick.

The beep circuit is comprised of a tiny PIC12F629 microcontroller along with a couple of other supporting components. The circuit is wired together dead bug style to conserve space. Three AG5 batteries power the circuit. A small piezo speaker provides the repeating beep to remind you to grab your USB stick before you walk away from the computer.

[Thanks Irish]

LeslieSnubber

Organ Donor Gives Up A Leslie Speaker

It was about ten years ago that [Richard] received an old musical organ. Moving to a new house meant it would be cumbersome to move the organ with him, so he opted to harvest some interesting components instead. Specifically, he kept the Leslie speaker.

A Leslie speaker is a special kind of speaker mechanism that creates a tremolo effect as well as a vibrato effect. You can hear this effect in [Richard’s] video below. Simple effects like this would be easy to do on a computer nowadays, but that wasn’t the case several decades ago. Before digital electronics, musical effects were often performed by analog means. [Richard’s] Leslie speaker is a small speaker behind of a Styrofoam baffle. The baffle spins around the speaker which changes the reflection angle of the sound, producing the musical effect.

[Richard] tried hooking this speaker up to other musical instruments but found that turning off the electric motor created an audible pop over the speakers. To remedy this, he build a simple “snubber” circuit. The circuit is just a simple 240 ohm resister and a 0.05 uF capacitor. These components give the transients a path to ground, preventing the pops and clicks when the motor is powered up. Now [Richard] can use this classic piece of audio equipment for newer projects. Continue reading “Organ Donor Gives Up A Leslie Speaker”

TweetHeart Shows You Some Love

[Stacey] wanted a more interesting way to monitor events related to her Twitter account. What she ended up with is a beautiful animated heart light.

Tweetbox
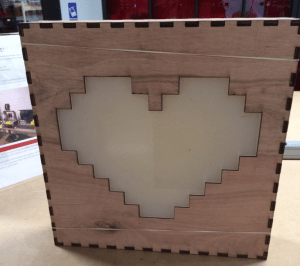
She started out by designing the enclosure. Having access to a laser cutter, she opted to make it out of thin plywood. [Stacey] used an online tool called BoxMaker to design the actual box. The tool is very simple to use. You simply plug in the dimensions of the box and it will provide you with a two dimensional template you can use with your laser cutter. The resulting plywood pieces fit together like a puzzle. The heart piece is made from frosted acrylic and was also cut by the laser.

To light up the heart, [Stacey] opted to use NeoPixels. These are like many of the RGB LED strips we’ve seen in the past, though the pixel density is higher than most. She cut up the LED strip into the appropriate sizes and glued them to a piece of plywood in a rough heart shape. She tested the lights during each step so she would know exactly when any errors were made.

[Stacey] opted to use a SparkCore to control the LEDs. This had the advantage of including WiFi connectivity out of the box.  [Stacey] started with NeoPixel example programs, but quickly realized they all relied on the Delay function. This was a problem for her, because she needed to constantly watch for new Twitter events. She ended up having to write her own functions that relied on interrupts instead.

[Stacey] then wrote a Node.js script to monitor twitter and control the Spark. The script watches for specific events, such as one of [Stacey’s] tweets being re-tweeted, or a user unfollowing [Stacey]. The script then sends a message to the Spark to tell it which event just occurred. The Spark will then repeat the event until a new one occurs. Check out the demonstration video below. Continue reading “TweetHeart Shows You Some Love”