Adaptive guitar: pick board and controller

Hackaday Prize Entry: Adaptive Guitar

Due to a skiing accident, [Joe]’s new friend severed the motor nerves controlling her left arm. Sadly she was an avid musician who loved to play guitar — and of course, a guitar requires two hands. Or does it? Pressing the string to play the complex chords is more easily done using fingers, but strumming the strings could be done electromechanically under the control of a foot pedal. At least that’s the solution [Joe] implemented so beautifully when his friend’s family reached out for help.

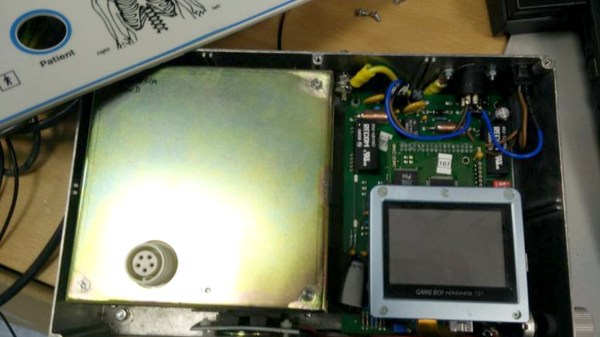
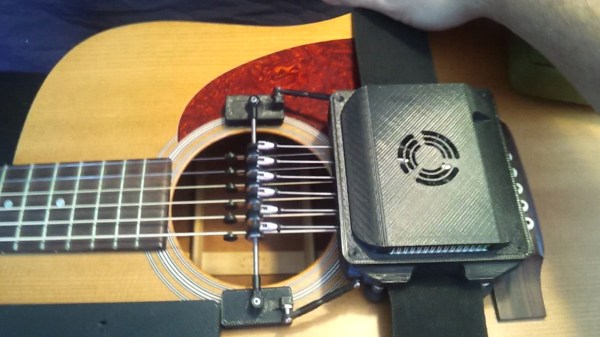
There are just so many things to enjoy while reading through [Joe]’s project logs on his hackaday.io page, which he’s entered into the Hackaday Prize. He starts out with researching how others have solved this problem. Then he takes us through his first attempts and experiments. For example, an early discovery is how pressing the strings on the fretboard pulls the string down where the picks are located, causing him to rethink his initial pick design. His criteria for the pick actuators leads him to make his own. And the actuators he made are a thing of beauty: quiet, compact, and the actuator body even doubles as part of a heat sink for his custom controller board. During his pick design iterations he gets great results using spring steel for flexibility leading up to the pick, but thinking of someday going into production, he comes up with his own custom-designed, laser-cut leaf springs, different for each string.  Needing Force Sensitive Resistors (FCRs) for the foot pedal, he iterates to making his own, laying out the needed interlinked traces on a PCB (using an Eagle script) and putting a piece of conductive rubber over it all. And that’s just a sample of the adventure he takes us on.

In terms of practicality, he’s made great efforts to make it compact and easy to set up. The foot pedal even talks to the control board on the guitar wirelessly. Non-damaging adhesives attach magnets and velcro to the guitar so that the control board and pick bridge can be precisely, yet easily, attached single-handedly. The result is something easy to manage by someone with only one working hand, both for set-up and actual playing. See it for yourself in the video below.

Continue reading “Hackaday Prize Entry: Adaptive Guitar”

Game Boy Advance SP in ECG device

Game Boy Advance Hiding In A Medical Device

It turns out that medical manufacturers also do hacking once in a while. [Jana Marie Hemsing] recently tweeted a photo of an ECG-Trigger-Unit that she’d opened up. Inside she found that the LCD screen was that of a Game Boy Advance (GBA) and the reason she could tell was that the screen’s original case was still there, complete with GAME BOY ADVANCE SP written on it.

In the manufacturer’s defense, this device was likely made around the year 2000 when gaming products were some of the best sources for high speed, high quality, small LCDs displays.  This design document for a portable ECG measurement instrument from as recently as 2013 cites reasons for using a GBA as:

  • impressive plotting results,
  • no serious transmission delays, and
  • fine graphics processing capability.

The Verge had even turned up this US patent from 1997 that has the diagnostic medical device be a cartridge for plugging into a Game Boy. At the time, PCs were frequently used for medical displays but this patent cites issues such as the higher cost of PCs, software installation issues, and crashing. However, they talk about the crashing being due to running word processing and spreadsheet software on the same PC, something not likely to happen if the PC is dedicated to bedside monitoring.

But despite all those pros, wouldn’t you feel surprise and alarm when you first glimpse the Game Boy inside the device that’s monitoring your heart? We also have to wonder what licensing these products went through in the countries in which they were used. This particular device was made by German company Medical Imaging Electronics.

Game Boy hacks aren’t limited to the medical industry though. Here on Hackaday, we’ve seen them turned into remote controls for flying drones and we’ve seen Game Boy cartridge emulators that use STM32. Finally, if you’re wondering where you saw [Jana Marie]’s name before, she was one of the two hackers driving the motorized armchair in a photo in our [Jenny List]’s SHACamp 2017 write-up.

Our thanks to [geonomad] for the tip!

Inventing The Induction Motor

When you think of who invented the induction motor, Nikola Tesla and Galileo Ferraris should come to mind. Though that could be a case of the squeaky wheel being the one that gets the grease. Those two were the ones who fought it out just when the infrastructure for these motors was being developed. Then again, Tesla played a huge part in inventing much of the technology behind that infrastructure.

Although they claimed to have invented it independently, nothing’s ever invented in a vacuum, and there was an interesting progression of both little guys and giants that came before them; Charles Babbage was surprisingly one of those giants. So let’s start at the beginning, and work our way to Tesla and Ferraris.

Continue reading “Inventing The Induction Motor”

Sawed Off Keyboard

Have you ever had to cut a piece of furniture in two to get it into a new place? Yours truly has, having had to cut the longer part of a sectional sofa in two to get it into a high-rise apartment. That’s what [Charles]’ sawed off keyboard immediately reminded us of. It sounds just as crazy, but brilliant at the same time.

In [Charles]’ case he wanted a keypad whose keys were customizable, and that would make a single keypress do common things like cut, copy and paste, which are normally ctrl-X, ctrl-C and ctrl-V in Windows. To do that he literally sawed off the numeric keypad from a full-sized keyboard. He also sawed off the end to the left of the QWERTY keyboard, and glued it onto the open end of his keypad.

The circuit board was too wide to fit in his new keypad, but he couldn’t stretch out the connections from the keypad’s keys to the board. So he did what any self-respecting hacker would do, he cut the circuit board where there were a manageable number of traces, leaving one part that would fit inside the keypad and another part that he could connect the traces to using a few wires. Lastly, he’d started with a PS/2 keyboard but he wanted USB output and programmability. So he redirected the PS/2 wires to an Arduino compatible Pro Micro and wrote some conversion code which you can find on his GitHub.

What other transformations can we do to keyboards? [Shrodingers_Cat] combined his with some DVD case covers to come up with a pedal board for use with his feet. And given that the keys on the numeric keypad are redundant, [Kipkay] put it to use as a hiding place for valuables instead.

Automatic part remover for 3D printer

Automatically 3D Print Infinite Number Of Parts

We’ve seen 3D printers coming out with infinite build volumes, including some attempts at patenting that may or may not stall their development. One way around the controversy is to do it in a completely different way. [Aad van der Geest]’s solution may not give you the ability to print an infinitely long part, but it will allow you to print an infinite number of the same, or different, parts, at least until your spool runs out.

[Aad]’s solution is to have a blade automatically remove each part from the print bed before going on to the next. For that he put together a rail system that sits on the bed of his Ultimaker 2, but out of the way on the periphery. A servo at one end pulls a blade along the rails, sweeping over the bed and moving any parts on the bed to one end where they fall away. This is all done by a combination of special G-code and a circuit built around a PIC12F629.

One of many things that we think is pretty clever, as well as fun to watch, is that after the part is finished, the extruder moves to the top corner of the printer and presses a micro switch to tell the PIC12F629 to start the part removal process. You can see this in the first video below. The G-code takes over again after a configurable pause.

But [Aad]’s put in more features than just that. As the second video below shows, after the parts have been scraped from the build plate, a pin on the extruder is used to lift and drop the blade a few times to remove small parts that tend to stay on the blade. Also, the extruder is purged between prints by being moved over a small ridge a few times. This of course is also in that special G-code.

How do you produce the special G-code, since obviously it also has to include the parts to print? For that [Aad]’s written a Windows program called gcmerge. It reads a configuration file, which you edit, that contains: a list of files containing the G-code for your parts, how many to print, whether or not you want the extruder to be purged between prints, various extruder temperatures, cooling times, and so on. You can find all this, as well as source for the gcmerge program, packaged up on a hackaday.io page. Incidentally, you can find the PIC12F629 code there too.

Continue reading “Automatically 3D Print Infinite Number Of Parts”

Hack Space Debris At Your Peril

Who has dibs on space debris? If getting to it were a solved problem, it sure would be fun to use dead orbital hardware as something of a hacker’s junk bin. Turns out there is some precedent for this, and regulations already in place in the international community.

To get you into the right frame of mind: it’s once again 2100 AD and hackers are living in mile-long space habitats in the Earth-Moon system. But from where do those hackers get their raw material, their hardware? The system abounds with space debris, defunct satellites from a century of technological progress. According to Earth maritime law, if space is to be treated like international waters then the right of salvage would permit them to take parts from any derelict. But is space like international waters? Or would hacking space debris result in doing hard time in the ice mines of Ceres?

Continue reading “Hack Space Debris At Your Peril”

Wall fans for circulating hot ceiling air

Winter Is Coming: Keeping Heat Where It’s Needed

If your workshop has ceilings as high as [Niklas Roy]’s 3.6 meters (11.8 feet), then you’re familiar with his problem. Hot air rises, and there it usually stays until the heat is transferred outdoors. But in the winter time we need that heat indoors and down low. One solution is to install ceiling fans that blow that hot air back down. However, [Niklas] often builds tall things that would collide with those fans. And so he had to hack together some wall hugging fans which will be both high up and out of the way.

Corroded industrial controller

For the fans he’s using six of those ubiquitous standing fans, the ones that normally sit on a post a few feet off the ground and swivel back and forth. Discarding the posts, he mounted the fan bodies to a horizontal wooden frame with a wheel attached to one end, one that he’d made for another project. A rope around the wheel, and hanging down, makes it easy to tilt the fans. For controlling the fans, a friend had given him an old industrial controller, and opening it up, all he saw was corrosion. Cleaning it all out he installed an old Russian 3-position switch from his collection.

In the future he’d like to add a closed-loop control system that would not only turn the fans on and off but also adjusting their speed. For now, however, he reports that it works really well. Check out his page for build photos and more details.

Meanwhile, winter really is coming to these northern latitudes and so here are more hacks to prepare you. For automated shovelling snow, how about an RC controlled 3D printed snow blower. And while you’re snug and warm inside remotely controlling your snow blower, you can still be getting exercise using a DIY bicycle roller. But if you do venture outside, perhaps you’d want to zip around on a dogless dog sleigh.