Arcade With LED Marquee Shows Off Your Game

We’ve seen a lot of arcade machine builds here on Hackaday. Seriously, a lot. Even more so since the Raspberry Pi took over the world and made it so you didn’t have to cannibalize an old laptop to build one anymore. It’s one of those projects with huge appeal: either you’re somebody who’s built their own arcade, or you’re somebody who wishes they had. But even after seeing all these builds, we occasionally come across a specimen that deserves special recognition.

LED display controller

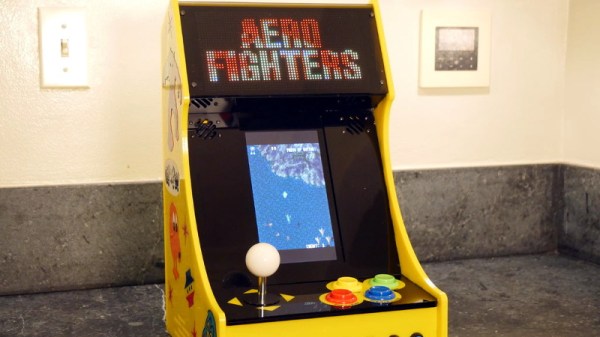
[Al Linke] recently wrote in to tell us about his arcade build, which we think you’ll agree is worth a closer look. The core build is actually a modification of a previously published design, but what makes this one unique is the addition of a programmable LED matrix in the top that actually shows the logo and artwork for whatever game you’re currently playing. This display really helps sell the overall look, and instantly makes the experience that much more authentic. Sure you don’t need the marquee of your home arcade machine to show era-appropriate artwork…but we know you want it to.

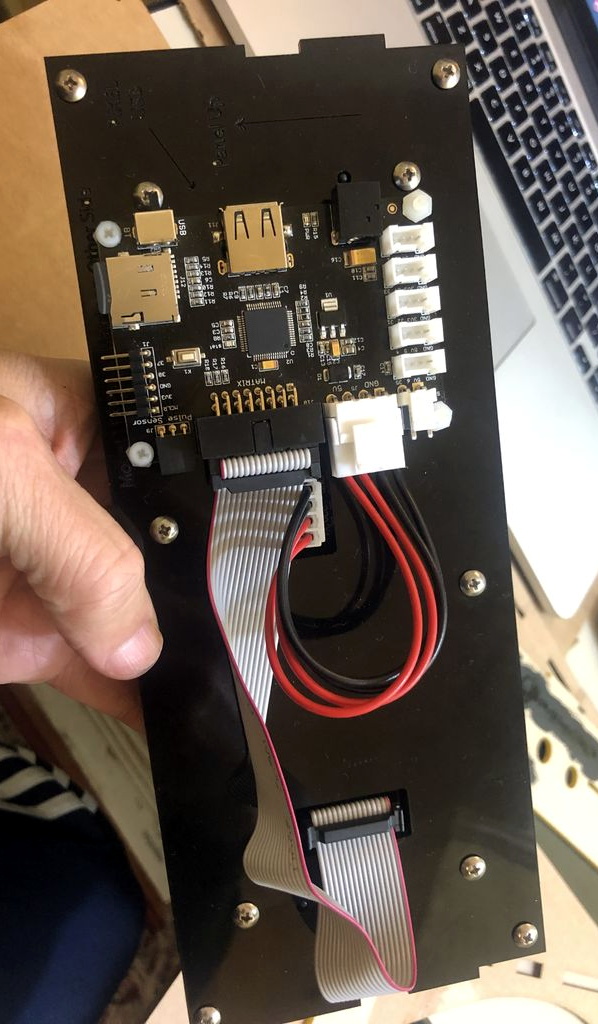
So how does one interface their Raspberry Pi with this beautiful 64×32 LED marquee display? Well it just so happens that [Al] is in the business of making cool LED displays, and even has a couple successful Kickstarter campaigns under his belt to prove it. He’s developed a board that lets you easily connect up to low-cost HUB75 LED panels such as the one used in the arcade. It’s been a few years since we’ve last seen a project that tackled these specific LED displays, and it’s encouraging to see how far things have come since then.

Even if you’re somehow not in love with the LED marquee, this build really does stand on its own as a fantastic example of a desktop arcade machine. [Al] went to great length to document his build, including putting together several videos during different phases of construction. If you’re curious about the start of the art for home arcade builds, this project would be a pretty good one to use as a barometer.

Whether it’s a full-size replica of the machine you spent your youth standing in front of, or an entirely new design made to your exacting specifications, there’s few projects that are a better conversation starter than one of these beauties blinking away in your living room.

Continue reading “Arcade With LED Marquee Shows Off Your Game”

Developing The Ultimate Open Source Radio Control Transmitter

While we’ve come a long way in terms of opening up the world of radio control to open source software, a good deal of the hardware itself is still closed up. You can flash a cheap RC transmitter with a community developed firmware, in fact there’s a decent chance that’s what it ships with, but the hardware itself is still an immutable black box. That might be fine if you’re just flying an RC plane or quadcopter, but what if you’ve got something a bit more advanced in mind?

An in-development version of the hardware.

To address this issue, [Alireza Safdari] has spent the last several years working on a truly open source RC transmitter that can be modified and augmented to meet the user’s needs, called the Alpha V1. With the hardware and software nearing completion, he’s looking to get some community feedback on the system before the planned crowdfunding campaign kicks off.

From his personal experience, [Alireza] found that traditional RC transmitters have their limits when you start using them for robotics. You’ll often want input schemes or devices which would never occur to the remote’s designers, and you’ll almost certainly want to have more channels and functions than the original hardware will allow. One of the big advantages with the Alpha V1 is that the front and back of the controller are simple acrylic panels, meaning you can easily cut openings or drill holes in them to add more hardware without having to deal with the (relatively) ergonomic shapes of a traditional transmitter.

Of course, that’s only one half of the equation. When you add new hardware, you’ll need to make the software aware of it. To that end, [Alireza] says he and his team have developed a library of adaptable firmware modules which should make it very easy to add in new components without having to get bogged down with software configuration. In fact, he says the goal is to allow the user to add new hardware to the Alpha V1 without requiring them to write a single line of code.

The Alpha V1 communicates at 2.4 GHz using either XBee or Murata DNT24 radios, and supports as many as 72 individual channels as well as two-way telemetry. If your requirements aren’t quite so high, we recently covered a significantly less intimidating attempt at building an open source RC transmitter that might suit your needs.

Raspberry Pi Breathes Life Into A Scale Model SEGA

Miniature game consoles are all the rage right now. Many of the big names in gaming are releasing their own official “mini” versions of their classic machines, but naturally we see plenty of DIY builds around these parts as well. Generally they’re enclosed in a 3D printed model of whatever system they’re looking to emulate, but as you might expect that involves a lot of sanding and painting to achieve a professional look.

But for SEGA Genesis (or Mega Drive as it was known outside the US) fans, there’s a new option. A company by the name of Retro Electro Models has released a high-fidelity scale model of SEGA’s classic console, so naturally somebody hacked it to hold a Raspberry Pi. Wanting to do the scale detailing of the model justice, [Andrew Armstrong] went the extra mile to get the power button on the front of the console working, and even added support for swapping games via RFID tags.

[Andrew] uses the Raspberry Pi 3 A+ which ended up being the perfect size to fit inside the model. Fitting the Pi Zero would have been even easier, but it lacks the horsepower of its bigger siblings. The RFID reader is connected to the Pi over SPI, and the reed switch used to detect when the power switch has been moved is wired directly to the GPIO pins. The system is powered by a USB cable soldered directly to Pi’s PCB and ran out a small hole in the back of the case.

For input, [Andrew] is using a small wireless keyboard that includes a touch pad and gaming controls. Unfortunately, it has a proprietary receiver which had to be integrated into the system. In a particularly nice touch, he used snipped off component leads to “wire” the receiver’s PCB directly to the pins of the Pi’s USB port. Not only does it look cool, but provides a rigid enough connection that he didn’t even need to glue it down to keep it from rattling around inside the case. Definitely a tip to keep in the back of your mind.

The software side of this project is about what you’d expect for an emulation console, though with the added trickery of loading games based on their RFID tag. At this point [Andrew] only has a single “cartridge” for the system, so he simply drops the tags into the cartridge slot of the console to load up a new title. It doesn’t look like Retro Electro Models is selling loose cartridges (which makes sense, all things considered), so there might still be a job for your 3D printer yet if you want to have a library of scale cartridges to go with your console.

For those of you who were on Team Nintendo in the 1990’s, we’ve seen a similar build done with a 3D printed case. Of course, if even these consoles are a bit too recent for your tastes, you could build a miniature Vectrex instead.

Continue reading “Raspberry Pi Breathes Life Into A Scale Model SEGA”

Custom Inflatables Are Only A Laser Beam Away

Carl Sagan one said “If you wish to make an apple pie from scratch, you must first invent the universe.” It might not be a very accurate description of the relative difficulty level of baking, but the logic is sound enough: there’s often a lot of ground work that needs to be to covered before you hit your ultimate goal. A perfect example of this principle is the inflatable raft that [ralph124c] hopes to eventually create; before he can set sail he has to perfect making balloon animals with his laser cutter.

In the long run, the raft will be constructed from sheets of TPU coated fabric that are fused together with a hot iron. But before he spends the time and money on building the real thing, he wants to do some scaled down tests to make sure his design works as expected. He makes a cryptic remark about learning the hard way that inflatables are prone to bouts of strange behavior, and out of an overabundance of caution we’ll just take his word for it.

He hoped to test his designs with the much cheaper LDPE film, but he found that the hot iron didn’t fuse it together in the way he was hoping. His mind turned to his 60 watt laser cutter, and wondered if the desired effect could be achieved by turning the power down as low as possible and quickly moving across the material.

His first attempts either blew right through the film or did absolutely nothing, but eventually he had the bright idea to move the laser farther from the LDPE. This put the beam out of focus, which not only expanded the area it would cover, but reduced the energy being delivered to the surface. With a bit more experimentation, he found he was able to neatly weld the pieces of material together. He even found that he could increase the power slightly to cut through the film without having to adjust the laser focus. With the ability to create complex inflatable shapes, perhaps [ralph124c] will create balloon version of Carl Sagan or an apple pie to celebrate.

Of course, this technology isn’t limited to birthday balloons and model rafts. The ability to quickly and easily produce custom inflatable shapes could be a huge boon to anyone working in soft robotics, and we’ve even seen similar concepts applied to haptic feedback systems.

[Thanks to Arthur for the tip.]

The Only Cassette Player Worth Owning In 2019

Vinyl has the audiophiles to keep it relevant, and CDs still have the people who are scared of streaming music, but who mourns for the cassette tape? Yesterday we would have said nobody, but now that [Igor Afanasyev] has unleashed his latest creation onto an unsuspecting world, we aren’t so sure anymore. A portable tape player that started as a $5 find from the Goodwill is now an outrageously gorgeous piece of electronic art thanks to 3D printing and a liberal application of LEDs.

After freeing the tape mechanism from the original enclosure and extraneous electronics like the AM/FM tuner, [Igor] got to work designing a retro styled enclosure for the hardware which would show off the complex electromechanical bits which would traditionally be hidden. With the addition of a clever 3D printed holder, he was even able to add microswitches under the original player’s buttons so he could detect the player’s current state without having to modify the electronics. This lets the finished player change the color of the RGB LEDs based on what it’s currently doing.

[Igor] came up with a very clever way of integrating light-up icons into the case by placing bright LEDs behind specially crafted thin sections of the print. It looked awesome in his tests, but after the considerable sanding, priming, and painting it took to turn the 3D printed parts into a production-quality enclosure, the LEDs are no longer visible on the final product. Even though they didn’t work in this particular case, we think it’s a brilliant technique worthy of stealing further research.

The detail that [Igor] but into this build is phenomenal. Seeing all the individual components he had to design and print to make the final product come together is really nothing short of inspirational. Projects like these are where 3D printing really shines, as trying to replicate this build with traditional manufacturing techniques would be an absolute nightmare.

If you can’t quite shake the feeling that you’ve seen this name or attention to detail before, it’s for good reason. Last year we covered another build showing the knack [Igor] has for turning the ordinary into the extraordinary.

Continue reading “The Only Cassette Player Worth Owning In 2019”

A Scratch Built VFD Clock With Inner Beauty

Vacuum fluorescent displays (VFDs) are one of those beautiful pieces of bygone technology that you just don’t see much of anymore. At one time they were a mainstay of consumer electronics, but today they’ve largely been replaced with cheaper and more energy efficient displays such as LEDs and LCDs. While they might be objectively better displays, we can’t help but feel a pang of regret seeing a modern kitchen bereft of that unmistakable pale green glow.

If his impressive VFD clock is any indication [Simón Berraud] feels the same way. Not only does the clock’s display instantly trigger waves of nostalgia, but the custom PCB has that mistakable look of consumer electronics circa 1985. If we didn’t know better, we’d think this thing fell through a time warp.

Well, if it wasn’t for the SMD ATmega328 on the flip side of the board, anyway. In addition to the MCU, the clock features four ULN2003AN Darlington transistor arrays to drive the VFD, and a M48T08 Real Time Clock to keep the whole thing ticking.

The careful observer might notice a distinct lack of buttons or switches on the clock, and wonder how this retro wonder is set. In a particularly radical hack, [Simón] sets the time with a hard coded variable in the source code; you just need to set it far enough into the future so that you have enough time to power it up at the appropriate moment.

[Simón] has put the Arduino-flavored source code for the ATmega328 as well as the schematics and board files in his GitHub repository for anyone else who might want to take a walk down memory lane. While you’re at it, you may want to look at these tips for getting unknown VFDs up and running, as well as this interesting explanation of how they can be used as amplifiers if you’re really looking for style points.

[Caleb Kraft] Brings Us The Moon, On A Budget

As you might expect from one of our most illustrious alumni, [Caleb Kraft] is a rather creative fellow. Over the years he’s created some absolutely phenomenal projects using CNC routers, 3D printers, laser cutters, and all the other cool toys the modern hacker has access to. But for his latest project, a celebration of the full Moon, he challenged himself to go low-tech. The Moon is something that anyone on Earth can look up and enjoy, so it seemed only fitting that this project should be as accessible to others as possible.

[Caleb] started this project by looking for high-resolution images of the Moon, which was easy enough. He was even able to find sign shops that were more than happy to print a giant version for him. Unfortunately, the prices he was quoted were equally gargantuan. To really be something that anyone could do, this project needed to not only be easy, but as affordable as possible. But where do you get a giant picture of the Moon for cheap?

He eventually found a source for Moon shower curtains (we told you he was creative), which fit the bill perfectly. [Caleb] says they aren’t nearly as detailed as the original images he found, but unless you’ve got your face pressed up against it you’ll never notice anyway. To make the round frame, he used PEX tubing from the hardware store and simply stapled the curtain directly to the soft plastic. The hardest part of the whole project is arguably getting the curtain flat and taut on the PEX ring.

Technically you could stop now and have a pretty slick piece of art to hang on your wall, but [Caleb] took the idea a bit farther and put a strip of RGB LEDs along the inside of the ring. The shower curtain material does a decent enough job of diffusing the light of the LEDs to make it look pretty good, though there’s certainly some room for improvement if you want to get a more even effect over the entire surface. While you’re at it, you might as well add in some additional electronics so the lighting matches the current phase of the real-life Moon.

On the other hand, if you’re willing to settle for a far more diminutive version of Luna and don’t mind using those highfalutin hacker tools that [Caleb] decided to avoid for the good of mankind, we’ve got a project you might be interested in.

Continue reading “[Caleb Kraft] Brings Us The Moon, On A Budget”