Designing A Drone To Fire From A Grenade Launcher

You might think that tiny autonomous drones that can be fired out of a standard 40 mm grenade launcher for rapid deployment would be the kind of thing the military would love to get their hands on. Which is true, of course, and a number of companies are working on the idea for police and military applications. But [Glytch] thinks the technology could also be used for search and rescue operations, so he’s working on creating a version for us civilians.

During his presentation “3D Printing Canister-Launchable Drones for City-Scale Wardriving” at the 2019 CircleCityCon, [Glytch] gave an overview of his progress towards creating a small fixed-wing Unmanned Aerial Vehicle (UAV) that can be built even by those of us who don’t have the budgets of a three letter government agency. He’s not at the point where he can do a test launch just yet, but the design is coming along nicely, and we’re extremely interested in seeing where it goes from here.
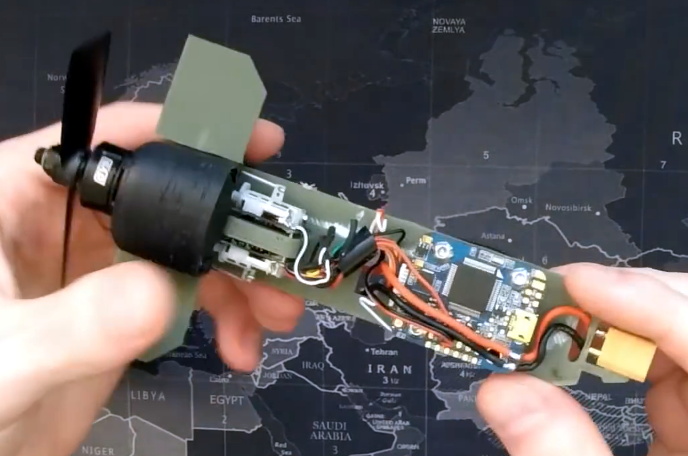
The only way you’re fitting a winged aircraft into the bore of a 40 mm launcher is by folding it up, and so far, that’s where [Glytch] has directed most of his efforts. The wings of his UAV will use a rigid leading edge that folds flat until deployment. When in flight mode, ripstop nylon attached between the body of the drone and the leading edge will be pulled taught to form the actual wing surface; think of it sort of like a bat’s wing. A similar trick will be used for the two control surfaces at the rear of the craft.

Internally, the UAV is using all off-the-shelf components which [Glytch] hopes will keep it cheap enough that they could eventually be mass produced. As he explained in a recent YouTube video, the motor, speed controller, receiver, and flight controller, are all the sort of thing you’d expect to find in a small RC quadcopter. To make it easier to manage the UAV in the field, the batteries and payload will be housed in a detachable nose cone; allowing the user to rapidly configure the hardware for different missions.

Right now, [Glytch] says the biggest obstacle keeping his drone out of the air is finding a foldable propeller with the specific characteristics he requires. Unable to find anything commercially available, he’s currently looking into designing it himself and having it 3D printed on an SLA machine. He also needs to design a sabot to hold the drone as it travels through the barrel of the launcher. Incidentally, he’s currently testing his design with an Airsoft grenade launcher, as he doesn’t want to wade through the paperwork involved in getting the real deal.

[Glytch] is no stranger to the world of high-tech UAVs. The “Watch Dog” inspired hacking drone he created last year was a huge hit, and he’s recently been working on a HD video and telemetry link over WiFi with the Raspberry Pi Zero for his flying creations.

Continue reading “Designing A Drone To Fire From A Grenade Launcher” →

Overengineering The Humble USB Power Bank

Back in the flip phone days, you could get through the whole weekend before you had to even think about plugging the thing in. But as the processing power of our mobile devices increased, so to did their energy consumption. Today you’re lucky if your phone doesn’t die before you make it home at the end of the day. To avoid the horrors of having to live without their mobile devices, many people have resorted to lugging around small “power banks” to keep their phones topped off.

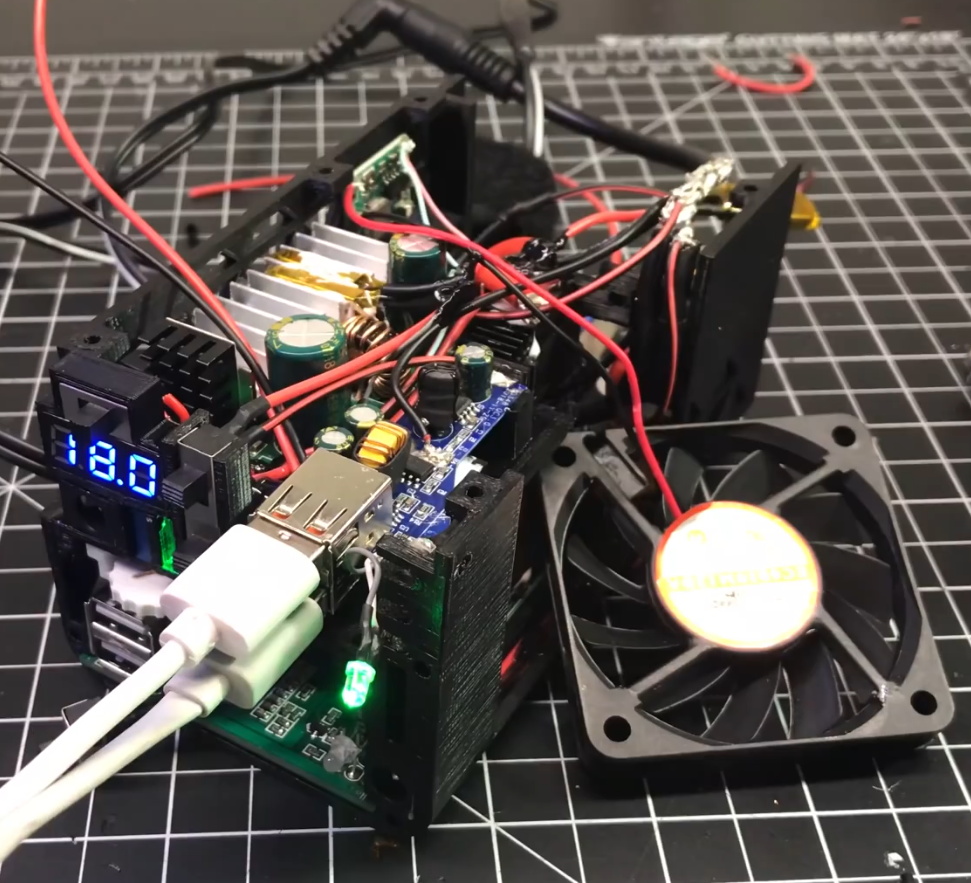
That said, the “Ultimate 18650 Power Bank” created by [Kennedy Liu] is on a whole new level. Only true Road Warriors need apply for this particular piece of kit. Inside the 3D printed enclosure is…well, pretty much everything. It’s got an internal inverter to power your AC devices, a Qi wireless charging coil, an adjustable DC output, displays for all relevant voltages, and naturally plenty of USB ports to charge your gadgets. Oh, and some RGB LEDs tossed in for good measure.

[Kennedy] packed a lot of hardware into this relatively small package, and in the video after the break, shows off exactly how everything is arranged inside of this power bank. A big part of getting the whole thing together is the 3D printed frame, which includes carefully designed insets for all of the key components. So if you want to build your own version, you’ll need to get the exact same hardware he used to make sure the puzzle fits together. Luckily, he’s provided links for all the relevant components for exactly that purpose.

Now, you might be wondering about the wisdom of packing all this electronic gear into a thermoplastic enclosure. But [Kennedy] has thought about that; in addition to tacking a heatsink onto pretty much everything, he’s added fans for active cooling and a fairly robust thermal overload protection scheme. By mounting thermally controlled switches to the heatsinks of the high-output components, the system can cut power to anything getting too hot before it has a chance to melt the plastic (or worse).

Most of the DIY power banks we’ve seen in the past have been little more than a simple collection of 18650 cells, so it’s interesting to see one with so much additional functionality packed in. Admittedly some elements of the construction are, to quote the great Dave Jones, “a bit how ya doin.” But with some refinements we think it would be a very handy device to have in your arsenal.

Continue reading “Overengineering The Humble USB Power Bank” →

Mobile SIGINT Hacking On A Civilian’s Budget

Signals Intelligence (SIGINT) refers to performing electronic reconnaissance by eavesdropping on communications, and used to be the kind of thing that was only within the purview of the military or various three letter government agencies. But today, for better or for worse, the individual hacker is able to pull an incredible amount of information out of thin air with low-cost hardware and open source software. Now, thanks to [Josh Conway], all that capability can be harnessed with a slick all-in-one device: the RadioInstigator.

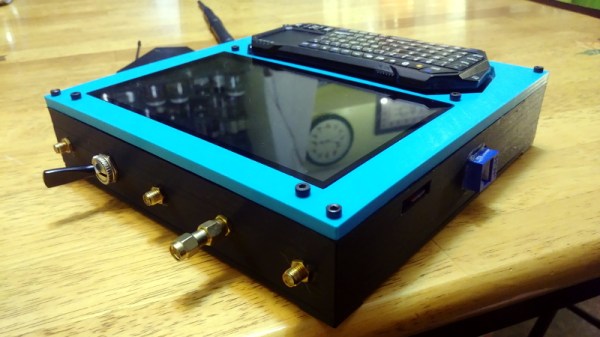
In his talk at the recent 2019 CircleCityCon, [Josh] (who also goes by the handle [CrankyLinuxUser]) presented the RadioInstigator as an affordable way to get into the world of wireless security research beyond the traditional WiFi and Bluetooth. None of the hardware inside the device is new exactly, it’s all stuff the hacking community has had access to for a while now, but this project brings them all together under one 3D printed “roof” as it were. The end result is a surprisingly practical looking device that can be used on the go to explore huge swaths of the RF spectrum at a cost of only around $150 USD.

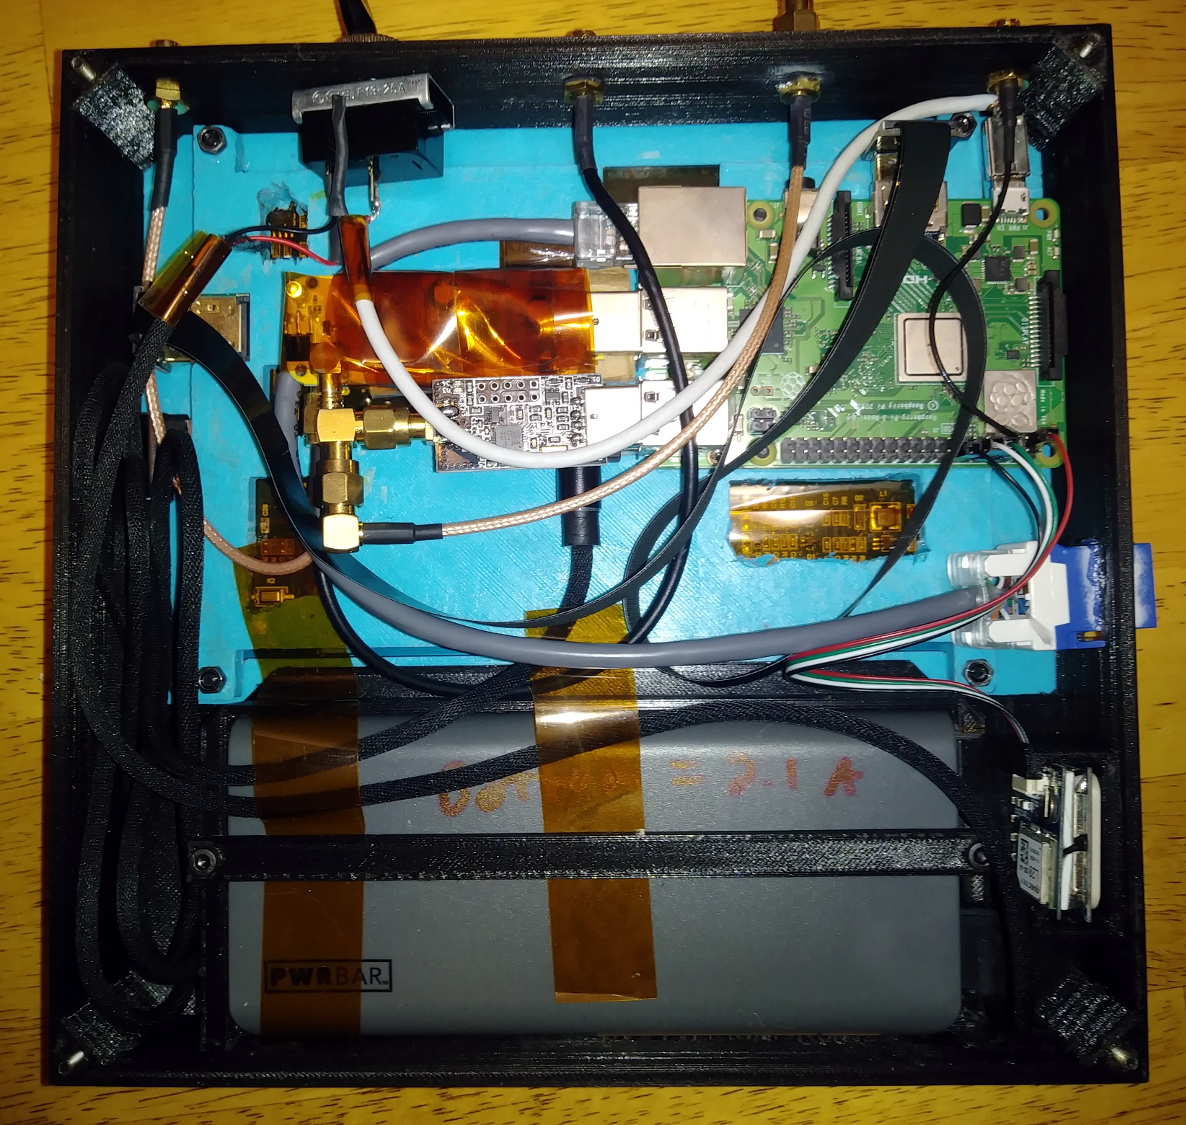
So what has [Josh] packed into this wireless toybox? It will probably come as little surprise to find out that the star of the show is a Raspberry Pi 3 B+, combined with a touch screen display and portable keyboard so the user can interface with the various security tools installed.

To help the RadioInstigator surf the airwaves there’s an RTL-SDR and a 2.4 Ghz nRF24LU1+ “Crazyradio”, both broken out to external antenna connectors on the outside of the device. There’s even an external SMA connector hooked up to the Pi’s GPIO pin, which can be used for low-power transmissions from 5 KHz up to 1500 MHz with rpitx. Everything is powered by a beefy 10,000 mAh battery pack which should give you plenty of loiter time to perform your investigations.

[Josh] has also written several Bash scripts which will get a trove of radio hacking tools installed on the Pi automatically, either by pulling them in through the official repositories or downloading the source and compiling them. Getting the software environment into a known-good state can be a huge time sink, so even if you don’t build your own version of the RadioInstigator, his scripts are still worth checking out.

You can do some pretty incredible things with nothing more than a Pi and an RTL-SDR, but we can’t help but notice there’s still plenty of room inside the RadioInstigator for more gear. It could be the perfect home for a Mult-RTL setup, or maybe even a VGA adapter for spoofing cell networks.

Continue reading “Mobile SIGINT Hacking On A Civilian’s Budget” →

Your Table Is Ready, Courtesy Of HackRF

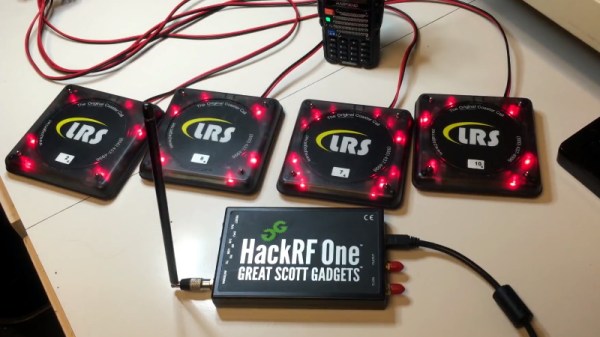
Have you ever found yourself in a crowded restaurant on a Saturday night, holding onto one of those little gadgets that blinks and vibrates when it’s your turn to be seated? Next time, bust out the HackRF and follow along with [Tony Tiger] as he shows how it can be used to easily fire them off. Of course, there won’t actually be a table ready when you triumphantly show your blinking pager to the staff; but there’s only so much an SDR can do.

Even if you aren’t looking to jump the line at your favorite dining establishment, the video that [Tony] has put together serves as an excellent practical example of using software defined radio (SDR) to examine and ultimately replicate a wireless communications protocol. The same techniques demonstrated here could be applied to any number of devices out in the wild with little to no modification. Granted these “restaurant pagers” aren’t exactly high security devices to begin with, but you’d be horrified surprised how many other devices out there take a similarly cavalier attitude towards security.

[Tony] starts by using inspectrum to examine the Frequency-shift keying (FSK) modulation used by the 467.750 Mhz devices, and from there, uses Universal Radio Hacker to capture the actual binary data being sent over the air. Between studying the transmissions and the information he found online, he was eventually able to piece together the packet structure used by the restaurant’s base station.

Finally, he wrote a Python script which generates packets based on which pager he wants to set off. If he’s feeling particularly mischievous, he can even set them all off at once. The script outputs a binary file which is then loaded into GNU Radio for transmission via the HackRF. [Tony] says he’s not quite ready to release his script yet, but he gives enough information in the video that the intrepid hacker could probably get their own version up and running by the time he gets it posted up to GitHub anyway.

We saw some very similar techniques demonstrated at the recent WOPR Summit security conference, so once you’re done hacking the local restaurants, you can take these same lessons and apply them to the rest of the Internet of Things. If you’re wondering, it’s even easier to eavesdrop on the non-restaurant pagers.

Continue reading “Your Table Is Ready, Courtesy Of HackRF” →

Simple Arduino Universal Remote Control

The infrared remote control might not hold the seat of honor in the average home theater setup that it once enjoyed, but it’s not quite out to pasture yet. After all, what are you going to use to stop Netflix once the Chromecast invariably disconnects from your phone? As long as there are devices out there that will respond to commands blasted their way via an IR LED, hackers will be looking to get in on the action.

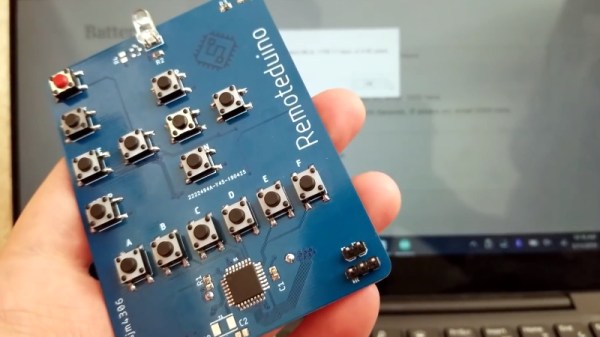
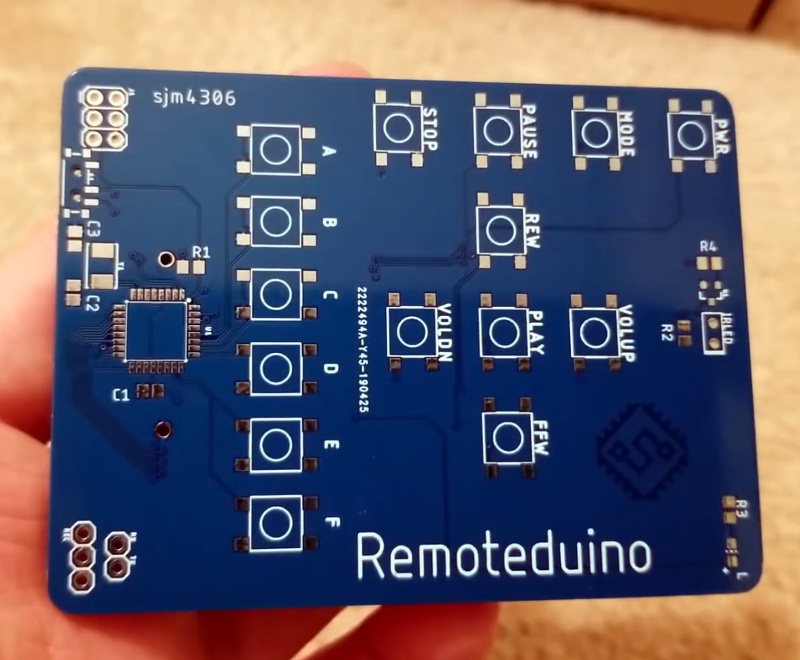
In an effort to make IR remote hacking just a bit easier, [sjm4306] has submitted his Remoteduino for the 2019 Hackaday Prize. With this handy tool in your arsenal, you can focus on developing the software side of your next IR remote project without worry about the hardware. Just upload your code, and get clicking.

As you might imagine, the design is rather simple. On the front edge of the PCB you’ve got the prerequisite IR LED, and a healthy supply of tactile buttons that your code can use as input. The remote features a fairly standard layout on the top half, complete with silkscreened labels for the common functions, but below that [sjm4306] has packed in six general purpose buttons that can be used for whatever you like.

The Remoteduino is powered by an ATmega328P, and the whole thing runs on a CR2032 cell mounted on the backside. [sjm4306] mentions in his write-up on Hackaday.io that battery life was always a consideration during development of the Remoteduino, so he’s made a few energy-saving considerations. Using the internal 8 MHz oscillator instead of an external crystal shaved a bit off the top, and the aggressive sleep routines got him the rest of the way. In testing, he estimates the battery should last a few years even with daily use.

Continue reading “Simple Arduino Universal Remote Control” →

Repairdown: Disklavier DKC500RW Control Unit

If you’ve been kind enough to accompany me on these regular hardware explorations, you’ve likely recognized a trend with regards to the gadgets that go under the knife. Generally speaking, the devices I take apart for your viewing pleasure come to us from the clearance rack of a big box retailer, the thrift store, or the always generous “AS-IS” section on eBay. There’s something of a cost-benefit analysis performed each time I pick up a piece of gear for dissection, and it probably won’t surprise you to find that the least expensive doggy in the window is usually the one that secures its fifteen minutes of Internet fame.

DKC500RW installed on right side.

But this month I present to you, Good Reader, something a bit different. This time I’m not taking something apart just for the simple joy of seeing PCB laid bare. I’ve been given the task of repairing an expensive piece of antiquated oddball equipment because, quite frankly, nobody else wanted to do it. If we happen to find ourselves learning about its inner workings in the process, that’s just the cost of doing business with a Hackaday writer.

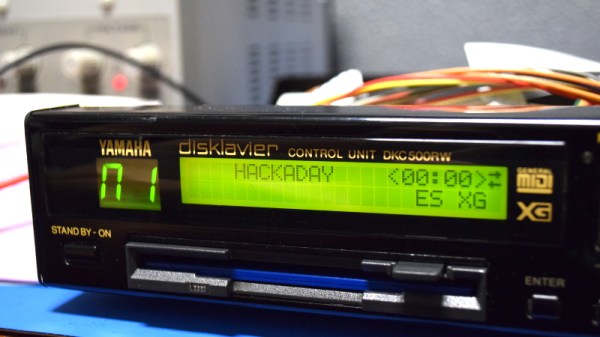
The situation as explained to me is that in the late 1990’s, my brother’s employer purchased a Yamaha Mark II XG “Baby Grand” piano for somewhere in the neighborhood of $20,000. This particular model was selected for its ability to play MIDI files from 3.5 inch floppy disks, complete with the rather ghostly effect of the keys moving by themselves. The idea was that you could set this piano up in your lobby with a floppy full of Barry Manilow’s greatest hits, and your establishment would instantly be dripping with automated class.

Unfortunately, about a month or so back, the piano’s Disklavier DKC500RW control unit stopped reading disks. The piano itself still worked, but now required a human to do the playing. Calls were made, but as you might expect, most repair centers politely declined around the time they heard the word “floppy” and anyone who stayed on the line quoted a price that simply wasn’t economical.

Before they resorted to hiring a pianist, perhaps a rare example of a human taking a robot’s job, my brother asked if he could remove the control unit and see if I could make any sense of it. So with that, let’s dig into this vintage piece of musical equipment and see what a five figure price tag got you at the turn of the millennium.

Continue reading “Repairdown: Disklavier DKC500RW Control Unit” →

Freeform ESP8266 Network Attached Data Display

Like many of us, [Josef Adamčík] finds himself fascinated with so-called “freeform” electronic designs, where the three dimensional circuit makes up sections of the device’s structure. When well executed, such designs really blur the line between being a practical device and an artistic piece. In fact his latest design, an ESP8266 MQTT client, would seem to indicate there might not be much of a “line” at all.

The inspiration for this project actually comes from something [Josef] had worked on previously: an ESP8266-based environmental monitoring system. That device had sensors to pick up on things such as humidity and ambient light level, but it didn’t have a display of its own; it just pushed the data out onto the network using MQTT. So he thought a companion device which could receive this environmental data and present it to him in a unique and visually appealing way would be a natural extension of the idea.

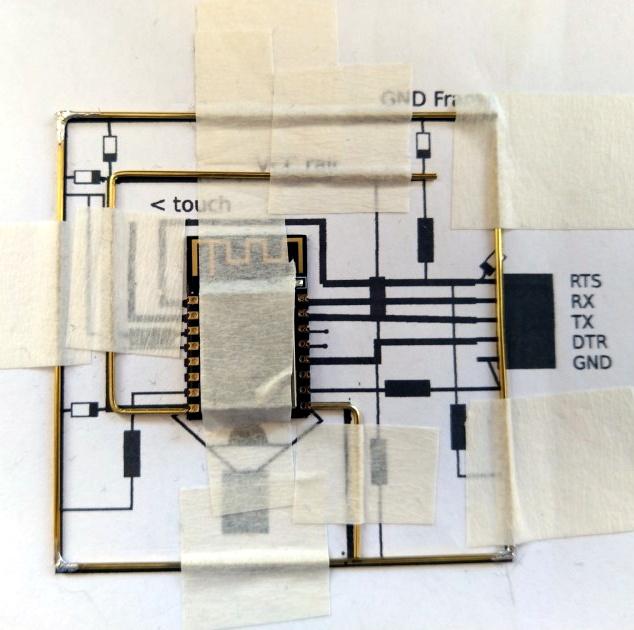
As the display doesn’t need any local sensors of its own, it made the design and construction much easier. Which is not to say it was easy, of course. In this write-up, [Josef] takes the reader through the process of designing each “layer” of the circuit in 2D, printing it out onto paper, and then using that as a guide to assemble the real thing. Once he had the individual panels done, he used some pieces of cardboard to create a three dimensional jig which helped him get it all soldered together.

On the software side it’s pretty straightforward. It just pulls the interesting bits of information off of the network and displays it on the OLED. Right now it’s configured to show current temperature on the display, but of course that could be changed to pretty much anything you could imagine if you’re looking to add a similar device to your desktop. There’s also a red LED on the device which lights up to let [Josef] know when the batteries are getting low on the remote sensor unit; a particularly nice touch.

If you’d like to see more of these freeform circuits, we’d advise you to checkout the finalists for our recently concluded “Circuit Sculpture” contest. Some of the finalists are truly beyond belief.