Stretched PC Case Turned GPU Cryptominer

We don’t do financial planning here at Hackaday, so we won’t weigh in on the viability of making money mining cryptocurrency in such a volatile market. But we will say that if you’re going to build a machine to hammer away at generating Magical Internet Monies, you might as well make it cool. Even if you don’t turn a profit, at least you’ll have something interesting to look at while you weep over your electricity bill.

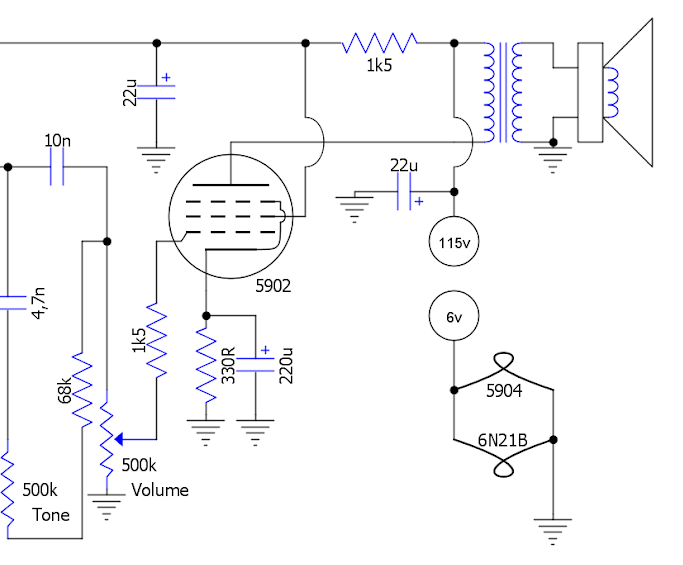
Sick of seeing the desktop machine he built a decade ago gathering dust, [plaggle24w5] decided to use it as the base for a cryptocurrency mining rig. Of course, none of the original internals would do him any good, but the case itself ended up being a useful base to expand on. With the addition of some 3D printed components, he stretched out the case and installed an array of video cards.

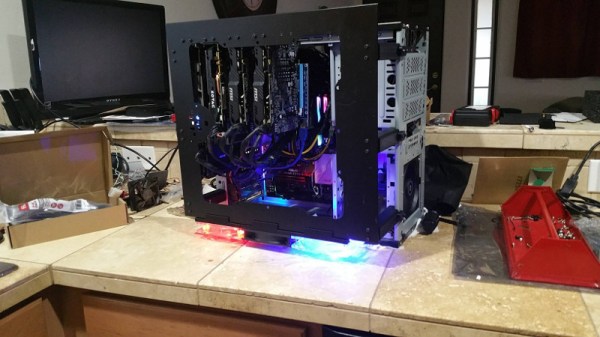
To start with, all the original plastic was ripped off, leaving just the bare steel case. He then jammed a second power supply into the original optical drive bays to provide the extra power those thirsty GPUs would soon be sucking down. He then designed some 3D printed arms which would push out the side panel of the case far enough that he could mount the video cards vertically alongside the case. Three case fans were then added to the bottom to blow air through the cards.

While [plaggle24w5] mentions this arrangement does work with the case standing up, there’s obviously not a lot of air getting to the fans on the bottom when they’re only an inch or so off the ground. Turning the case on its side, with the motherboard parallel to the floor, allows for much better airflow and results in a measurable dip in operating temperature. Just hope you never drop anything down onto the exposed motherboard…

Mining Bitcoin on desktop computers might be a distant memory, but the latest crop of cryptocurrencies are (for now) giving new players a chance to relive those heady early days.

3D Printing Brings A Child’s Imagination To Life

Telling somebody that you’re going to make their dreams come true is a bold, and potentially kind of creepy, claim. But it’s one of those things that isn’t supposed to be taken literally; it doesn’t mean that you’re actually going to peer into their memories, extract an idea, and then manifest it into reality. That’s just crazy talk, it’s a figure of speech.

Original sketch of the CURV II

As it turns out, there’s at least one person out there who didn’t get the memo. Remembering how his father always told him about the elaborate drawings of submarines and rockets he did as a young boy, [Ronald] decided to 3D print a model of one of them as a gift. Securing his father’s old sketchpad, he paged through until he found a particularly well-developed idea of a personal sub called the CURV II.

The final result looks so incredible that we hear rumors manly tears may have been shed at the unveiling. As a general rule you should avoid making your parents cry, but if you’re going to do it, you might as well do it in style.

Considering that his father was coming up with detailed schematics for submarines in his pre-teen days, it’s probably no surprise [Ronald] has turned out to be a rather accomplished maker himself. He took the original designs and started working on a slightly more refined version of the CURV II in SolidWorks. Not only did he create a faithful re-imagining of his father’s design, he even went as far as adding an interior as well as functional details such as the rear hatch. Continue reading “3D Printing Brings A Child’s Imagination To Life”

Skull Cane Proves Bondo Isn’t Just For Dents

[Eric Strebel] is quickly becoming a favorite here at Hackaday. He’s got a fantastic knack for turning everyday objects into something awesome, and he’s kind of enough to document his builds for the viewing pleasure of hackers and makers everywhere. It also doesn’t hurt that his voice and narration style gives us a real Bob Ross vibe.

The latest “Happy Accident” out of his workshop is a neat light-up cane made from a ceramic skull found at a local store. But while the finished cane itself might not be terribly exciting, the construction methods demonstrated by [Eric] are well worth the price of admission. Rather than using Bondo like the filler we’re all accustomed to, he shows how it can be used to rapidly build free-form structures and components.

After building up layers of Bondo, he uses a cheese grater to smooth out the rough surface and a hobby knife to clean up the edges. According to [Eric], one of the benefits of working with Bondo like this is that it’s very easy to shape and manipulate before it fully hardens; allowing you to really make things up as you go.

[Eric] also shares a little secret about how he makes his gray Bondo: he mixes some of the toner from a laser printer cartridge into it. This allows you to very cheaply augment the color of the filler, and is definitely something to file away for future reference.

If the video below leaves you hungry for more [Eric Strebel], check out his fantastic series on working with foam core, which should lead you right down the rabbit hole to his DIY foam core spray painting booth.

Continue reading “Skull Cane Proves Bondo Isn’t Just For Dents”

QuickBASIC Lives On With QB64

When I got my first computer, a second hand 386 running MS-DOS 6.22, I didn’t have an Internet connection. But I did have QuickBASIC installed and a stack of programming magazines the local library was throwing out, so I had plenty to keep myself busy. At the time, I thought QuickBASIC was more or less indistinguishable from magic. I could write simple code and compile it into an .exe, put it on a floppy, and give it to somebody else to run on their own machine. It seemed too good to be true, how could this technology possibly be improved upon?

Of course, that was many years ago, and things are very different now. The programming languages du jour are worlds more capable than the plodding BASIC variants of the 80’s and 90’s. But still, when I found a floppy full of programs I wrote decades ago, I couldn’t help but wonder about getting them running again. With something like DOSBox I reasoned I should be able to install the QuickBASIC IDE and run them like I was back on my trusty 386.

Unfortunately, that was not to be. Maybe I’m just not well versed enough in DOSBox, but I couldn’t get the IDE to actually run any of the source code I pulled off the floppy. This was disappointing, but then it occured to me that modern BASIC interpreters are probably being developed in some corner of the Internet, and perhaps I could find a way to run my nearly 30 year old code without having to rely on 30 year old software to do it. Continue reading “QuickBASIC Lives On With QB64”

ESP-01 Bridges The Gap Between IR And WiFi

[Emilio Ficara] dropped us a line recently about his efforts to drag his television and receiver kicking and screaming into the modern era. His TV is old enough that it needs an external tuner, which means it requires two separate remotes to properly channel surf. He wanted to simplify the situation, and figured that while he was at it he might as well make the whole thing controllable over WiFi.

To begin the project, [Emilio] had to capture the IR signals from the two remotes he wanted to emulate. He put together a quick little IR receiver out of parts he had in the junk bin which would connect up to his computer’s microphone port. He then used an open source IR protocol analyzer to capture the codes and decode them into hex values.

As a proof of concept he came up with a little device that combines an ESP-01 with an ATmega88. The ESP-01 runs a minimal web server that receives hex codes as URL query strings. These hex codes are then interpreted by the ATmega88 and sent out over the IR LED. [Emilio] notes that driving the IR LED directly off of the ATmega pin results in fairly low range of around one meter, but that’s good enough for his purposes. If you want to drive the IR LED with more power, you’ll need to add a transistor to do the switching.

Passing the hex code 0x0408 to turn off the TV

Now that he can decode the signals from his original remotes and transmit them over WiFi via his bridge device, he has all the groundwork he needs to come up with a streamlined home entertainment controller. A native application for his smartphone or perhaps a minimal web interface is the last piece of the puzzle.

This project reminds us of a similar attempt at controlling legacy IR devices from a smartphone via Bluetooth. If you’re looking for more information about wrangling IR signals from your microcontroller, this primer from 2013 is still a great look at the subject.

Invasion Of The Tiny Magnetic PCB Vises

[Proto G] recently wrote in to share a very slick way of keeping tabs on all the tiny PCBs and devices that litter the modern electronics workbench. Rather than a big bulky PCB vise for each little board, he shows how to make tiny grippers with magnetic bases for only a couple bucks each. Combined with a sheet metal plate under an ESD mat, it allows him to securely position multiple PCBs all over his workspace.

The key to this hack is the little standoffs that are usually used to mount signs to walls. These already have a clamping action by virtue of their design, but the “grip” of each standoff is improved with the addition of a triangular piece of plastic and rubber o-ring.

With the gripping side of the equation sorted, small disc magnets are glued to the bottom of each standoff. With a suitable surface, the magnets are strong enough to stay upright even with a decently large PCB in the jaws.

An especially nice feature of using multiple small vises like this is that larger PCBs can be supported from a number of arbitrary points. It can be difficult to clamp unusually shaped or component-laden PCBs in traditional vises, and the ability to place them wherever you like looks like it would be a huge help.

We’ve recently covered some DIY 3D printed solutions for keeping little PCBs where you want them, but we have to say that this solution looks very compelling if you do a lot of work on small boards.

Continue reading “Invasion Of The Tiny Magnetic PCB Vises”

Tiny Guitar Amp Rebuilt With Tiny Tubes

[Blackcorvo] wrote in to tell us how he took a cheap “retro” guitar amplifier and rebuilt it with sub-miniature vacuum tubes. The end result is a tiny portable amplifier that not only looks the part, but sounds it to. He’s helpfully provided wiring schematics, build images, and even a video of the amplifier doing it’s thing.

Detail from the circuit diagram

The original Honeytone amplifier goes for about $26, and while it certainly looks old-school, the internals are anything but. [Blackcorvo] is too much of a gentleman to provide “before” pictures of the internals, but we looked it up and let’s just say it doesn’t exactly scream high quality audio. Reviews online seem to indicate it works about as well as could be expected for an amplifier that costs less than $30, but this is definitely no audiophile gear.

Powering up the miniature vacuum tubes takes a bit of modern support electronics, including a buck converter to provide the high voltage for the tubes as well as a 6V regulator. The plus side is that the new circuit can power the tubes from an input voltage between 12 and 30 volts, meaning the amplifier can still be powered by batteries if you want to take it on the go.

We’ve seen some fantastic tube amplifier builds over the years, proving that some things never go out of style. If you’d like to learn more about the magic that lets these little tubes of hot pixies make beautiful music, the US Army has you covered.

Continue reading “Tiny Guitar Amp Rebuilt With Tiny Tubes”