Here Are The Ten Finalists For The Hackaday Prize Wildcard Challenge

Each phase of the 2021 Hackaday Prize challenged designers to reimagine traditional solutions within various fields, from robotics to assistive devices. But for the Reactivate Wildcard, the fifth and final Challenge of this year’s Prize, this theme of Rethink, Refresh, Rebuild could be applied on anything the entrant wanted. Today we’re pleased to announce the ten Wildcard projects that have been selected to win $500 and move onto the finals. Who will win the top spot this year? We’ll find out during Hackaday Remoticon in just a few weeks!

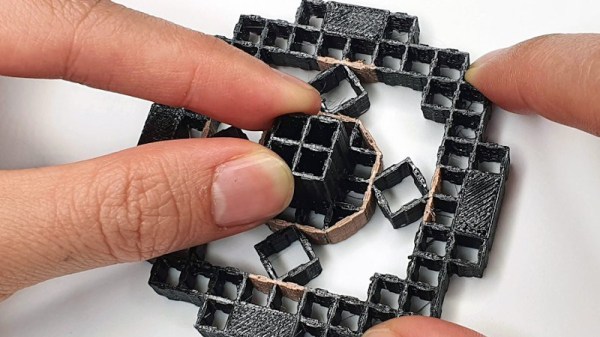
The MetaSense project is a perfect example of how new technology can be used to rethink what we generally consider to be a solved problem. This project leverages multi-material 3D printing to produce conductive cells which vary their capacitance in response to physical deformation. With some clever geometry, these cells can be chained together to produce single-part devices which can stand in for traditional toggle switches, joysticks, pressure sensors, and even accelerometers.

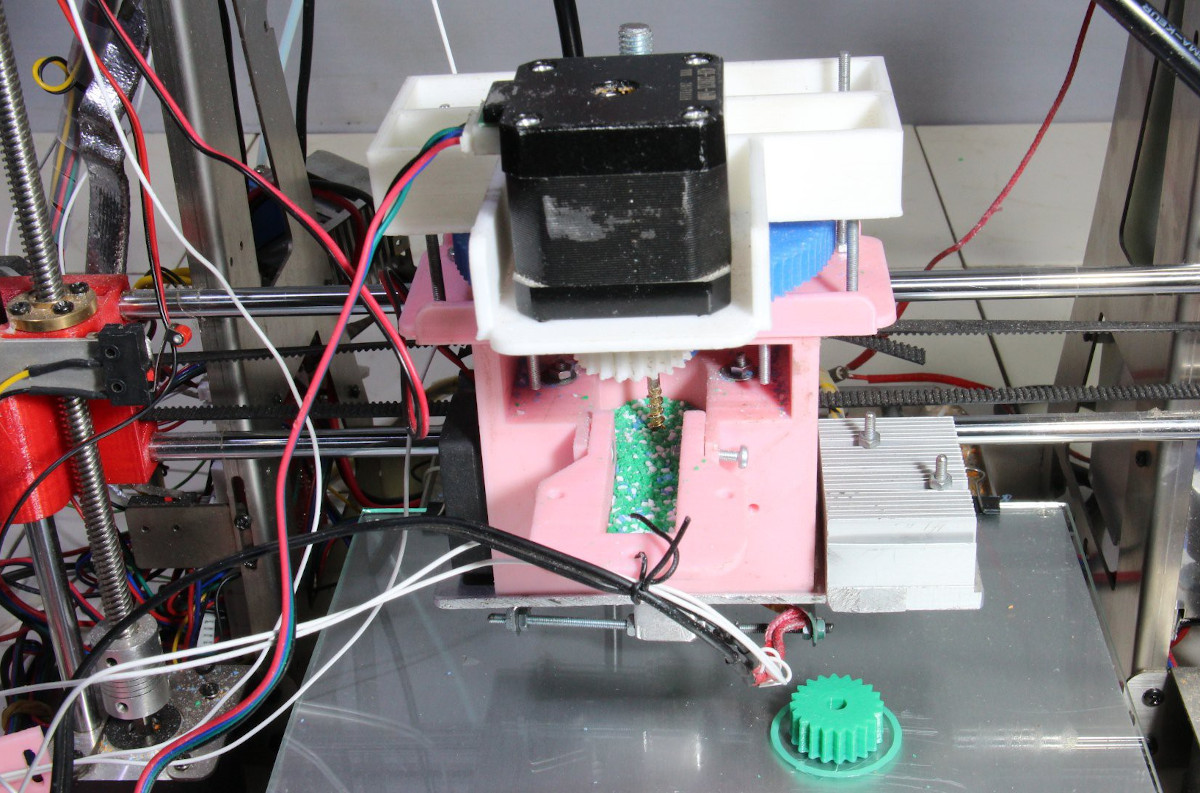
Speaking of 3D printing, the Direct Granules Extruder project imagines a future were desktop printers are no longer limited to using rolls of manufactured filament. The key is a robust extruder design that can grind up plastic pellets fast enough to feed them directly into the hotend of a conventional 3D printer. This not only means a considerable operational savings, as raw plastic pellets are much cheaper than filament by weight, but would potentially allow for printing with more exotic plastic blends and even recycled materials.

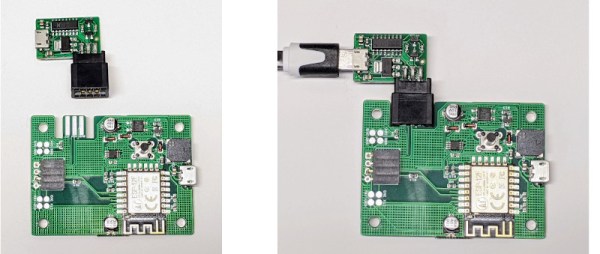
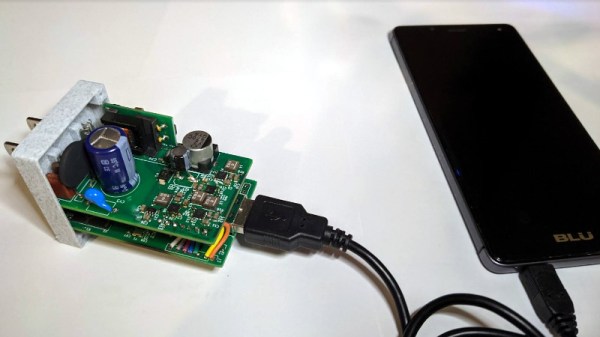
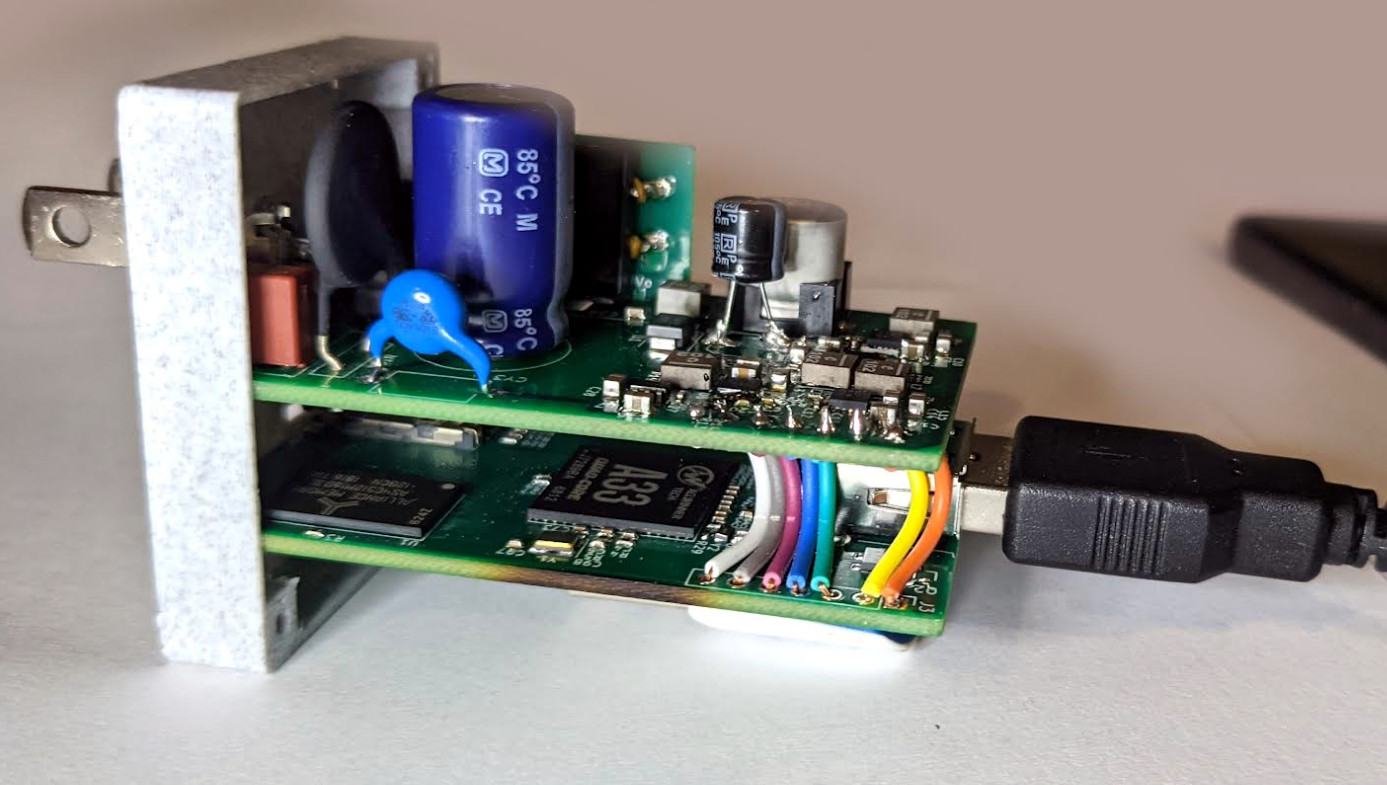
Some of the projects even made us rethink what’s possible for the individual hacker. The WiFiWart utilizes a miniature single-board Linux computer that was designed and built from the ground up by a single person, using only free and open source software. Whether it’s that this penetration testing gadget has packed a full Linux computer and two WiFi adapters into a box the size of a phone charger, or the fact that it’s been done by a dedicated hacker with free tools, you can’t help but come away impressed with this one.

Wild For Wildcard

With nearly 100 projects submitted for the Reactivate Wildcard challenge, this was clearly a theme that resonated with the Hackaday community. As always, it was extremely difficult to narrow this down to the ten finalists below:

Whether or not they made the Finals this year, the complete list of Reactivate Wildcard entries contains an incredible array of fascinating concepts that are well worth browsing through. If any of them particularly catch your eye, why not strike up a conversation with the creator in the comments and see if you can’t help out? There’s always next year.

Liberating The ESP8266 From Its Development Board

While the ESP32 is clearly a superior piece of hardware, we think you’ll agree that the ESP8266 is just too useful not to have a dozen or so kicking around the parts bin at any given time. Cheap, easy to use, and just enough capabilities to bring your projects into the wonderful world of IoT. But if you really want to get the most out of it, you’ll eventually have to skip the development board and start working with the bare module itself.

It can be a scary transition, but luckily, [Ray] has collected some notes that should prove helpful for anyone looking use modules like the ESP-12F in their own custom PCBs. From different tips on making sure the power-hungry modules get enough juice, to cost cutting measures that help reduce the ancillary parts needed in your circuit design, it’s a worthwhile read for new and experienced ESP8266 wranglers alike.

An auto-reset circuit with the CH340C

For example, [Ray] talks a bit about using the infamous GPIO10 pin. This pin is on the rear of the ESP8266 module, and on many development boards, it isn’t even connected. That’s because its internally hooked up to the ESP8266’s SPI flash chip, and using it can cause problems if you’re not careful. But as explained in the blog post, as long as you make sure the flash mode is set to “dual IO” (DIO), then GPIO10 can be used just like any other free pin.

We also really liked the tip [Ray] shares at the end for making your boards more easily programmable. Sure you can leave an unpopulated header on the board, or fiddle with some pogo pin setup, but his edge connector approach is quite clever. Just slip the programmer on for the initial burn, and then after that you can update over the air.

There’s no denying how easy it is to throw something together with an ESP8266 development board, but we’ve covered so many incredible projects that have made use of the bare module’s diminutive dimensions that you’ll ultimately be missing out if you don’t cut out the middle-man.

Tiny Open Hardware Linux SBC Hides In Plain Sight

There was a time, not quite so long ago, when a computer was a beige box that sat on your desk. Before that, computers were big enough to double as desks, and even farther back, they took up a whole room. Today? Well today it’s complicated. Single-board computers (SBCs) like the Raspberry Pi put a full desktop experience in the palm of your hand, for a price that would have been unfathomable before the smartphone revolution increased demand for high-performance ARM chips.

But compared to the tiny open hardware Linux SBC that lives inside the WiFiWart, even the Raspberry Pi looks massive. Developed by [Walker] as a penetration testing tool, the custom computer is housed in an enclosure designed to make it look like a traditional (if a bit large) USB phone charger. In fact, it doesn’t just look like a USB charger, it actually is one. The internal power supply is not only capable of converting AC into the various DC voltages required to run the miniature Linux box, but also features a USB port where you can plug in your phone to charge it.

For the infosec folks in the audience, the applications for the WiFiWart are obvious. Just plug this thing in somewhere inconspicuous, and you’ve got a foot in the door. The dual WiFi interfaces mean you can connect to a target network on one card and use the second to spin up a fake access point or exfiltrate data. Plus with a quad-core Cortex-A7 ARM processor running at 1.2 GHz and a healthy 1 GB of DDR3, you’ll have enough power to run many security tools locally.

But of course, nothing keeps you from using the WiFiWart for non-security purposes. That’s what has us particularly excited, as you can never have enough open hardware Linux boards. Especially ones this tiny. Removed from its wall charger disguise, the brains of the WiFiWart could be used for all kinds of projects. Plus, not only is the final design open source, but [Walker] made sure to only use free and open source tools to create it. Keeping his entire workflow open means it will be easier for the community to utilize and improve upon his initial design, which in the end, is the whole idea behind the open hardware movement and efforts such as the Hackaday Prize.

Computer Vision Lets You Skip Songs With A Glance

Have you ever wished you could control your home automation devices with nothing more than a withering stare? Well then you’re in luck, as [Norbert Zare] has come up with a clever way of controlling an MP3 player with only your face. Though as you might imagine, the technique could be applied to a whole range of home automation tasks with some minor tweaks.

At the core of this project is the Raspberry Pi, specifically the 3 B+ model, though with the computational demands of computer vision you might want to bump it up to the latest-and-greatest Pi 4. From there you need to load up OpenCV and a model trained for face detection, which as luck would have it, tends to be a fairly common application for this technology.

With a relatively simple Python script, [Norbert] is able to determine when OpenCV detects he’s looking directly into the camera and fire off one of the Pi’s GPIO pins that’s been connected to the “Skip” button on a physical MP3 player. That’s right, you read that correctly. He’s using a dedicated MP3 player in the year 2021.

In all seriousness, we’re not really sure why [Norbert] went this route compared to simply playing the music on the Pi and controlling it through software, but this does serve as a good example of how you can interface with physical devices if need be. In any event, using the Python script he’s provided, you could easily modify the setup to control other tasks, virtual or otherwise.

While face recognition can be a scary thing out in the wild, we do think it has some interesting applications within the home, so long as the user is the one who is in control of where their data ends up.

Continue reading “Computer Vision Lets You Skip Songs With A Glance”

Modded GBA SP Does Its Best Switch Impression

The whole idea behind the Nintendo Switch is that the system isn’t just a handheld, but can be converted into a more traditional home game console when placed into its dock. The wireless controllers even pop off the sides so you can kick back on the couch and enjoy your big-screen gaming from a distance. Judging by how many units Nintendo has sold of their latest system, it’s clearly a winning combination.

Which is probably why [Tito] of Macho Nacho and his friend [Kyle Brinkerhoff] decided to recreate some of the Switch’s core features using one of Nintendo’s older handhelds, the Game Boy Advance SP. There was already a video-out mod kit on the market for the GBA SP that would let them play games on the TV, but the team still had to figure out how to make a dock for the 18 year old handheld, plus get it working with the official Switch Joy-Cons.

Wiring the custom PCB into the GBA SP

Lucky, this crew is no stranger to developing impressive GBA SP add-ons. Last month they took the wraps off of an expanded 3D printed rear panel for the system that housed a number of upgrades, such as an expanded battery pack and support for Bluetooth audio.

This mod uses a similarly expanded “trunk” for the GBA, but this time it’s to hold the rails the Joy-Cons mount to, as well as the electronics required to get the modern controllers talking to the Game Boy. Namely, a Raspberry Pi Zero and a custom PCB designed by [Kyle] that uses a dozen transistors to pull the system’s control inputs low when the Pi’s GPIO pins go high.

[Tito] doesn’t seem to mention it in the video below, but we’re assuming the dock component of this project is just a 3D printed box with a connector sticking up for the GBA SP’s link cable port, since that’s where the TV-out modification outputs its video. Incidentally that means you don’t really need the dock itself, but it certainly looks cool.

At the end of the video [Tito] goes over a few of the rough edges of the current build, including the rather lengthy pairing process to get the Joy-Cons talking to the Raspberry Pi. But ultimately, he says that not only does the system feel good in his hands, but playing those classic games on the big screen has been a nice change of pace.

Continue reading “Modded GBA SP Does Its Best Switch Impression”

Smoothing Out Foam Parts With Lots Of Gesso

Whether you’re building a product mock-up or a lightweight enclosure, carving your parts out of hard foam is a fast way to get the job done. Unfortunately, the end result can have a bit of a rough finish; a problem if you’re looking to attract investors or get some nice shots so you can send your handiwork into Hackaday.

If you ever find yourself in a situation where you need to make a carved piece of foam look like it isn’t a carved piece of foam, this tip from prolific maker [Eric Strebel] could really come in handy. Rather than using some spray-on primer or epoxy coating, things that can be difficult to work with when you’re confined to a small home workspace, he recommends sealing it up with several coats of gesso.

The gesso fills in the tiny voids in the foam’s surface.

For the less artistically inclined in the audience, gesso is essentially a paint that’s been combined with chalk or gypsum to make it thicker. Gesso is generally used to prepare an absorbent surface (such as wood or canvas) before applying paint. In this case, [Eric] is using it to build up the surface of the foam and seal up all the open pores.

The downside is that the gesso requires several coats to really build up. [Eric] puts six coats on in this demonstration before he starts to thin it out a bit with water. At that point, each successive coat is sanded with increasingly higher grits. After nine coats, he does his finish sanding with 600 grit paper, and the results look fantastic.

To add some color [Eric] dyed the piece and then used a toothbrush to flick on some black and white paint, creating a very convincing granite-like finish. Unfortunately, his attempt to brush on a water-based sealer caused this finish to run, and he had to take it all off. In the end, he had to resort to using spray paint to finish the piece, but at least it was a simple rattle can.

This isn’t the first time [Eric] has experimented with alternative priming techniques. He’s a big fan of two-component primer in a can, which lets you lay down a professional finish without the expense and complication of using a spray gun.

Continue reading “Smoothing Out Foam Parts With Lots Of Gesso”

RC Minecraft Boat Patrols The Pool For Treasure

Looking to recreate those relaxing Minecraft fishing sessions in real life, [electrosync] recently set out to 3D print himself a blocky remote controlled boat, complete with a similarly cubic occupant to ride in it. Each element of the build, from the oars to the bobber on the end of the fishing line, has been designed to look as faithful to the source material as possible. In fact, the whole thing is so accurate to the game that it’s almost surreal to see it rowing around the pool.

That said, some of the resemblance is only skin deep. For example the rowing action, though it appears to be properly synchronized to the boat’s movement through the water, is completely for show. A standard propeller and rudder arrangement under the boat provide propulsion and directional control, and [electrosync] notes its actually powerful enough to push the boat very near to its scale top speed from the game, despite the exceptionally poor hydrodynamics of what’s essentially just a rectangle.

A look under the deck.

Speaking of which, [electrosync] even went through the trouble of printing the hull in wood-fill PLA and coating it in polyester resin to make sure it was watertight. Granted he could have just made the boat out of wood in the first place, saving himself the nearly 60 hours it took to print the hull parts, but that would have been cheating.

Beyond the servos and motors that move the boat and the oars, [electrosync] had to give his 3D printed fisherman a considerable amount of dexterity. Servos embedded into the 3D printed parts allow “Steve” to rotate at the hips and raise and lower his arm. With a fishing pole slipped into a hole printed into the hand, he’s able to cast out his magnetic bobber and see whats biting.

We’ve actually seen quite a number of projects that allow virtual objects inside Minecraft to interact with the real world, but comparatively few efforts to recreate objects from the game’s blocky universe, so the change of pace is nice.

Continue reading “RC Minecraft Boat Patrols The Pool For Treasure”