Learning Morse Code The Ludwig Koch Way

Most countries have dropped the requirement for learning Morse code to become a ham radio operator. Because of that, you might think Morse code is dead. But it isn’t. Some people like the nostalgia. Some like that you can build simple equipment to send and receive Morse code. Others like that Morse code is much more reliable than voice and some older digital modes. Regardless of the reason, many people want to learn Morse code and it is still a part of the ham radio scene. The code has a reputation of being hard to learn, but it turns out that is mostly because people haven’t been taught code in smart ways.

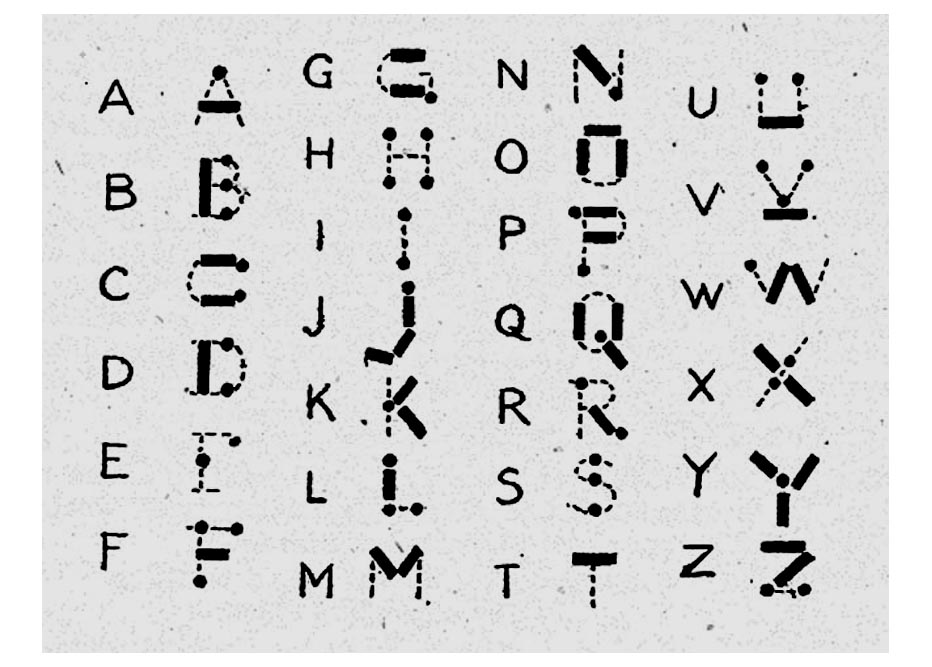
I don’t know if they still do, but some youth organizations used to promote some particularly bad ways to learn the code. The second worse way is to learn “dots and dashes” and many people did learn that way. The very worst way was using an image like the adjacent one to try to map the dots and dashes into letter shapes. This chart dates back to at least 1918 when a Girl Guides handbook printed it.

Even if you are a visual learner, this is a bad idea. The problem is, it is nearly impossible to hear sounds at 20 or 30 words per minute and map them to this visual representation. Another visual method is to use a binary tree where left branches are dots and right branches are dashes.

If you only need to master 5 words per minute to get a merit badge, you might get away with this. But for real use, 5 words a minute is very slow. For example, this sentence would take about 3 minutes to send at that speed. Just that one sentence.

So what are the better ways? Let’s take a look.

Continue reading “Learning Morse Code The Ludwig Koch Way”

Solid State Relay Simulation, Explained

[SaltyPuglord] needed a solid state relay for a project. We’d have just bought one, but he decided to design his own in LTSpice. Along the way he made the video below, which is pretty informative and a good example of a non-trivial design in LTSpice.

MOSFETs have made designs like this a lot easier, to the extent that it should be as easy as putting a pair of beefy fets in-line with the AC source and load. However, that has a few ramifications that [Salty] covers in the video.

The biggest concern comes in isolating the DC supply from ground. He used a transformer which is tricky to simulate in LTSpice. Beyond that the design of the power supply is quite simple, and as he mentions in the video, you don’t really need this complex of a regulator just to feed the gates of the MOSFETs.

Continue reading “Solid State Relay Simulation, Explained”

3D Print Your 3D Scanner

[QLRO] wanted a 3D scanner, but didn’t like any of the existing designs. Some were too complex. Some were simple but required you to do things by hand. That led to him designing his own that he calls AAScan. You can see the thing operating in the video below.

In general, you can move the camera around the object or you can move the object around while the camera stays fixed. This design chooses the latter. You’ll need a stepper motor with a driver board and an Arduino to make the turntable rotate. You also need a computer running Python and Meshroom. The phone also has to run Python and [QLRO] used QPython on an Android device.

Continue reading “3D Print Your 3D Scanner”

Everything You Wanted To Know About 3D Printing Support But Were Afraid To Ask

At the dawn of 3D printing, support structures were something to avoid. ABS is a hard substance to clear off, and the slicers did a comparatively poor job of making structures that were easy to remove. Today, supports are not a big deal and most of the slicers and materials allow for high-quality prints with supports. We were printing something with supports the other day and noticed that Cura has a support floor and roof function. Curious, we did a quick search and found this very comprehensive post about the current state of support.

With 25 topics in the table of contents, this isn’t a 3-minute read. Of course, you might wish to skip over some of the first parts if you get why you need support and understand the basic ideas. We became more interested when we reached the geometry section.

Continue reading “Everything You Wanted To Know About 3D Printing Support But Were Afraid To Ask”

Transparent LCD Makes Everything Look Futuristic

According to [Kelsey], transparent displays are guaranteed to make “everything feel like the future.” Unfortunately they’re hard to find, and the ones typically available are OLED and can’t make solid black colors. But as luck would have it, it’s possible to repurpose a common LCD to be sort of transparent.

A LCD uses nematic crystals that can polarize light, with the amount of polarization changing based on the electric field applied to the crystal. Light enters the front of the panel through a polarizing film, passes through the display, and then bounces off a reflective back coating. The display itself usually polarizes light in a way that matches the front polarizer. That means if you do nothing you get reflected light. However, if a part of the LCD gets an electric field, it will repolarize in such a way as to block the reflected light making the display look black in that area.

[Kelsey’s] trick is to peel off the reflector and replace it with polarizing film taken from another display. The new polarizer needs to be bigger than the display for one reason: you need to match the polarizing angle of the front film with the new back film. That means if the new film is exactly the right size, it won’t be able to rotate without leaving gaps. By starting with a larger piece, you’ll be able to rotate for maximum transparency before you stick it on.

We’ve seen some homemade transparent numeric displays. The transparent wood, though, has usually left something to be desired.

Amp Volt Ohm Meter Model 8 Mark III From The 1960s

There’s hardly any piece of test equipment more fundamental than a volt ohm meter. Today you’re likely to have a digital one, but for most of history, these devices had real needle meters. The AVOmeter Model 8 Mark III that [Jeff Tranter] shows off had an odd banana-shaped meter. Maybe that goes with the banana plugs. You can get a closer view of this vintage piece of equipment in the video after the break.

Even the outside description of the meter is interesting. There were several unique features. For example, if the meter goes full scale a little button pops out and disconnects the probes to protect the meter. Another unusual control reversed the polarity of the leads so you didn’t have to swap them manually.

Some of the other features will be familiar to anyone who has used a good analog meter. For example, the meter movement has a mirror under the needle. This is used to make sure you are looking straight down on the needle when making readings. If you can see the reflection of the needle, then you are off to one side and will not read the precise value you are interested in.

If you only want to see the insides, [Jeff] teases you until around the six minute mark. There are no active devices and this meter is old enough to not use a printed circuit board. The AC ranges work with a transformer and germanium diodes. The rest of the circuit is mostly a bunch of resistors.

The point to point wiring always makes us wonder who built this thing sixty years ago. You can only wonder what they would think if they knew we were looking at their handiwork in the year 2020.

We see a lot of meter clocks, but it would be a shame to tear this unique meter apart for its movement. Perhaps someone should make a clock that outputs a voltage to a terminal so you could read it with your favorite meter. This instrument was probably pretty precise for its day, but we doubt it can match a modern 6.5 digit digital instrument.

Continue reading “Amp Volt Ohm Meter Model 8 Mark III From The 1960s”

GitHub Goes GUI-less

Git is a handy tool that many of us are using for more than just software development. Having a cloud-based upstream repository is also surprisingly useful, but until now using GitHub — the most common upstream server — meant firing up a web browser, at least for certain tasks. Now GitHub is releasing a beta version of command-line tools made to manipulate your GitHub repos.

The tools are early release so they mostly focus on issues and pull requests. Of course, git itself will do the normal things like clone and checkout — you’ve always been able to do that on the command line. The example given in the announcement blog post lists all issues with a help wanted label:

gh issue list --label "help wanted"

We noticed that asking to view the issue, while done on the command line, will still open a browser. The tools are still a little early, so this is an excellent time to let the developers know what you’d like or otherwise influence the project.

We were a little surprised it wouldn’t just consume git, so that you’d use the same commands for everything and it would just pass pre-formed commands to git. Of course, that would be pretty easy to write as a shell script wrapper if you were interested in such a thing.

You’d be forgiven for only thinking of git as a way to manage source code revisions, but it’s actually capable of all sorts of interesting tricks.