Color By Number 3D Printing Style

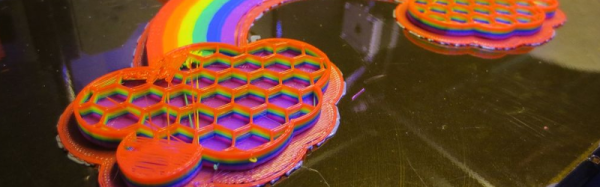
Remember paint-by-number kits? Your canvas has outlines with numbered regions that you paint with correspondingly numbered paints. When you are done, you’ve recreated the Mona Lisa. [KurtH3] uses a similar technique to coax multicolor prints from his 3D printer.

The technique isn’t general purpose, but it still is an interesting way to add some color to your usually monochrome prints. The idea is simple: You find a paint-by-number layout (apparently, you can find them with a Google search). Use your favorite method to get the outline into a CAD program. [KurtH3] doesn’t really get into the details about this, but some CAD programs will directly import images. Others will require you to trace in Inkscape (or a similar program) and convert to a vector format like DXF that the 3D CAD program can import.

Here’s the trick: instead of extruding the 2D image as one piece, you extrude the numeric regions to slightly different heights. Say you wanted to print a red, white, and blue flag to a thickness of about 5mm and you use 0.2mm layers. You could extrude the white part to 5mm, for example. Then the red parts could be extruded to 5.2mm (one layer higher) and the blue parts to 5.4mm. You could extend the idea to do multiple layers, although that will increase the surface roughness.

[KurtH3] pauses the print at the end of the layers to change filament, but we would probably edit the sliced G-Code to put pauses in the right places (for example, Repetier Host lets you put @pause in your file). You could also use software to split the G-Code as we’ve previously covered.  The resulting print, using our example, would be white from the bottom up but would have thin red and blue layers over the top in the right places. The few hundred microns difference from the white surface to the other colors means you won’t get a perfectly smooth surface, but a few hundred microns shouldn’t be too noticeable.

Continue reading “Color By Number 3D Printing Style”

Microcontroller Adjustment Of A DC To DC Converter

[Hugatry] wanted to replace the adjustment pot on an LM2596 buck converter with a microprocessor-controlled voltage. The regulator IC uses a divider to generate a 1.25V reference from the output. The pot is part of a divider circuit that sets the output voltage. For example, if the divider is 10:1, the controller will keep the output at 1.25V and, therefore, the output voltage will be 12.5V.

[Hugatry’s] strategy was to use a filtered PWM signal from a microcontroller to offset the 1.25V signal. By adding a small voltage to the control point, the output voltage would not need to rise as high as before to maintain the 1.25V reference. For example, adding 0.25V to the reference input would only require 1V, which corresponds to a 10V output.

The video has a nice view of a scope showing the relationship between the PWM duty cycle and the output voltage. Although he didn’t mention it, it struck us that since PWM is proportional to the supply voltage, the voltage on the microcontroller and PWM output stage probably needs to be fixed. That implies you couldn’t use the buck converter to directly power the microcontroller itself. Then again, what kind of microcontroller needs to adjust its own power supply?

Continue reading “Microcontroller Adjustment Of A DC To DC Converter”

Literal Breadboard Hack Forces It To Accept Dual Pin Headers

Usually when there is a clear demand for something, some entrepreneur will fill that demand. Unfortunately, no one seems to think there’s a need for a solderless breadboard product that can handle boards that have a dual row header. These devices have 0.1″ spacing in both directions, so while they will fit in a standard breadboard, the contacts will short out the adjacent pins on the device, which makes it worthless.

[Baz] needed to connect an RF24L01 module to a breadboard. Instead of connecting leads to the device or devising a breakout board, [Baz] actually hacked his breadboard. To make an area to plug in a dual row device, he took the breadboard apart, pulled the spring contacts, cut them, and then put them back in.

Of course, you have to make sure the cut is wide enough that the two parts of the spring won’t touch. It looks like [Baz] used a small screwdriver to help the springs keep their shape and cut them with simple diagonal cutters.

Continue reading “Literal Breadboard Hack Forces It To Accept Dual Pin Headers”

Beautiful Arduino Fireworks Controller

A lot of designers have the luxury of creating things that aren’t supposed to explode. That’s usually easy. The trick is designing things that are supposed to explode and then making absolutely sure they explode at the right time (and only the right time). [JonBush] recently did a beautiful build of an Arduino-based fireworks controller. Seriously, it looks like a movie prop from a summer blockbuster where [Bruce Willis] is trying to decide what wire to cut.

[Jon] used a mega 2560 because he wanted to do the I/O directly from the device. His code only takes about 8K of the total program storage, so with some I/O expansion (like shift registers) a smaller chip would do the job. The device can control up to 8 sets of fireworks, uses a physical arm key, and has a handheld remote. It is even smart enough to sense igniter failures.

The front panel is a work of art and includes a seven-segment display made from Neopixel LEDs. The whole thing is in a waterproof case and uses optical isolation in several key areas.

Continue reading “Beautiful Arduino Fireworks Controller”

Hand Controlled Robot Uses Accelerometer

What do orchestra conductors, wizards, and Leap controller users have in common? They all control things by just waving their hands. [Saddam] must have wanted the same effect, so he created a robot that he controls over wireless using hand gestures.

An accelerometer reads hand motions and sends them via an RF module to an Arduino. This is a bit of a trick, because the device produces an analog value and [Saddam] uses some comparators to digitize the signal for the RF transmitter. There is no Arduino or other CPU on the transmit side (other than whatever is in the RF module).

Continue reading “Hand Controlled Robot Uses Accelerometer”

Design Diary: Varactor-Tuned Regen Receiver

[QRP Gaijin] likes to build regenerative receivers. If you’ve ever built a serious one, you know there are (at least) two problems: One is you need a variable capacitor (hard to find these days). The other annoyance is that if you cover a wide frequency range, you probably need more than one coil.

[QRP Gaijin’s] latest radio design doesn’t have either of these problems. He uses a coil with a single pole double throw switch to bandswitch a single coil. There is no traditional main tuning capacitor. Instead a 1SV149 varactor provides the radio’s main tuning capacity (the diode tunes between 35 to 500 pF).

The post provides a nice design and a neat looking build in a Tupperware container (well… the outside is neat, at least; the inside is… best left inside the Tupperware). Better still, [QRP Gaijin’s] post details how he got to the final design, starting with the idea, and detailing the original design and the changes he made along the way. He also used data from an earlier build to limit how much the regeneration control has to be changed over wide frequencies and details how that changed the design. The prototype actually lacks the planned bandswitch, but will cover 3 to 30 MHz with the right coil.

There are certainly simpler regenerative receivers out there. However, the sophistication of this design along with the details of the designer’s thought processes makes this an interesting intermediate weekend project.

Continue reading “Design Diary: Varactor-Tuned Regen Receiver”

New Version Of Raspberry Pi Thin Client

It is funny how many times you use your full-blown PC as a terminal to another computer (which is quite often not as capable as the terminal computer). If all you need is a remote display and keyboard, a Raspberry PI would be enough. One of the newer Pi 2 boards would be even better.

You could roll your own set of remote access software, but you don’t have to. [Gibbio] has already created a thin client image called RPiTC and recently released version 1.4. The build supports diverse remote protocols including Microsoft Remote Desktop, Citrix, VMWare, and even X3270.

It supports WiFi and VPN. We were a little disappointed that it didn’t seem to have any serial communication programs (in case we wanted to build one into an old TeleType case). Of course, it is just a Linux system so you can install anything you want or need.

Continue reading “New Version Of Raspberry Pi Thin Client”