Google’s T-Rex Game Ported To The ESP32

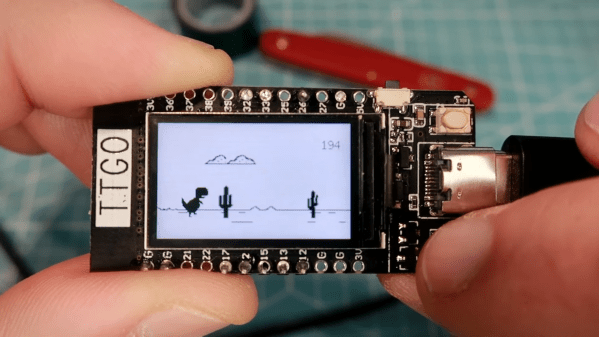
Most Chrome users will have come across a neat little Easter egg when their Internet connection has gone down – a game known as “T-Rex” where a dinosaur must be jumped over cactii. Whether or not this is accurate in terms of the evolutionary timeline, it’s a bit of fun, and Volos Projects educator [Danko Bertović] decided to port the game to the ESP32.

The game runs on the LILYGO TTGO T-Display development board, which pairs the powerful microcontroller with a 1.14-inch color LCD. His clone goes as far as authentically replicating the “No Internet” page from within Google Chrome, before kicking into the game at the press of a tactile button.

The game is built using a sprite-based engine, which enables gameplay with a minimum of flickering on the screen. Transparency is included to stop the sprites from occluding other screen elements unnecessarily. [Danko] hasn’t yet released a full tutorial on using sprites on the ESP32, but code is available for your own digestion.

It’s not the first time we’ve seen [Danko]’s ESP32 games, as he’s developed a few over the years. Others have gone so far as coding 8-bit emulators for the platform. Video after the break.

Continue reading “Google’s T-Rex Game Ported To The ESP32”

Active Pickguard Makes For A Great Guitar Mod

Much discussion goes on in the guitar world about the best hardware to use. Whether its pickups, how they’re positioned, or even the specific breed of wood on the fretboard, it’s all up for debate. [Eli Hughes] put much of that to one side, however, with his innovative “Active Pickguard” project.

The project reimagines the electronics of an electric guitar from the ground up. Instead of typical electromagnetic pickups, six individual piezo pickups are built into the bridge – one for each individual string. The outputs of these pickups is conditioned and then read by the analog-to-digital converter of a Freescale Kinetis K40. The DSP-capable chip can then be used to apply all manner of effects. [Eli] demonstrates the guitar providing an uncanny imitation of an acoustic guitar, before demonstrating jazz and overdrive tones as well.

The Kinetis chip also features touch-sensitive inputs, which [Eli] put to good use. All the hardware is built into a pickguard-shaped PCB, complete with touch controls for things like volume, tone, and choosing different DSP patches.

Unlike a regular guitar, this one needs a power supply, which it gets via a CAT 6 cable, in place of the usual 1/4″ guitar cable. The CAT 6 also carries audio out to a converter box which allows the audio to be output to a regular guitar amplifier.

It’s a neat build, and one that shows just how modern technology can reimagine a simple 20th-century instrument. DSP really is magic, after all. Video after the break.

Continue reading “Active Pickguard Makes For A Great Guitar Mod”

Resin Stacking Proves Messy And Difficult

3D printers are typically the tool you use when you want a one-off quick prototype. However, more and more, they’re being used to produce things in quantity. [Uncle Jessy] decided to try out the resin stacking technique in order to quickly produce many figurines on his resin printer. However, not everything went exactly to plan.

The technique is simple. The idea is to produce many copies of an object in a single continuous print on a resin 3D printer. To achieve this, the object is cloned many times, and scaffolding is created to allow the stacking of multiple objects on top of each other. This must be done carefully to avoid ruining the geometry of the object, and similarly to support material, uses more resin in the process.

[Uncle Jessy] experimented several times, but ran into multiple issues with the process when trying to print out some small Magneto figurines. An initial experiment using a raft failed when the print fell off the build plate. With the raft removed, the second print failed as the scaffolding didn’t print quite right. Further tweaks and beefing up the scaffold improved things, and [Jessy] managed to print 93 figurines in a single operation.

It’s a useful technique if you want to print a ton of models on a resin printer in as short a time as possible. However, expect to spend plenty of resin as you refine the technique. You’ll also need a big wash tank to clean the prints during post-processing. Video after the break.

Continue reading “Resin Stacking Proves Messy And Difficult”

Getting Familiar With Round Displays

Once upon a time, maker projects were limited to using simple character displays or those salvaged from popular Nokias, largely due to cost. These days, a small OLED or LCD is available for just a few bucks. However, you can go fancier, and [Mr. Volt] does just that with an exploration of nice round displays.

Using round displays doesn’t have to be hard, with plenty of great products on the market. [Mr. Volt] goes through various options, from the cheap bare screens you can hook up to a microcontroller, to larger models designed for direct use with the Raspberry Pi or even straight HDMI inputs. Many are quite high resolution, and look particularly beautiful when driven with appropriate artwork.

However, there are a few tricks that come in handy when you’re going away from traditional rectangular screens. Screen mounts on some models may not be directly aligned with the center of the circular display, which can lead to results that look off if not accounted for.

It’s also important to remember that round displays are still driven like square displays, using Cartesian coordinates. Trying to use software with interface elements around the edges can be trying, as many end up rendered off-screen. Instead, circular displays are best used to display purpose-made content, rather than used with traditional software expecting a rectangular screen.

Fundamentally, round displays are a neat thing to have, as they allow for the construction of elegant projects that don’t have to abstract a circle with cheats like obscuring bezels or housings. Video after the break.

Continue reading “Getting Familiar With Round Displays”

Controller Swaps Can Save An HDD If You Do It Right

Hard drives are fragile and reliable all at once. It’s entirely possible to have a hard drive fail, even if your data is still in perfect condition on the magnetic platters inside. [Keith Sherry] was recently trying to recover data for a friend off a damaged hard drive, and demonstrated that modern twists on old tricks can still work.

The drive in question was an old 160GB disk that itself was being used as a backup. Of course, a backup you haven’t tested is no backup at all, and this one failed in the hour it was most needed.

The suspicion was that the controller board was the culprit, and that swapping the board out might bring things back to life. Back in the day, this was a common hacker trick. However, it often fails with modern drives, which store a great deal of drive-specific calibration data on the controller board. Without this specific data, another controller will be unable to access the data on the drive, and could even cause damage.

However, as [Keith] demonstrates, there is a way around this. A controller from a similar drive was sourced, albeit from a SATA version of the drive versus the original which used USB. A single chip is then removed from the original controller, containing the calibration data specific to that drive. Soldering this chip onto the new controller got everything up and running, and the files could be recovered.

If your data is invaluable, it’s likely worth paying a professional. As [Keith] demonstrates though, the old tricks can still come in handy as long as your techniques are up to date. DIYing your own data recovery can be done, it’s just risky is all.

Oh, and don’t forget — once you’ve recovered the files, throw the drive away. Don’t keep using it! Video after the break.

Continue reading “Controller Swaps Can Save An HDD If You Do It Right”

Digital Painting On An IPad With Real Brushes

Drawing tablets are a great way to make digital art, and iPads and other tablets are similarly popular in this area. However, they all typically involve using some sort of special stylus for input. [Richard Greene] developed another method, with Light Strokes for the iPad letting one “paint” with real paint brushes instead!

The system uses a Fresnel prism in view of the iPad’s camera. This allows the camera to see only the parts of a paint brush, sponge, or other implement, as they make contact with the surface of the prism itself. This is via the principle known as total internal reflection.

Thus, simply wetting a paintbrush, sponge, or even a finger, allows one to paint quite authentically on the surface of the prism. The corresponding Light Strokes app on the iPad turns this into the pretty pixels of your creation. The app also allows one to experiment with all manner of fancy brush effects, too.

The build requires some finesse, with the lamination of the special Fresnel film onto glass using liquid optically clear adhesive, or LOCA. A series of mirrors are then assembled in an enclosure, allowing the iPad to be mounted with the camera having a good view of the glass painting area.

The project takes advantage of a simple physical effect in order to create a great artistic tool. Alternatively, if you prefer to draw directly, consider whipping up your own screen-based drawing tablet. Video after the break.

Continue reading “Digital Painting On An IPad With Real Brushes”

Sound-Reactive Mannequin Arms Make For Creepy Lounge Decor

Music visualizers were all the rage back in era of Winamp and Windows Media Player. They’re even cooler when they don’t just live on your computer screen, though, as [Emily Velasco’s] latest project demonstrates.

The build consists of two mannequin arms on a board mounted on the wall. The arms were sourced for just $5 from a Sears that went out of business, and originally fastened to the mannequin thanks to magnets inside. Thus, putting two steel plates on the board allowed the arms to be attached, and they can be freely arranged as [Emily] sees fit.

The ESP32-based Pixelblaze LED controller serves as the brains of the operation, controlling LEDs mounted inside the arms themselves. Using a dedicated controller makes working with addressable LEDs a cinch. As a further bonus, the board serves up a web interface, allowing patterns to be changed without having to hook up a cable to the device. Meanwhile, a sensor board inside the arms uses a microphone to enable the light show to react to sound and music.

It’s one of the more obscure uses for an old mannequin, but definitely one that appeals to our love of everything that flickers and glows. It’s a build very much up [Emily’s] alley; as a prolific maker, she loves to build weird and wonderful creations, as shared during her talk at the 2019 Hackaday Superconference. Video after the break.

Continue reading “Sound-Reactive Mannequin Arms Make For Creepy Lounge Decor”