Microphone Isolation Shield Is A Great IKEA Hack; Definitely Not A Xenomorph Egg

As any content creator knows, good audio is the key to maintaining an audience. Having a high quality microphone is a start, but it’s also necessary to reduce echoes and other unwanted noise. An isolation shield is key here, and [phico] has the low down on making your own.

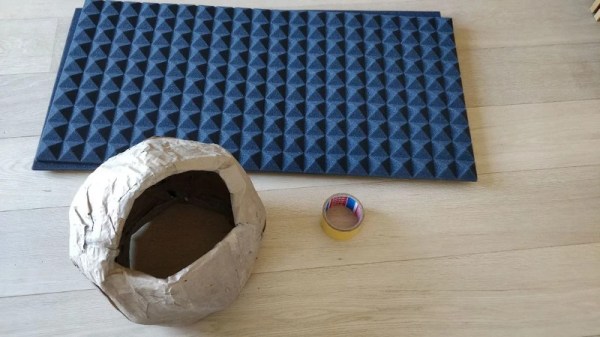
The build starts with an IKEA lampshade, so it’s a great excuse to head down to the flatpack store and grab yourself some Köttbullar for lunch while you’re at it (that’s meatballs for those less versed in IKEA’s cafeteria fare). This is really more of a powder-coated steel frame than a shade, perfect as the bones of an enclosure. [Phico] hacks it open with a Dremel to make room for the microphone. Cardboard soaked in wallpaper paste is then used to create a papier-mache-like shell, which is then stuffed with acoustic foam. A small opening is left to allow the narrator’s voice to reach the microphone, while blocking sound from other directions. Finally, a stocking is wrapped around the whole assembly to act as an integral anti-pop filter.

It’s a tidy build, and while it looks a bit like a boulder to some, if you encounter a room full of ovomorphs that look just like this, tiptoe right out of there. IKEA hacks are always popular, and this laser projector lamp is a great example. If you’ve got your own nifty Swedish-inspired build, make sure you let us know!

New Silicon Carbide Semiconductors Bring EV Efficiency Gains

After spending much of the 20th century languishing in development hell, electric cars have finally hit the roads in a big way. Automakers are working feverishly to improve range and recharge times to make vehicles more palatable to consumers.

With a strong base of sales and increased uncertainty about the future of fossil fuels, improvements are happening at a rapid pace. Oftentimes, change is gradual, but every so often, a brand new technology promises to bring a step change in performance. Silicon carbide (SiC) semiconductors are just such a technology, and have already begun to revolutionise the industry.

Mind The Bandgap

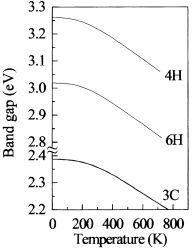
A graph showing the relationship between band gap and temperature for various phases of Silicon Carbide.

Traditionally, electric vehicles have relied on silicon power transistors in their construction. Having long been the most popular semiconductor material, new technological advances have opened it up to competition. Different semiconductor materials have varying properties that make them better suited for various applications, with silicon carbide being particularly attractive for high-power applications. It all comes down to the bandgap.

Electrons in a semiconductor can sit in one of two energy bands – the valence band, or the conducting band. To jump from the valence band to the conducting band, the electron needs to reach the energy level of the conducting band, jumping the band gap where no electrons can exist. In silicon, the bandgap is around 1-1.5 electron volts (eV), while in silicon carbide, the band gap of the material is on the order of 2.3-3.3 eV. This higher band gap makes the breakdown voltage of silicon carbide parts far higher, as a far stronger electric field is required to overcome the gap. Many contemporary electric cars operate with 400 V batteries, with Porsche equipping their Taycan with an 800 V system. The naturally high breakdown voltage of silicon carbide makes it highly suited to work in these applications.

Continue reading “New Silicon Carbide Semiconductors Bring EV Efficiency Gains” →

Object Tracking Camera Slider Gets The Nice Shots

In this day and age, where all leisure activities must be duly captured and monetized online, camera sliders are hot items. Many start with a simple manual build, before graduating to something motorized for more flexibility. [Saral Tayal] took things a step further, implementing a basic tracking mode for even sweeter shots. 

The build is mechanically simple, relying on 8mm steel rods and linear bearings more typically found in 3D printers. An Arduino Uno is pressed into service to run the show, outfitted with an OLED screen to run the interface. A RoboClaw motor controller is used to control the geared DC motors used, one controlling the linear motion, the other the rotation of the camera.

With encoders fitted to the motors, the RoboClaw controller enables the Arduino to track the position and rotation of the slider as it moves. The slider then can be given the position of an object relative to itself. With a little maths, it will rotate the camera to track the object as it moves along.

It’s a simple addition to the typical slider build that greatly increases the variety of shots that can be achieved. There are plenty of ways to go about building a slider, too, as we’ve seen before. Video after the break.
Continue reading “Object Tracking Camera Slider Gets The Nice Shots” →

Mimic Artfully Employs LEDs In Fashion

Any science fiction piece set in the near-future involves clothes that light up or otherwise have some form of electronics inside. This hasn’t happened in mainstream fashion just yet, but [Amped Atelier] are doing serious work in the field. Mimic was their entry for the 2016 MakeFashion Gala, serving as a great example of LEDs in fashion done right.

Mimic consists of two pieces, designed as cocktail dresses that mimic their surroundings, in much the same way as a chameleon. LEDs are controlled by an Arduino, fitted with a colour sensor. When activated, the Arduino can change the color of the LEDs to match whatever is presented to the sender. This technology could serve as a great way to avoid clashing with a friend’s outfit, or to send a surreptitious signal to your ride that you’re ready to leave.

The LEDs are hidden beneath attractive geometric diffusers, which are 3D printed directly on to the fabric of the outfit. This gives an attractive, finished look to the garment, and allows the diffusers to naturally flow with the lines of the piece.

These pieces show that it’s possible to create glowable night wear that is as stylish as it is high tech. If you’re looking for something a little edgier however, we’ve got that too. Video after the break.

Continue reading “Mimic Artfully Employs LEDs In Fashion” →

How To 3D Print Your Identical Twin

It’s possible to have an enjoyable weekend touring a city with a stolen cardboard cutout from some advertising display or other. However, it’s 2019, and 3D printing means you can go so much further. [Simon] of RCLifeOn went so far as to print a lifesized body double of himself, and it’s only slightly creepy! (Video, embedded below.)

The model was sourced from a 3D scan [Simon] had done with commercial hardware. An Optimus P1 industrial-grade 3D printer was used to print the parts, with total printing time being around 200 hours. Adhesive was used to join the various segments together, and the assembly was then sanded and primed, ready for paint.

Unwilling to tackle the task alone, [Simon] enlisted a professional painter to help put the finishing touches on the piece. The end result is impressive, particularly from a distance. [Simon 2.0] was then sent out to the city centre, aiming to raise money from bewildered passers by.

We suspect the market for custom body doubles will only increase as the technology to create them becomes more widespread. If you’ve tackled a similar project, be sure to let us know. Video after the break.

Continue reading “How To 3D Print Your Identical Twin” →

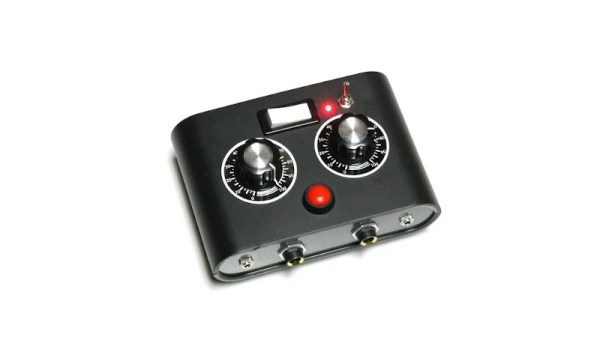
Echo And Reverb In A Pretty Little Box

These days, if there’s a chip worth using, there will be a cheap pre-built module on eBay to make using it even easier. It’s a great time saver, and projects that used to take a couple of weekends can now be completed in a rainy afternoon. [lonesoulsurfer] knows how it is, and took advantage of this very approach to build this tidy echo & reverb effects box.

The build starts with a PT2399 echo/delay line module sourced of eBay, a part that we’ve learned much about thanks to the hard work of others. A resistor is cut off the board, enabling echo as well as reverb functionality. It’s laced up in a box with a couple of pots and a switch to control the effect, and hooked up with 6.5mm audio jacks to enable it to be easily used with guitars, synths, or karaoke machines.

It’s a fun build, and one that could serve as as a useful component in a larger setup. Adding a 3PDT switch could make it more useful as a guitar pedal, or it could be integrated into a Eurorack module, too. We’d particularly love to see the results possible from stuffing five of the modules in a single box and routing them into each other in new and exciting ways. If you pull that off, drop us a line.

Replica Marshmello Helmet Is A Tidy Halloween Build

As the saying goes – you don’t need a stylized, bedazzled helmet to have a successful career in EDM, but it helps. Marshmello is the latest in a long line of musicians to sport bespoke headgear, and [MikeTheSuperDad] undertook the construction of a replica for Halloween.

The build starts with a piece of concrete form tube as the base of the helmet. This is combined with 3D printed components to create a grid in which to place WS2812B LED strings. These are controlled by an Arduino Pro Mini, which is responsible for handling the animations. Further 3D printed parts are used as templates to cut out the characteristic eyes and mouth, as well as to cover the top. Plastic sheeting is then used over the top of everything to diffuse the LEDs and provide the final look, with black mesh behind the eyes and mouth making them properly stand out.

Marshmello should be lauded for creating a helmet with a distinctive visual style, while remaining easy to replicate, unlike popular Daft Punk builds of years past. Building a replica could serve as good practice before starting out on your own unique build. Video after the break.

Continue reading “Replica Marshmello Helmet Is A Tidy Halloween Build” →