Ford Ka Becomes Diwheel Monster

If you’ve been to the right events, you’ve seen them before – the cars with an external cage that let the car complete a somersault in the forward direction under heavy braking. They’re impressive, but it’s possible to take things even further. Enter [mastermilo82] and the RollKa.

The RollKa follows on from the RollGolf, which was a straightforward roll car build. Built around a Ford Ka, it eschews the external cage for a more radical design. The Ka has been shortened, and designed to fit within two enormous steel rims which wrap around each side of the car. Additional idler wheels have been welded to the Ka’s roof to enable it to effectively roll within the outer steel rims.

It’s a rather eccentric design, known as a diwheel. We’ve seen impressive electric versions before, but at least at this stage, this project appears to lack any advanced control systems and gets by on sheer luck and welding prowess. The build is still at an early stage, with episode three starting some early movement tests under power. It’s a testament to what can be achieved with a spacious garage and some imagination, and we can’t wait to see what happens next! Video after the break.

[Thanks to Baldpower for the tip!]
Continue reading “Ford Ka Becomes Diwheel Monster” →

HTTPS For The Internet Of Things

Every day, we’re connecting more and more devices over the internet. No longer does a household have a single connected computer — there are smartphones, tablets, HVAC systems, deadbolts — you name it, it’s been connected. As the Internet of Things proliferates, it has become readily apparent that security is an issue in this space. [Andreas Spiess] has been working on this very problem, by bringing HTTPS to the ESP8266 and ESP32. 

Being the most popular platform for IOT devices, it makes sense to start with the ESP devices when improving security. In his video, [Andreas] starts at the beginning, covering the basics of SSL, before branching out into how to use these embedded systems with secure cloud services, and the memory requirements to do so. [Andreas] has made the code available on GitHub so it can be readily included in your own projects.

Obviously implementing increased security isn’t free; there’s a cost in terms of processing power, memory, and code complexity. However, such steps are crucial if IOT devices are to become trusted in wider society. A malfunctioning tweeting coffee pot is one thing, but being locked out of your house is another one entirely.

We’ve seen other takes on ESP8266 security before, too. Expect more to come as this field continues to expand.

[Thanks to Baldpower for the tip!]

IoT Traffic Light Is Cardboard Made Fun

Traffic lights! Kids love them, hackers love them, and they’re useful in industrial contexts to see if the giant machine is currently working or having a bad day. While the real deal are unwieldy and hard to come by, there’s nothing stopping you tackling a fun cardboard build at home.

It’s a great way to teach kids about traffic rules, too.

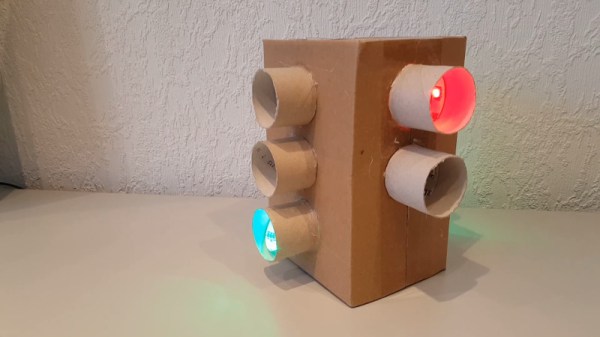
In this case, the light is courtesy of WS2812b LED strips. They’re a great choice, as they interface easily with most microcontrollers thanks to readily available libraries. An ESP8266 runs the show here, serving up a basic web interface over WiFi. This allows the color of the various LEDs to be controlled remotely. It also allows the lights to be switched on and off to direct whatever traffic you may be controlling. The whole project is all wrapped up in a simple cardboard enclosure, mimicking the municipal street furniture which so resolutely commands our movements.

The cardboard traffic light is a project that shows just what can be done with some off-the-shelf parts and some good old-fashioned kindergarten-style arts and crafts. If you find yourself similarly admiring these devices, check out our primer on the North American traffic signal. Video after the break.

Continue reading “IoT Traffic Light Is Cardboard Made Fun” →

Return Of The Infamous Triforium

The Triforium is a public art installation in Los Angeles, weighing 60 tons and standing six stories tall. Built in 1975, it was designed to combine light and sound, all under the control of computer hardware of the era.

Sadly, it was plagued with technical problems from the start, and over the years, became an object of ridicule. However, this “polyphonoptic” masterpiece will live once again, thanks to the dedicated effort of The Triforium Project. The Triforium Project are hosting a series of free public performances on Friday nights in October and November, so if you’re in the area, be sure to check it out. The series starts tonight, so get on it!

The team were able to recover the original software that ran the sculpture’s effects — stored on 8-bit paper tape, which was not uncommon for the era. These were manually transcoded, and an emulated version of the original program has been created. In the interest of not causing further damage to the sculpture, the original lights are being left untouched. Instead, an LED system will be fitted to the sculpture to enable it to be relit.

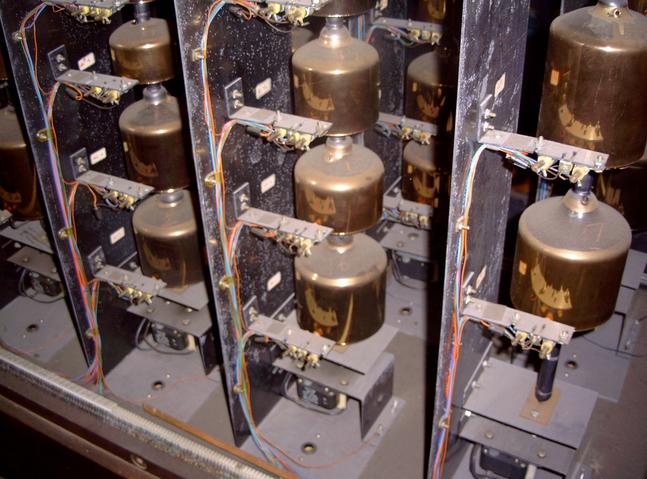
Quartz bells of the original carillon

A reflection pool at the base of the sculpture is long gone, as is the original audio source. When first built it housed a carillon — a musical instrument that uses a bell for each note in the scale. In the case of the Triforium, the carillon was made of 79 quartz bells played either manually or by the computer and amplified over a speaker system.

In 2006 that carillon was removed (replace with a digital audio source) but the gods of dumpster diving were smiling that day. It was snapped up by someone who recognized the uniqueness of the instrument and shared their story as a brief webpage. We hope that some day this will also be restored to working condition and played along with the Triforium in an exhibition. The sound of a carillon is amazing to hear in person, and we suspect the timbre of quartz bells to add an indescribable layer to the experience.

For those who can’t make it to an upcoming public performance, you can at least get a feel for the scupture through Google Street View. We do love a good public art piece here at Hackaday — whether it’s a giant head, a set of wings, or doodles in the sand.

[Thanks to JohnU for the tip!]

A Robotic Arm For Those Who Like Their Kinematics Both Ways

A robotic arm is an excellent idea if you’re looking to get started with electromechanical projects. There’s linkages to design, and motors to drive, but there’s also the matter of control. This is referred to as “kinematics”, and can be considered in both the forward and inverse sense. [aerdronix] built a robotic arm build that works in both ways.

The brains of the build is an Arduino Yun, which receives commands over the USB interface. Control is realised through the Blynk app, which allows IoT projects to easily build apps for smartphones that can be published to the usual platforms.

The arm’s position is controlled in two fashions. When configured to use inverse kinematics, the user commands an end effector position, and the arm figures out the necessary position of the linkages to make it happen. However, the arm can also be used in a forward kinematics mode, where the individual joint positions are commanded, which then determine the end effector’s final position.

Overall, it’s a well-documented build that lays out everything from the basic mechanical design to the software and source code required to control the system. It’s an excellent learning resource for the newcomer, and such an arm could readily be used in more complex projects.

We see plenty of robotic arms around these parts, like this fantastic build based on an IKEA lamp. If you’ve got one, be sure to hit up the tip line. Video after the break.

Continue reading “A Robotic Arm For Those Who Like Their Kinematics Both Ways” →

Balancing Robots From Off-The-Shelf Parts

In this day and age, we are truly blessed as far as the electronics hobby is concerned. Advanced modules such as gyros and motor controllers are readily available, not just as individual parts, but as pre-soldered modules that can be wired together with a minimum of fuss and at low cost. This simple balancing robot is a great example of what can be done with such parts (Google Translate link).

The robot has an ESP32 running the show, which provides both the processing power required, as well as the WiFi interface used to control the ‘bot from a smartphone. This is achieved using an app from JJRobots, an open-source robotics teaching resource. Stepper motors are controlled by DRV8825 modules sourced from amazon, and an MPU6050 gyro rounds out the major components. Naturally, source code is available on GitHub for your reading pleasure.

It’s remarkable that in this day and age, it’s possible to build such a project with little to no soldering required at all. With a credit card and a healthy supply of patch leads, it’s possible to whip up complex digital projects quite quickly. We’ve seen a similar approach before, too. Video after the break.

[Thanks to Baldpower for the tip!]
Continue reading “Balancing Robots From Off-The-Shelf Parts” →

Arcade Asteroids, Now In Colour

Asteroids is one of the classic games of the early arcade era. Launched in 1979 by Atari, it relied upon using an XY vector monitor to deliver crisp graphics for its space-based gameplay. One of the limitations of the original arcade games was that the game was only rendered in a single colour, white. Over 30 years later, [Arcade Jason] decided to see what it would take to build a color Asteroids machine.

The ROM hack also modified the shapes of several in-game objects.

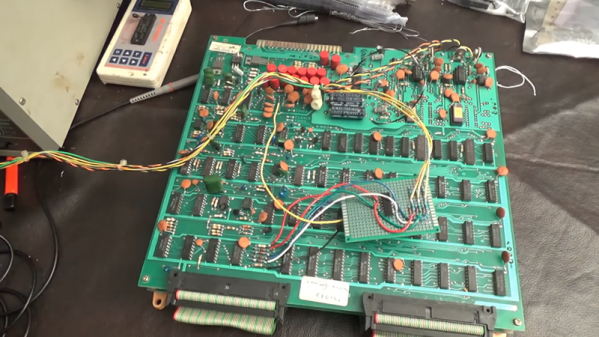
The hack relies on the fact that the original game used a four-bit resistor ladder DAC to draw vectors in different intensity levels. Through some ingeniously simple hardware, this DAC is repurposed to denote different colours instead. It’s laced together with a 74LS08 AND gate chip, along with a handful of resistors and diodes. Three bits are used for red, green, and blue, respectively, with the fourth used as a “white boost” signal to allow the differentiation of colours like red and pink, or dark and light blue. It’s then all wired into an RGB vector monitor for final display. After that, it’s just a matter of a simple ROM hack to set the colors of various on screen objects.

Vector monitors are notoriously hard to film well, but it’s clear that in person the output is rather impressive. Making color versions of old retro games is actually a hobby of [Arcade Jason]’s – we’ve featured his color Vectrex before. Video after the break.

Continue reading “Arcade Asteroids, Now In Colour” →