Making Colored Smoke Devices, The Right Way

Pyrotechnics are fun, and, with the proper precautions taken, safe enough to play with at home (usually). While it’s typical to purchase fireworks and smoke devices off the shelf, it’s actually possible to brew these up in a properly stocked home lab. [Tech Ingredients] is here to share the techniques behind producing your own super vibrant colored smoke devices at home.

Producing colored smoke requires a slightly different tack than making a simpler white smoke device. Colored smokes use dyes that are temperature sensitive, and thus the reaction temperature must be controlled carefully. This is achieved by choosing a potassium chlorate oxidiser, and combining it with magnesium carbonate and sodium bicarbonate, which help stop the reaction getting too hot. Sugar is used as the primary fuel, with both lactose and sucrose being fit for purpose. Color is then added with solvent-based dyes, readily sourced online. These are stable at higher temperatures than typical water-based food grade dyes, and thus are the best choice for creating thick, vibrant colored smoke.

[Tech Ingredients] does a great job of explaining both the theory behind the work, as well as the practical considerations necessary to be successful. The video is the result of much experimentation and work off-camera, which shows in the final presentation. If you’ve been working on your own pyrotechnic creations, be sure to hit up the tips line. Video after the break.

Continue reading “Making Colored Smoke Devices, The Right Way” →

Suspense Courtesy Of Arduino, Mess Of Wires

The ticking clock on the bomb is a Hollywood trope that simply refuses to die. Adding to the stress levels of the bomb squad and creating great suspense for the watcher, it’s always interesting to wonder why the average bomb maker is so courteous as to supply this information to law enforcement. Regardless, if you’d like to build a dramatic prop and are mature enough to do so responsibly, [Giorgio] has the guide you need.

The build is a straightforward one, relying on an Arduino to run the show. This is hooked up to a classic 7-segment LED display, upon which the countdown is displayed. For extra flair, an MP3 player is fitted to play the Mission Impossible theme. It all adds to the tension as you wipe the sweat from your brow, trying to decide if you’re cutting the right wire.

It’s a build that would be an excellent prop for a film production or a fun game at a holiday party. However, it’s also a build that could easily be mistaken for the real thing by those less technically inclined. Even the most innocuous homebrew projects have caused problems for innocent hackers in the past. Fake bombs can be incredibly dangerous, just like the real thing, so it’s important to be careful.

We’ve seen other takes on this kind of build before, too. As always, build responsibly.

The Bolt-On Peristaltic Pump

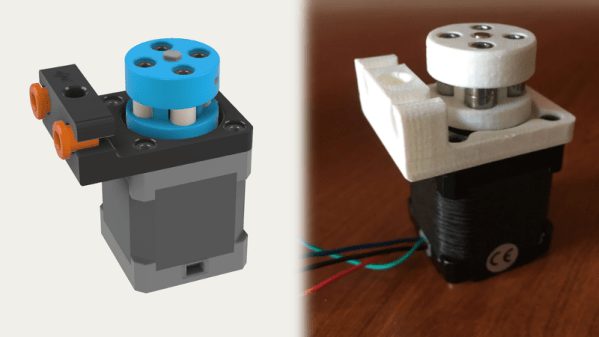
With the proliferation of 3D printing in the new millennium, stepper motors are no longer those idle junkbox inhabitants you pulled out of a dot matrix in 1994 and forgot about ever since. NEMA standard parts are readily available and knocking about just about everywhere. Now, you can readily turn a stepper motor into a peristaltic pump with just a few simple 3D printed parts.

The pump consists of a bracket that fits on to a standard NEMA-14 stepper motor frame. A rotor is then fitted to the motor shaft, constructed out of a 3D printed piece fitted with a series of standard roller bearings. These bearings roll against the tubing, pumping the working fluid.

The design uses the bearings to squeeze outwards against the tube’s own elastic resistance. Frictional wear is minimised by ensuring the tube is only pressed on by the bearings themselves, avoiding any contact between the tubing and hard plastic surfaces.

While the design is in its early stages of development, we’d be interested to see a pump performance comparison against other 3D printed peristaltic designs – we’ve seen a few before!

[Thanks to Baldpower for the tip!]


Ghost Rider Costume Is Smoking Hot

It’s that spooky time of year once again, with pumpkins and cobwebs as far as the eye can see. This year, [Mikeasaurus] has put together something really special – a Ghost Rider costume with some amazing effects.

The costume starts with the skull mask, which started with a model from Thingiverse. Conveniently, the model was already set up to be 3D printed in separate pieces. [Mike] further modified the design by cutting out the middle to make it wearable. The mask was printed in low resolution and then assembled. [Mike] didn’t worry too much about making things perfect early on, as the final finish involved plenty of sanding and putty to get the surface just right. To complete the spooky look, the skull got a lick of ivory paint and a distressed finish with some diluted black acrylic.

With the visual components complete, [Mike] turned his attention to the effects. Light is courtesy of a series of self-blinking LEDs, fitted inside the mask to give the eye sockets a menacing orange glow. However, the pièce de résistance is the smoke effect, courtesy of a powerful e-cigarette device and an aquarium pump. At 225W, and filled with vegetable glycerine, this combination produces thick clouds of smoke which emanate from the back of the wearer’s jacket and within the skull itself. Truly stunning.

[Mike] reports that the costume is scary enough that he has been banned from answering the door as Ghost Rider. We think it’s bound to be a hit, regardless. For another epic mask build, check out the Borderlands Psycho. Video after the break. Continue reading “Ghost Rider Costume Is Smoking Hot” →

Child’s Pushcar Gets Serious Horsepower

A pushcar is a great toy for a young child. They’re great excercise, and kids love anything on wheels. However, the bigger kids might want something with a little more grunt. [Master Milo] has just the thing – an engine from a concrete saw and the fabrication skills to match. (YouTube, embedded below.)

The build starts with the disassembly of the concrete saw, with covers, the saw drive and handle all removed. This leaves a 70 cc petrol engine with a centrifugal clutch already fitted. A steel frame is then built around the engine to mount the rest of the drivetrain. An intermediate shaft is used at the rear to allow for an extra level of gear reduction, and steering up front is handled with parts cribbed from an old ATV. The plastic shell of the pushcar is then fitted over the top and a seat constructed out of scrap wood.

Mechanical parts are in ready supply, with bearings and shafts all sourced from INDI, a European equivalent to McMaster Carr. By purchasing gears, belts and other parts off the shelf, it’s easy to make something that fits first time with a minimum of modification required.

The testing video is worth a watch – with both top speed and handling tests. The platform’s handling does leave something to be desired, but that’s half the fun in a build like this.

We’re no strangers to these projects around these parts – a modded Power Wheels is a great electric take on the same concept. Continue reading “Child’s Pushcar Gets Serious Horsepower” →

AV Synth Is Psychedelic Analog Mayhem

Digital video is cool and all, but it can’t compete with analog in terms of smooth, creamy glitches and distortion. [gieskes] has developed an analog audio-visual synthesizer that is a great example of the old-school retro visuals you can create with a handful of simple components.

Known as the 3TrinsRGB+1c, it’s available both assembled and in kit form. It’s probably best to start with the manual. Synthesis is achieved through the use of a HEF40106 hex inverting buffer – a cheap and readily available part that nonetheless provides for excellent results. Video can be switched between RGB oscillators and a series of inputs, and there are various controls to create those classic scrolling effects and other visual oddities.

Additionally, a series of connections to the underlying circuitry are broken out on a header connector. This allows for extra modules to be plugged in, and several designs are available to expand the unit’s capabilities.

Analog video isn’t used so much on a day-to-day basis anymore, but it’s a great technology to tinker and experiment with. We’ve seen some of [gieskes] experiments in this arena before, too – like this Arduino video sampler. Video after the break.

Continue reading “AV Synth Is Psychedelic Analog Mayhem” →

Camera Obscura On Wheels Hits The Open Road

A camera obscura is a very simple device. Consisting of a dark chamber, with only a pinhole to let light in, it focuses an image on its inside surface. If you want to take a permanent copy, it’s as simple as installing a photosensitive film inside and managing the exposure time. Sounds like a normal camera, right? The difference is the scale —  a camera obscura is large enough that humans can stand inside and view the image. Usually, they are large stationary rooms. [Physics Girl] took the show on the road by building a camera obscura out of a rented box truck.

The optics of the camera obscura project an image upside-down.

The basic concept is a great one – hire a box truck, and cover the rear opening with cardboard. Cut a small hole in the cardboard, and you’ve created a camera obscura on wheels. The video does a great job of explaining the optical principles behind what’s happening, and there’s even experimentation around how to change the exposure level and focus through modification of the aperture.

The only downside to viewing a camera obscura on video is that you can’t appreciate the resolution and detail visible in real life. Trust us though, it’s better than any HDTV on the market today.

The rolling camera obscura makes for a great experiment which requires little more than some cardboard, tape, and a sunny day. It would be great fun to execute as an educational activity at a school or makerspace. Once you’ve tackled that, perhaps consider the digital version. Video after the break.

[Thanks to Baldpower for the tip!]

Continue reading “Camera Obscura On Wheels Hits The Open Road” →