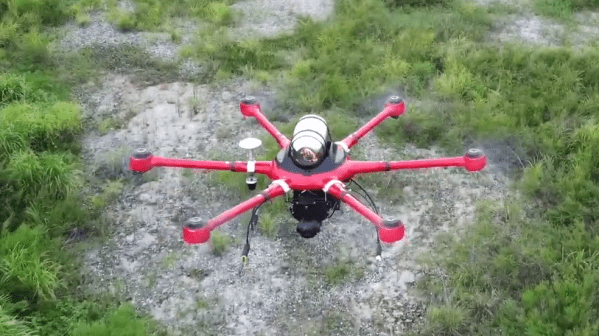
A profile view of a medical training mannequin with a tube down its "throat." A ventillation bag is in the gloved hand of a human trainee.

Making Medical Simulators Less Expensive With 3D Printing And Silicone

Medical training simulators are expensive, but important, pieces of equipment. [Decent Simulators] is designing simulators that can easily be replicated using Fused Deposition Modeling (FDM) printers and silicone molds to bring the costs down.

Each iteration of the simulators is sent out for testing by paramedics and doctors around the world, and feedback is integrated into the next revision. Because the trainers are designed to be easily replicated, parts can easily be replaced or repaired which can be critical to keep personnel trained, especially in remote areas.

While not open source, some models are freely available on the [Decent Simulators] website like wound packing trainers or wound prostheses which could be great if you’re trying to get a head start on next year’s Halloween costumes. More complicated models will be on sale starting in January as either just the design files or a kit containing the files and the printed and/or silicone parts.

Interested in more medical hacks? Check out this Cyberpunk Prosthetic Eye or this Arduino Hearing Test Device.

IR Remote tester in use, showing a remote control lighting up an LED and screenshots of the Arduino serial terminal

IR Remote Tester Helps You Crack The Code

Even though some devices now use WiFi and Bluetooth, so much of our home entertainment equipment still relies on its own proprietary infrared remote control. By and large (when you can find them) they work fine, but what happens when they stop working?  First port of call is to change the batteries, of course, but once you’ve tried that what do you do next? [Hulk] has your back with this simple but effective IR Remote Tester / Decoder.

IR remote tester schematic showing arduino, receiver, LED and resistor
How to connect the TSOP4838 to an Arduino to read the transmitted codes

By using a cheap integrated IR receiver/decoder device (the venerable TSOP4838), most of the hard work is done for you! For a quick visual check that your remote is sending codes, it can easily drive a visible LED with just a resistor for a current-limit, and a capacitor to make the flickering easier to see.

For an encore, [Hulk] shows how to connect this up to an Arduino and how to use the “IRremote” library to see the actual data being transmitted when the buttons are pressed.

It’s not much of a leap to imagine what else you might be able to do with this information once you’ve received it – controlling your own projects, cloning the IR remote codes, automating remote control sequences etc..

It’s a great way to make the invisible visible and add some helpful debug information into the mix.

We recently covered a more complex IR cloner, and if you need  to put together a truly universal remote control, then this project may be just what you need.

Continue reading “IR Remote Tester Helps You Crack The Code”

How Those NES DIP Chips Were Reduced To QFNs

The world of console modding leads us to some extremely impressive projects, and a recent one we featured of note was a portable NES produced by [Redherring32]. It was special because the original NES custom DIP chips had been sanded down to something like a surface-mount QFN package. Back when our colleague [Arya] wrote up the project there wasn’t much information, but since then the full details have been put up in a GitHub repository. Perhaps of most interest, it includes a full tutorial for the chip-sanding process.

To take irreplaceable classic chips and sand them down must take some guts, but the premise is a sound enough one. Inside a DIP package is a chip carrier and a web of contact strips that go to the pins, this process simply sands away the epoxy to expose those strips for new contacts. The result can then be reflowed as would happen with any QFN, and used in a new, smaller NES.

Along the way this provides a fascinating insight into DIP construction that most of us never see. If any of you have ever managed to fatigue a pin off a DIP, you’ll also no doubt be thinking how the technique could be used to reattach a conductor.

You can read our original coverage of the project here.

Commodore Datasette Does Its Own Calibration

Ah, the beloved Commodore 64. The “best-selling computer system of all time”. And hobbyists are keeping the dream alive, still producing software for it today. Which leads us to a problem with using such old equipment. When you get your copy of Petscii Robots on cassette, and try to fastload it, your machine might just consistently fail to load the program. That’s fine, time to pull out the cue-tips and rubbing alcohol, and give the read heads a good cleaning. But what if that doesn’t do the job? You may just have another problem, like tape speed drift.

There are several different ways to measure the current tape speed, to dial it in properly. The best is probably a reference cassette with a known tone. Just connect your frequency counter or digital oscilloscope, and dial in the adjustment pot until your Datasette is producing the expected tone. Oh, you don’t have a frequency counter? Well good news, [Jan Derogee] has a solution for you. See, you already have your Datasette connected to a perfectly serviceable frequency counter — your Commodore computer. He’s put out a free program that counts the pulses coming from the Datasette in a second. So play a reference cassette, run the program, and dial in your Datasette deck. Simple! Stick around after the break for a very tongue-in-cheek demonstration of the problem and solution.

Continue reading “Commodore Datasette Does Its Own Calibration”

Smelting Solar Style

If you attended the 2022 Supercon, you might have heard the story about the SMD soldering challenge table nearly catching on fire. A magnifying lamp caught the sun just right and burned a neat trench into another lamp’s plastic base. While disaster was averted, [Jelle Seegers] does this on purpose using a huge 5-meter lens to smelt metal.

The Design Academy Eindhoven student is participating in Dutch Design Week and built the machine which is able to manually track the sun to maximize the amount of solar energy applied to the metal.

Continue reading “Smelting Solar Style”

Overengineered Fume Extractor, Version 2

We all know the temptation of adding one more feature to your latest project. [Arnov Sharma] didn’t resist the urge. Building on his 3D-printed fume extractor, he developed a new version made of PCB material.

The device has a 18650 battery and corrects several flaws in the original design we covered earlier. In particular, the new version uses a quiet fan and consumes less power. There is also a 3D-printed filter housing that uses cotton as a filter media. Continue reading “Overengineered Fume Extractor, Version 2”

Four M.2 cards of different sizes on a desk surface

M.2 For Hackers – Cards

Last time, I’ve explained everything you could want to know if you wanted to put an M.2 socket onto your board. Today, let’s build M.2 cards! There’s a myriad of M.2 sockets out there that are just asking for a special card to be inserted into it, and perhaps, it’s going to be your creation that fits.

Why Build Cards?

Laptops and other x86 mainboards often come with M.2 slots. Do you have a free B-key slot? You can put a RP2040 and bunch of sensors on a B-key PCB as an experimental platform carried safely inside your laptop. Would you like to do some more advanced FPGA experiments? Here’s a miniscule FPGA board that fits inside your laptop and lets you play with PCIe on this same laptop – the entire setup having a super low footprint. Are you looking for an extra PCIe link because you’re reusing your laptop as a home server? Again, your WiFi slot will provide you with that. Want to get some PCIe out of a SteamDeck? Building a M-key 2230 card seems to be your only hope! Continue reading “M.2 For Hackers – Cards”