Given how fast technology is progressing, some consumer gadgets lend themselves to being replaced every few years. Mobile phones are a particularly good example of a device that you probably won’t want to hold onto for more than 4 years or so, with TVs not far behind them. On the other hand, something like a home alarm system can stay in the fight for decades. As long as it still goes off when somebody tries to pop a window, what more do you need?
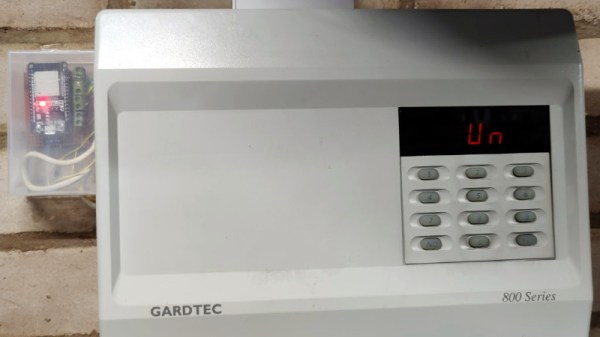
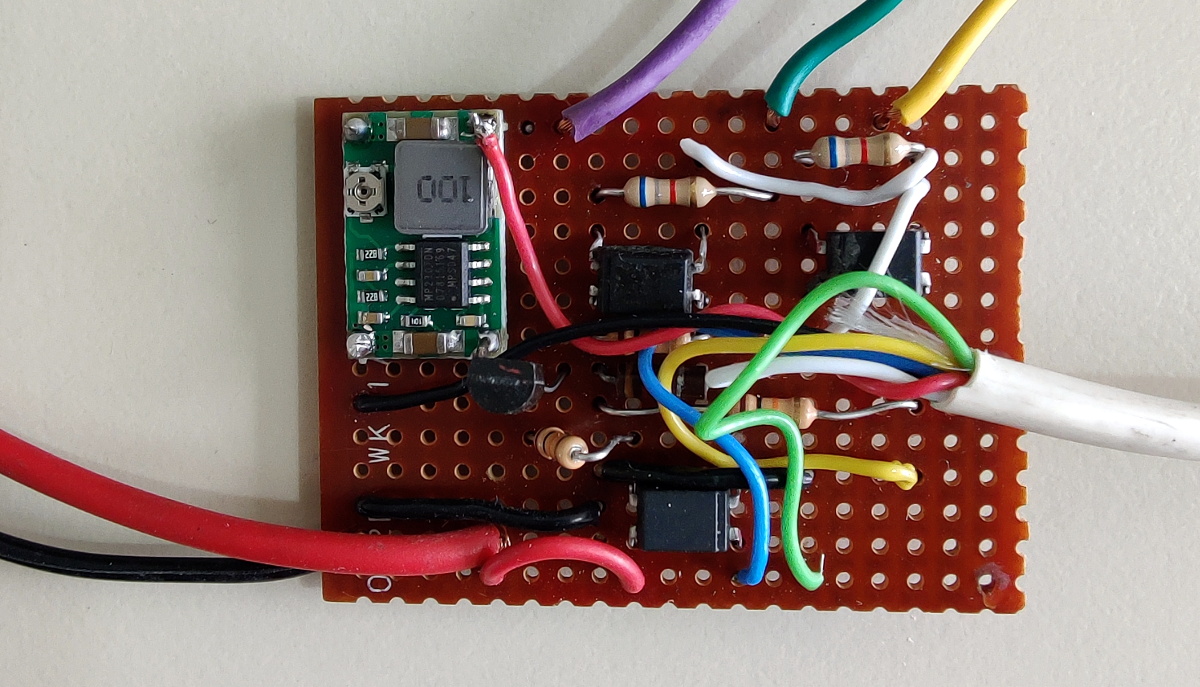
Well if you’re like [Brett Laniosh], you might want the ability to arm the system and check its current status from your phone. But instead of getting a whole new system, he decided to upgrade his circa 1993 Gardiner Gardtec 800 alarm with an ESP32. As it so happens, the original panel has an expansion connector which he was able to tap into without making any modifications to the alarm itself. If you’ve got a similar panel, you might even be able to use his source code and circuit schematics to perform your own modification.
Optocouplers link the ESP and alarm panel.
Now we know what you’re thinking. Surely there’s a risk involved when trusting an ESP32 connected to the Internet with the ability to disarm your home alarm system. [Brett] has considered this, and made sure that the web server running on the microcontroller can only be accessed from the local network. If he does want to connect from beyond WiFi range, he does so through a VPN. In other words, his code is never directly exposed to the wilds of the Internet and is always hiding behind some kind of encryption.
The WiFi connection allows [Brett] to arm and disarm the alarm system remotely, check if it’s been triggered, and reset it if necessary, all from his smartphone. But he’s also added in a 433 MHz receiver so he can use simple handheld fobs to arm the system if he doesn’t want to go through the phone. Even if you dropped out the Internet connectivity, this alone is a pretty nice upgrade.
[Lior] wanted to cancel the monitoring system for his home’s alarm, but he didn’t want to stop using the alarm all together. The trick is to rig up some way to monitor it himself. It would have been simple to have it just call him instead of the alarm company since the system just uses a telephone connection. But this would require that he have a land line for it to connect to, and when it calls him he would have no idea what part of the system had been set off. He developed a way to have the system text message him with all of the available details.
An Arduino controls the system, with a SIM900 GSM shield to hand the cell side of things. The board to the left emulates the standard telephone line, with an M8870 DTMF touch tone decoder to figure out what the alarm system is telling him. He also needed to implement touch tone generation to talk back to the system. His write-up includes links to other articles he posted about hardware, software, and protocol specifics.
Instructables user [willnue] wanted to build a DIY Tweeting alarm system from the ground up, but reconsidered after taking a close look at the scope of such a project. He settled on using an off the shelf security system, taking care of the Twitter interface on his own. He bought a GE 45142 Wireless alarm and promptly disassembled it to see how he might retrieve status messages from the unit.
He figured that monitoring the alarm’s LEDs would make the most sense, so he used a bit of Ethernet cable and wired all of the system’s indicators to his Arduino board. He hooked up an Ethernet shield to the Arduino, then wrapped the pair up in a plastic project box that closely matched the look of the security system. Once that was done, he wrote some simple code for the Arduino that monitors each of the alarm system’s six status lights, sending updates to Twitter via the ThingTweet service.
With this system you might not get your status messages in time to foil whoever is carrying off your plasma TV, but at least you will know what to expect once you get home!
If you want to keep tabs on [Will’s] security system to find out the best time to rob him see how things are going, check out his Twitter feed here.
To many of us, our garage (or workshop) is probably one of the most important parts of the house. If a burglar broke in, we’d likely be more worried about our tools! [Ron Czapala] decided he needed an alarm system in his garage to keep his stuff safe, so he decided to build one from scratch.
The system makes use of a Parallax 4×4 keypad membrane, a MCP23008 port expander, a Parallax Propeller, a LCD screen, and a few switches to represent future magnetic reed switches located in the door and window.
Using circular buffers, the propeller has several states for monitoring the garage.
Not armed — ignore all sensors
Armed — system will react to changes in the sensors
Exit delay — system has been armed, 45 second countdown has begun to allow you to exit the garage
Window trigger — if the window is opened, the alarm will go off immediately (siren and strobe light)
Door trigger — alarm will go off in 60 seconds if correct code has not been entered on the keypad
For a complete demonstration, check out the following video where [Ron] explains it all!
The build is based on an ESP32 microcontroller, which has wireless hardware onboard to communicate with the rest of [Salim’s] Home Assistant setup. Using the ESPHome firmware framework as a base, the microcontroller is connected to a four-by-three button keypad array, built using nice clicky key switches. There’s also an indicator light on top as a system status indicator. A fingerprint scanner provides an easy way for users to authenticate when disarming the alarm.
Security and speed were the push for [Salim] to whip up this system. He found it difficult to disarm his alarm in a hurry when fumbling with his phone, and the direct keypad entry method was far more desirable.
There’s a train vulnerability making the rounds this week. The research comes from [midwestneil], who first discovered an issue way back in 2012, and tried to raise the alarm.
Turns out you can just hack any train in the USA and take control over the brakes. This is CVE-2025-1727 and it took me 12 years to get this published. This vulnerability is still not patched. Here's the story: https://t.co/MKRFSOa3XY
To understand the problem, we have to first talk about the caboose. The caboose was the last car in the train, served as an office for the conductor, and station for train workers to work out of while tending to the train and watching for problems. Two more important details about the caboose, is that it carried the lighted markers to indicate the end of the train, and was part of the train’s breaking system. In the US, in the 1980s, the caboose was phased out, and replaced with automated End Of Train (EOT) devices.
These devices were used to wirelessly monitor the train’s air brake system, control the Flashing Rear End Device (FRED), and even trigger the brakes in an emergency. Now here’s the security element. How did the cryptography on that wireless signal work in the 1980s? And has it been updated since then?
The only “cryptography” at play in the FRED system is a BCH checksum, which is not an encryption or authentication tool, but an error correction algorithm. And even though another researcher discovered this issue and reported it as far back as 2005, the systems are still using 1980s era wireless systems. Now that CISA and various news outlets have picked on the vulnerability, the Association of American Railroads are finally acknowledging it and beginning to work on upgrading.
Laravel provides the encrypt() and decrypt() functions to make that process easy. The decrypt() function even does the deserialization automatically. … You may be able to see where this is going. If an attacker has the APP_KEY, and can convince a Laravel site to decrypt arbitrary data, there is likely a way to trigger remote code execution through a deserialization attack, particularly if the backend isn’t fully up to date.
So how bad is the issue? By pulling from their records of GitHub, GitGuardian found 10,000 APP_KEYs. 1,300 of which also included URLs, and 400 of those could actually be validated as still in use. The lesson here is once again, when you accidentally push a secret to Github (or anywhere on the public Internet), you must rotate that secret. Just force pushing over your mistake is not enough.
Fake Homebrew
There’s a case to be made that browsers should be blocking advertisements simply for mitigating the security risk that comes along with ads on the web. Case in point is the fake Homebrew install malware. This write-up comes from the security team at Deriv, where a MacOS device triggered the security alarms. The investigation revealed that an employee was trying to install Homebrew, searched for the instructions, and clicked on a sponsored result in the search engine. This led to a legitimate looking GitHub project containing only a readme with a single command to automatically install Homebrew.
The command downloads and runs a script that does indeed install Homebrew. It also prompts for and saves the user’s password, and drops a malware loader. This story has a happy ending, with the company’s security software catching the malware right away. This is yet another example of why it’s foolhardy to run commands from the Internet without knowing exactly what they do. Not to mention, this is exactly the scenario that led to the creation of Workbrew.
SQL Injection
Yes, it’s 2025, and we’re still covering SQL injections. This vulnerability in Fortinet’s Fortiweb Fabric Connector was discovered independently by [0x_shaq] and the folks at WatchTowr. The flaw here is the get_fabric_user_by_token() function, which regrettably appends the given token directly to a SQL query. Hence the Proof of Concept:
GET /api/fabric/device/status HTTP/1.1

Host: 192.168.10.144

Authorization: Bearer 123'//or//'x'='x
And if the simple injection wasn’t enough, the watchTowr write-up manages a direct Remote Code Execution (RCE) from an unauthenticated user, via a SQL query containing an os.system() call. And since MySQL runs as root on these systems, that’s pretty much everything one could ask for.
AI guided AI attacks
The most intriguing story from this week is from [Golan Yosef], describing a vibe-researching session with the Claude LLM. The setup is a Gmail account and the Gmail MCP server to feed spammy emails into Claude desktop, and the Shell MCP server installed on that machine. The goal is to convince Claude to take some malicious action in response to an incoming, unsolicited email. The first attempt failed, and in fact the local Claude install warned [Golan] that the email may be a phishing attack. Where this mildly interesting research takes a really interesting turn, is when he asked Claude if such an attack could ever work.
Claude gave some scenarios where such an attack might succeed, and [Golan] pointed out that each new conversation with Claude is a blank slate. This led to a bizarre exchange where the running instance of Claude would play security researcher, and write emails intended to trick another instance of Claude into doing something it shouldn’t. [Golan] would send the emails to himself, collect the result, and then come back and tell Researcher Claude what happened. It’s quite the bizarre scenario. And it did eventually work. After multiple tries, Claude did write an email that was able to coerce the fresh instance of Claude to manipulate the file system and run calc.exe. This is almost the AI-guided fuzzing that is inevitably going to change security research. It would be interesting to automate the process, so [Golan] didn’t have to do the busywork of shuffling the messages between the two iterations of Claude. I’m confident we’ll cover many more stories in this vein in the future.
Cryptojacking is the technique where a malicious website embeds a crypto miner in the site. And while it was particularly popular in 2017-2019, browser safeguards against blatant cryptojacking put an end to the practice. What c/side researchers discovered is that cryptojacking is still happening, just very quietly.
ZDI has the story of Firefox and a JavaScript Math confusion attack. By manipulating the indexes of arrays and abusing the behavior when integer values wrap-around their max value, malicious code could read and write to memory outside of the allocated array. This was used at Pwn2Own Berlin earlier in the year, and Firefox patched the bug on the very next day. Enjoy!
Have you ever thought of giving new buzz to outdated wired alarm systems or saving money while upgrading your home security? The Hornet Nest Alarm Panel, to which hacker [Patrick van Oosterwijck] contributes, does just that. Designed for domotics enthusiasts, it offers 42 sensor zones and seamless integration with Home Assistant and ESPHome. This open-source gem uses the wESP32 board, which combines an ESP32 with Ethernet and Power over Ethernet (PoE) for robust, reliable connectivity. Check out the Crowd Supply campaign for details.
So what makes this Hornet Nest special? Besides its hackable nature, it repurposes existing wired sensors, reducing waste and cost. Unlike WiFi-dependent solutions, the PoE-powered ESP32 ensures stable performance, even in hard-to-reach locations. The optional USB programming port is genius—it’s there when you need it but doesn’t clutter the board when you don’t. With its isolated circuits, long-cable safety, and smart Ethernet, WiFi, and Bluetooth combination, this system ticks every DIY box.