Swapping The ROMs In Mini Arcade Cabinets

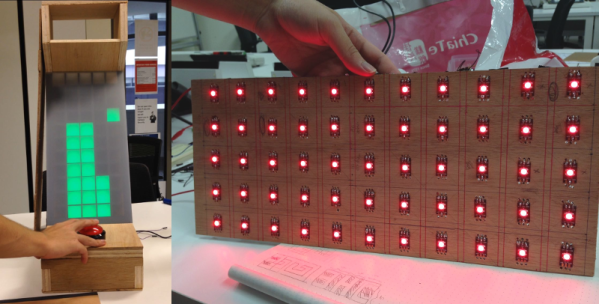
You’ve probably seen a few of these miniature arcade games online or in big box retailers: for $20 USD or so you get scaled-down version of a classic arcade cabinet, perfect for a desk toy or to throw up on a shelf as part of your gaming collection. Like any good Hackaday reader, you were probably curious about what makes them tick. Thanks to [wrongbaud], we don’t have to wonder anymore.

Over the course of several blog posts, [wrongbaud] walks readers through the hardware and software used in a few of these miniature games. For example, the Rampage cabinet is using a so-called “NES on a Chip” along with a SPI flash chip to hold the ROM, while Mortal Kombat is using a Genesis emulation solution and parallel flash. It wouldn’t be interesting if they didn’t throw you a few curves now and again, right?

But these are more than simple teardowns. Once [wrongbaud] gives an overview of the hardware, the next step is reading the respective flash storage and trying to make sense of the dumped data. These sort of games generally reuse the hardware among a number of titles, so by isolating where the game ROM is and replacing it, they can be made to play other games without hardware modification. Here, this capability is demonstrated by replacing the ROM data for Rampage with Yoshi’s Cookie. Naturally it’s one of those things that’s easier said than done, but it’s an interesting proof of concept.

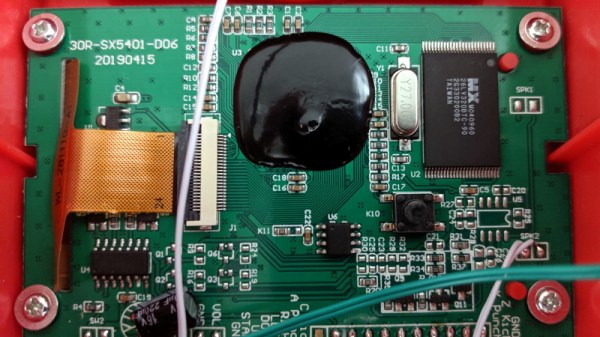
The Mortal Kombat cabinet is a newer addition to the collection, so [wrongbaud] hasn’t progressed quite as far with that one. The parallel flash chip has been dumped with the help of an ESP32 and a MCP23017 I/O expander, and some Genesis ROM headers are identifiable in the data, but there’s still some sifting to be done before the firmware structure can be fully understood.

Even if you’re not in the market for a diminutive arcade experience, the information that [wrongbaud] has collected here is really phenomenal. From understanding protocols such as I2C and SPI to navigating firmware dumps with a hex editor, these posts are an invaluable resource for anyone looking to get started with reverse engineering.

Mini Arcade Cabinet Looks As Good As The Real Thing

mame_cab

[Ed] had a netbook he no longer needed and decided to make it into a mini MAME cabinet for some of his family members. MAME cabinets are pretty plentiful, but this one was so nicely done, we wanted to share it.

He removed the monitor from an EeePC 901 in order to get some precise measurements, then went about crafting a mini cabinet from MDF. The whole thing was wrapped in sticky label paper adorned with old-school Galaga graphics, then covered in plexiglass for a nice sleek look that also protects the artwork.

He used an iPac 2 controller board to wire up all of the buttons and joystick to the netbook, opting to solder the controller’s wires directly to the USB header on the eeePC’s motherboard. A power switch was added up on top for easy operation, and the cabinet was sealed shut, though the back does open easily in the event that maintenance is required. The system is managed using the Maximus Arcade front end for MAME, which [Ed] claims is incredibly easy.

If you are interested in making your own MAME cabinet, check out some of the other MAME-based projects we have featured in the past, and don’t miss the video below of [Ed’s] cabinet in action.

Continue reading “Mini Arcade Cabinet Looks As Good As The Real Thing”

Neo Geo Mini Arcade

neopocket

[Pocket Lucho], the builder of mini arcade cabinets, is back with another build. This time it’s a miniature Neo Geo arcade machine (translated). The build is very compact and neat. He attached the control panel and the PS one display using magnets to make the wiring more accessible. It has video out and second player input too. You’ll find an assembly video embedded below along with a trial run. Continue reading “Neo Geo Mini Arcade”

Mini Arcade Cabinets

mini-arcade

[Pocket_Lucho] has really done a fantastic job on this one. He’s making miniature arcade cabinets(translated) from old consoles.  This post is mainly talking about a Sega genisis version, but he’s also done one for the PC engine(aka turbografix 16). He takes us through pulling RGB video strait from the chip as well as harvesting buttons from a cheapo all in one arcade controller. For the screen he’s using a PSone portable LCD, pretty much un modified. What really stands out is the final layout. He has built tiny arcade cabinets, about a foot tall, to house them. These are amazingly awesome and we want one. No, we want an entire mini arcade of them. You can see a video after the break.

Continue reading “Mini Arcade Cabinets”

A handheld game console made from bare PCBs

Minimalist Homebrew Hardware Recreates Arcade Classics

Classic video games might look primitive by today’s standards, but the addictive gameplay of Breakout or Pac-Man remains fun no matter what decade you were born in. Keeping the relevant hardware running becomes harder as the years pile up however, so when [Michal Zalewski] decided to introduce his kids to classic video games, he didn’t dig up his old game consoles. Instead, he decided to recreate several games from scratch using the bare minimum amount of hardware needed.

The first project is a copy of Snake, the arcade classic that millennials will recognize from their Nokia phones. [Michal] made an initial version using an ATmega328P with an 8×8 LED matrix as a display, but quickly upgraded the hardware to a 16×16 display powered by an ATmega644, and added an LED seven-segment display to show the score. All parts are simply soldered onto a piece of prototyping board, with no need for any custom PCBs or enclosures.

Game #2 is a side-scrolling space shooter called Dino in Space. This game runs on an ATmega1284 and uses a 4×20 character text display, allowing simple graphics as well as an on-screen score counter. Similar hardware, although with a 128×64 graphic OLED screen, powered game #3, a Breakout/Arkanoid clone called Blockbuster 7000.

[Michal]’s blog post is filled with interesting tips for real-life game programming. For example, a true random number generator creates a rather odd-looking bunch of asteroids in space – tweaking the distribution to make it a bit more uniform greatly enhances the game’s playability. Source files for all games are available on [Michal]’s website, and include a description of the exact hardware setup needed for each game.

Recreating Snake on custom hardware is sort of a rite of passage for microcontroller hackers, as you can see in  many impressive projects. Breakout-style games can also be implemented on various hardware platforms, including analog oscilloscopes.

Miniature Star Wars Arcade Lets You Blow Up The Death Star On The Go

If you have fond childhood memories of afternoons spent at the local arcade, then you’ve had the occasional daydream about tracking down one of those old cabinets and putting it in the living room. But the size, cost, and rarity of these machines makes actually owning one impractical for most people.

While this fully functional 1/4th scale replica of the classic Star Wars arcade game created by [Jamie McShan] might not be a perfect replacement for the original, there’s no denying it would be easier to fit through your front door. Nearly every aspect of the iconic 1983 machine has been carefully recreated, right down to a working coin slot that accepts miniature quarters. Frankly, the build would have been impressive enough had he only put in half the detail work, but we certainly aren’t complaining that he went the extra mile.

[Jamie] leaned heavily on resin 3D printed parts for this build, and for good reason. It’s hard to imagine how he could have produced some of the tiny working parts for his cabinet using traditional manufacturing techniques. The game’s signature control yoke and the coin acceptor mechanism are really incredible feats of miniaturization, and a testament to what’s possible at the DIY level with relatively affordable tools.

The cabinet itself is cut from MDF, using plans appropriately scaled down from the real thing. Inside you’ll find a Raspberry Pi 3 Model A+ running RetroPie attached directly to the back of a 4.3 inch LCD with integrated amplified speakers. [Jamie] is using an Arduino to handle interfacing with the optical coin detector and controls, which communicates with the Pi over USB HID. He’s even added in a pair of 3,000 mAh LiPo battery packs and a dedicated charge controller so you can blow up the Death Star on the go.

Still don’t think you can fit one in your apartment? Not to worry, back in 2012 we actually saw somebody recreate this same cabinet in just 1/6th scale.

Continue reading “Miniature Star Wars Arcade Lets You Blow Up The Death Star On The Go”

A Mini Stacker Arcade Cabinet

For [LumoW], what started as a school project turned into a passion project. He and his team made a hardware implementation of an arcade game called Stacker. Never heard of it? It’s pretty fun, kind of like an inverse Tetris. You can play the flash version here and see their mini arcade version after the break.

The game is based around the Mojo FPGA which the class required, and it’s programmed entirely in bitwise operators. It uses WS2812 RGB LEDs to represent the individual tower building blocks, and these are mounted on plywood in a matrix and separated into cells by a grid of foam board. After some trial and error, the team found the perfect shade of acrylic to diffuse the bright dots into glowing squares.

Since the game only needs one input, we don’t think [LumoW] should apologize at all for using the biggest, baddest button they could find. Besides, the game has that edge-of-your-seat action that can turn panic into heavy-handedness and cool DIY arcade games into shards of sadness.

Looking for something more advanced to do with an FPGA? Try your hand at vector games.

Continue reading “A Mini Stacker Arcade Cabinet”