Shenzhen, China is the home of the legendary electronics markets of Huaqiangbei. Friday was my first full day in the city, having spent the previous three days in Shanghai. We got a little bit of a late start as our flight didn’t arrive until after 1 am and we stayed at the first night at an airport hotel. We met up with Scotty Allen for an amazing meal followed by a very unique experience in the electronics markets, not just seeing the items, but meeting the booth owners who showed off some of their secrets.
The day was capped off by an absolutely packed meetup at X.factory, the collaborative creative space run by Seeed Studio. They lined up a half dozen hardware talks that were quite excellent, and there was a ton of hardware being demonstrated as the night progressed. They had to kick us out or we’d have stayed all night!
Seeed Studio recently launched its third Kickstarter campaign: ReSpeaker, an open hardware voice interface. After their previous Kickstarted IoT hardware, such as the RePhone, mostly focused on connectivity, the electronics manufacturer from Shenzhen now tackles another highly contested area of IoT: Voice recognition.
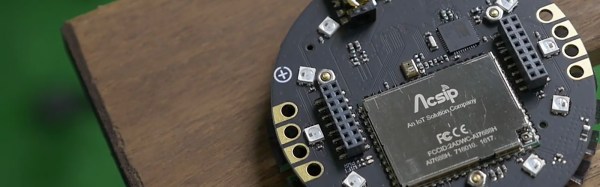
The ReSpeaker Core is a capable development board based on Mediatek’s MT7688 WiFi module and runs OpenWrt. Onboard is a WM8960 stereo audio codec with integrated 1W speaker/headphone driver, a microphone, an ATMega32U4 coprocessor, 12 addressable RGB LEDs and 8 touch sensors. There are also two expansion headers with GPIOs, I2S, I2C, analog audio and USB 2.0 and an onboard microSD card slot.
The latter is especially useful to feed the ReSpeaker’s integrated speech recognition engine PocketSphinx with a vocabulary and audio file library, enabling it to respond to keywords and commands even when it’s not hooked up to the internet. Once it’s online, ReSpeaker also supports most of the available cloud based cognitive speech recognition services, such as Microsoft Cognitive Service, Amazon Alexa Voice Service, Google Speech API, Wit.ai and Houndify. It also comes with an SDK and Python API, supports JavaScript, Lua and C/C++, and it looks like the coprocessor features an Arduino-compatible bootloader.
The expansion header accepts shield-like hardware add-ons. Some of them are also available through the campaign. The most important one is the circular, far-field microphone array. Based on 7 XVSM-2000 digital microphones, the extension board enhances the device’s hearing with sound localization, beam forming, reverb and noise suppression. A Grove extension board connects the ReSpeaker to the Seeed’s current lineup on ready-to-use sensors, actuators and other peripherals.
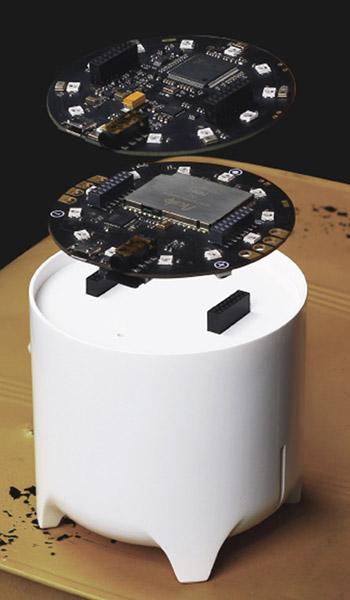
Seeed also cooperates with the Meow King Audio Electronic Company to develop a nice tower-shaped enclosure with built-in speaker, 5W amplifier and battery. As a portable speaker, the Meow King Drive Unit (shown on the right) certainly doesn’t knock your socks off, but it practically turns the ReSpeaker into an open source version of the Amazon Echo — including the ability to run offline instead of piping everything you say to Big Brother.
According to Seeed, the freshly baked hardware will ship to backers in November 2016, and they do have a track-record of on-schedule shipped Kickstarter rewards. At the time of writing, some of the Crazy Early Birds are still available for $39. Enjoy the campaign video below and let us know what you think of think hardware in the comments!
Everyone’s favorite Open Hardware store – Seeed Studio – was at Maker Faire this last weekend. They showed off a bunch of cool toys, oscilloscopes, Arduino shields and other hardware goodness, but one of the more interesting products was from their B Squares line.
As [Colin] from Seeed showed us, each B Square is a small plastic enclosure about the size of a drink coaster. The corners of these squares are clad in metal, and each one has magnets inside. The idea behind the B Squares system is to provide power to other B Square boards via magnetic connections.
So far, Seeed has released an Arduino square, battery, solar, and LED squares, as well as iPod docks and prototyping boards. These boards can also be orthogonally, meaning it’s entirely possible to turn six B Squares into a B Cube.
These magnetic connections only provide power connections; there is currently no way to transfer data between different B Squares. We suspect, though, that anyone wanting to replicate the Apple MagSafe power adapter and invent a magnetic I2C bus would find these boards perfectly suited to the task.
Seeed Studios, makers of the Seeeduino and fabricators of small-run PCB orders have put out a call to help develop an open source radiation detector. Will it be of any help to people in the area of Japan that is at risk? We really can’t say. But if you can lend some expertise with this, it can’t hurt. We’ve already seen a simple dosimeter project but this one sounds like it’s more on the level of a DIY Geiger counter. We know it’s possible, but the hacked together unit we saw back in 2007 had very little documentation and used parts that may be hard to come by.
The specific information needed is what type of sensor to use, what supporting circuits should be included, and what method is best to calibrate each unit. There’s a discussion going in the comment thread of that post which should be interesting to read even if you think you don’t have anything to add.
We think of the Arduino as a rapid prototyping tool but we never thought of it as an FTDI breakout board before. [Ihsan Kehribar] wrote a quick post to show how it’s done. You’ll find an FTDI chip on Arduino boards that have a USB connector. It’s used to handle the USB communications on one side, and TTL serial communications on the other. The serial pins from the chip are mapped to the UART on the AVR chip, and in turn they appear on the pin headers for easy connections. Just load up a really simple sketch(available from Ihsan’s post) to make sure the processor doesn’t get in the way and you’ve got yourself an FTDI breakout board. If you happen to have a Seeeduino there’s even more functionality as the board has a selector switch that allows you to choose between 5V and 3.3V levels.
This doesn’t hold true to the newest generation of Arduino, as those board have replaced the FTDI chip with an ATmega8U2. That’s basically and ATmega8 with native USB handling… fancy.
Make has assembled a buyers guide for the many different types of Arduino devices. The Arduino is an open hardware platform designed to make prototyping easily accessible. The design allows for other people to modify, expand, and improve on the base, and many people have started producing their own versions. The guide features a lot of the hardware we’ve covered in the past like the LilyPad, Arduino Pro, Sanguino, Duemilanove, Ethernet Shield, and Freeduino.
Out of the pack, the Seeeduino (pictured above) definitely caught our eye. It’s a low profile SMD design much like the Arduino Pro. They’ve taken advantage of the space saved by the SMD ATmega168 by adding more useful headers. In addition to the ICSP, you get the pins in UART order and an I2C header. Vcc is switch selectable for 3.3 or 5volts. The reset switch has been moved to the edge plus two additional ADC pins. Our favorite feature is the new spacing on the digital pins. Arduino digital pin headers have an inexplicable 160mil gap between the banks. The Seeeduino has the standard row for shield compatibility, but has an additional row spaced at standard 100mil spacing for use with protoboard. At $23.99, it’s competitively priced too.
It’s a common enough problem: you’re hitting the books, your phone dings with a notification, and suddenly it’s three hours later. While you’ve done lots of scrolling, you didn’t do any studying. If only there were a quick, easy project that would keep an eye on you and provide a subtle nudge to get you off the phone. [Makestreme] has that project, an AI study lamp that shifts from warm white to an angry red to remind students to get back to work. See it in action in the demo video below.