Illuminated smart curtain in front of a window, beside a Christmas tree

Smart LED Curtain Brings Sprites To Your Windows

Mobile interface for LED smart curtain display
A mobile interface is a nice touch

Anybody who has ever seen a video wall (and who hasn’t?) will be familiar with the idea of making large-scale illuminated images from individual coloured lights. But how many of us have gone the extra mile and fitted such a display in our own homes? [vcch] has done just that with his Deluxe Smart Curtain that can be controlled with a phone or laptop.

The display itself is made up of a series of Neopixel strips, hung in vertical lines in front of the window.  There is a wide gap between each strip, lending a ghostly translucent look to the images and allowing the primary purpose of the window to remain intact.

The brains of the system are hosted on a low-cost M5stack atom ESP32 device. The data lines for the LEDs are wired in a zig-zag up and down pattern from left to right, which the driver software maps to the rectangular images. However, the 5V power is applied to the strips in parallel to avoid voltage drops along the chain.

If you’d like to build your own smart curtain, Arduino sketch files and PHP for the mobile interface are included on the project page. Be sure to check out the brief video of what the neighbors will enjoy at night after the break.

If video walls are your kind of thing, then how about this one that uses Ping Pong Balls as diffusers? Continue reading “Smart LED Curtain Brings Sprites To Your Windows”

Remoticon 2021 // Jeroen Domburg [Sprite_tm] Hacks The Buddah Flower

Nobody likes opening up a hacking target and finding a black epoxy blob inside, but all hope is not lost. At least not if you’ve got the dedication and skills of [Jeroen Domburg] alias [Sprite_tm].

It all started when [Big Clive] ordered a chintzy Chinese musical meditation flower and found a black blob. But tantalizingly, the shiny plastic mess also included a 2 MB flash EEPROM. The questions then is: can one replace the contents with your own music? Spoiler: yes, you can! [Sprite_tm] and a team of Buddha Chip Hackers distributed across the globe got to work. (Slides here.)

[Jeroen] started off with binwalk and gets, well, not much. The data that [Big Clive] dumped had high enough entropy that it looks either random or encrypted, with the exception of a couple tiny sections. Taking a look at the data, there was some structure, though. [Jeroen] smelled shitty encryption. Now in principle, there are millions of bad encryption methods out there for every good one. But in practice, naive cryptographers tend to gravitate to a handful of bad patterns.

Bad pattern number one is XOR. Used correctly, XORing can be a force for good, but if you XOR your key with zeros, naturally, you get the key back as your ciphertext. And this data had a lot of zeros in it. That means that there were many long strings that started out the same, but they seemed to go on forever, as if they were pseudo-random. Bad crypto pattern number two is using a linear-feedback shift register for your pseudo-random numbers, because the parameter space is small enough that [Sprite_tm] could just brute-force it. At the end, he points out their third mistake — making the encryption so fun to hack on that it kept him motivated!
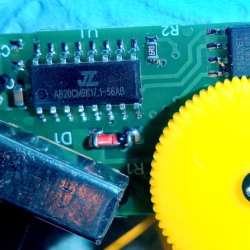
Decrypted, the EEPROM data was a filesystem. And the machine language turned out to be for an 8051, but there was still the issue of the code resident on the microcontroller’s ROM. So [Sprite_tm] bought one of these flowers, and started probing around the black blob itself. He wrote a dumper program that output the internal ROM’s contents over SPI. Ghidra did some good disassembling, and that let him figure out how the memory was laid out, and how the flow worked. He also discovered a “secret” ROM area in the chip’s flash, which he got by trying some random functions and looking for side effects. The first hit turned out to be a memcpy. Sweet.

[Neil555]’s Rosetta Stone
Meanwhile, the Internet was still working on this device, and [Neil555] bought a flower too. But this one had a chip, rather than a blob, and IDing this part lead them to an SDK, and that has an audio suite that uses a derivative of WMA audio encoding. And that was enough to get music loaded into the flower. (Cue a short rick-rolling.) Victory!

Well, victory if all you wanted to do was hack your music onto the chip. As a last final fillip, [Sprite_tm] mashed the reverse-engineered schematic of the Buddha Flower together with [Thomas Flummer]’s very nice DIY Remoticon badge, and uploaded our very own intro theme music into the device on a badge. Bonus points? He added LEDs that blinked out the LSFR that were responsible for the “encryption”. Sick burn!

Editor’s Note: This is the last of the Remoticon 2 videos we’ve got. Thanks to all who gave presentations, to all who attended and participated in the lively Discord back channel, and to all you out there who keep the hacking flame alive. We couldn’t do it without you, and we look forward to a return to “normal” Supercon sometime soon.

The Game Boy As You Have Never Seen It Before Is Newest From [Sprite_tm]

Explain a Game Boy to a child in 2021 and they’ll have little idea of how much impact that chunky grey brick had back in the day. Search for a YouTube video to demonstrate, and you might find the one we’ve put below the break. It starts with the classic Tetris on the Game Boy, then moves on to Super Mario World before treating us to Sonic the Hedgehog, and finally Doom. All seminal games of the Game Boy’s heyday, with one small problem. The last three were never Game Boy titles, and certainly wouldn’t have run on the device’s limited hardware. Most of you will by now not be surprised to find that the narrator is none other than [Sprite_tm], and his Game Boy has one of the nicest Raspberry Pi conversions we’ve ever seen.

Given his previous work we expected the cartridges to have an ESP32 on board that  somehow mapped into Game Boy display memory, but in fact he’s swapped the original Nintendo motherboard with a replacement carrying an ICE40 FPGA on one side to handle the Nintendo hardware and a Pi Zero on the other to do the heavy lifting. Insert a Game Boy cartridge and it emulates the original to the point you’d never suspect it wasn’t the real thing, but insert one of the non Game Boy cartridges and it passes an identifier to the Pi which launches a script to run the appropriate Pi code. So the Mario and Sonic games are running in Pi-based emulators, and Doom is running natively on the Pi. It gives the appearance of a seamless gaming experience, wherein lies its charm.

This project certainly has the quality we’ve come to expect from Sprite, and a quick flick through these pages will show plenty of previous examples. One of the most recent was a miniature working DEC VT100 terminal containing an emulated PDP minicomputer.

Continue reading “The Game Boy As You Have Never Seen It Before Is Newest From [Sprite_tm]”

Simple Sprite Routines Ease Handheld Gaming DIY

Making your own handheld games is made much easier with [David Johnson-Davies’] simple sprite routines for the Adafruit PyBadge and PyGamer boards. Sprites can be thought of as small, fixed-size graphical objects that are drawn, erased, moved, and checked for collision with other screen elements.

xorSprite() plots an 8×8 sprite, moveSprite() moves a given sprite by one pixel without any flicker, and hitSprite() checks a sprite for collision with any screen elements in a given color. That is all it takes to implement a simple game, and [David] makes them easy to use, even providing a demo program in the form of the rolling ball maze shown here.

These routines work out-of-the-box with the PyBadge and PyGamer, but should be easy to adapt to any TFT display based on the ST7735 controller. The PyGamer is the board shown here, but you can see the PyBadge as it was used to create an MQTT-enabled conference badge.

If you really want to take a trip down the rabbit hole of sprite-based gaming graphics, you simply can’t miss hearing about the system [Sprite_TM] built into the FPGA Game Boy badge.

Jumbo LED Matrix Brings Classic Sprites To Life

Despite all the incredible advancements made in video game technology over the last few decades, the 8-bit classics never seem to go out of style. Even if you weren’t old enough to experience these games when they were new, it’s impossible not to be impressed by what the early video game pioneers were able to do with such meager hardware. They’re a reminder of what can be accomplished with dedication and technical mastery.

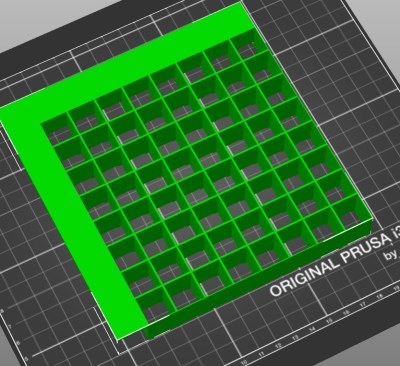
The grid has been split up for easier printing.

If you’d like to put a little retro inspiration on your desk, take a look at this fantastic 16 x 16 LED matrix put together by [Josh Gerdes]. While it’s obviously not the only thing you could use it for, the display certainly seems particularly adept at showing old school video game sprites in all their pixelated glory. There’s something about the internal 3D printed grid that gives the sprites a three dimensional look, while the diffused glow reminds us of nights spent hunched over a flickering CRT.

The best part might be how easy it is to put one of these together for yourself. You’ve probably got most of what you need in the parts bin; essentially it’s just a WS2812B strip long enough to liberate 256 LEDs from and a microcontroller to drive them. [Josh] used an Arduino Nano, but anything compatible with the FastLED library would be a drop-in replacement. You’ll also need a 3D printer to run off the grid, and something to put the whole thing into. The 12×12 shadowbox used here looks great, but we imagine clever folks such as yourselves could make do with whatever might be laying around if you can’t nip off to the arts and crafts store right now.

Beyond looking great, this project is a fantastic reminder of how incredibly handy WS2812 LEDs really are. Whether you’re recreating iconic game sprites or fashioning your own light-up sunglasses, it’s hard to imagine how we managed before these little wonders hit the scene.

Continue reading “Jumbo LED Matrix Brings Classic Sprites To Life”

Machine Inside Of A Chip: How Sprite_TM Built The FPGA Game Boy Badge

Kids of the 1990’s would call you a liar if you told them that within thirty years you’d go to a conference and be handed a Super Nintendo Entertainment System to wear around your neck. But that’s what happened with the badge Jeroen Domburg, aka [Sprite_TM], designed for the 2019 Hackaday Superconference. It’s built in the Game Boy form factor, complete with a cartridge slot, beautiful screen, and the familiar button layout. But there’s so much more here, like the HDMI port on the bottom and the ability to completely reconfigure the device by dropping a binary file onto it over USB.

Of course what makes this possible is the FPGA at the heart of the design. The story of how the badge was developed is shared in great detail during Sprite’s Supercon talk. The timeline, the hardware choices, and the oopses along the way make for a great story. But what you really don’t want to miss is how he built the machine inside of the FPGA — the collection of Verilog code known as “gateware” that brings together the System-on-a-Chip (SoC). From his delight at being able to spawn more processor cores by changing a single variable, to the fascinating SNES-inspired graphics subsystem, the inside story shared below is even more interesting than the physical device itself.

Continue reading “Machine Inside Of A Chip: How Sprite_TM Built The FPGA Game Boy Badge”

Perler Printer Pushes Pixel-Art Like No Sprite Artist Could

There’s something oddly soothing about the practice of laying down Perler Beads on a casual weekend to make your favorite classic Nintendo characters. But seriously, why use our grubby hands like a caveman when we could leverage a machine to do the heavy-lifting for us? That’s exactly what [knezuld11] did! They’ve built a 64-color Bead Sprite Printer including an automatic cooking feature for fusing the result. (Video, embedded below.)

From the top, up to 64 unique bead colors are stashed into cartridges at the top. A bulk agitator does the work of passing these beads into tubes for the lower-stage bead selector. At this level, beads colors are serialized into a single tube that feeds into the output “nozzle.” The entire process of directing the bead pattern is driven by a Python script that takes images as input and approximates their colors to the available bead palette. When the bead “printing” is done, the machine ramps up its heated bed and cooks the bottoms of the beads, fusing them together in a way that [knezuld11] says works actually better than the typical ironing method.

We simply love how feature-complete this system is. While [knezuld11] mentioned that the Bead Sprite Printer was an attempt at beating a world record, we imagine that there are dozens of other ways this machine could lead to some whimsical engagements. Quite frankly, we’d love to see this machine at an Artist Alley making on-demand art.

If you managed to spill all your beads from sheer excitement watching this video, fret not! This automatic bead sorter from our past is just the thing to help you out.

Continue reading “Perler Printer Pushes Pixel-Art Like No Sprite Artist Could”