3D-Printed Thermite Brings The Heat, And The Safety

Thermites are a double-edged sword. Packing a tremendous energy density, and eager to produce tremendous heat when ignited, thermite is great for welding train tracks. But sometimes you might be looking for a little more finesse. A new approach to 3D printing thermites might just be able to tame the beast.

Most of us do our soldering while sitting safely indoors in a comfortable climate. The biggest dangers we’re likely to face are burnt fingertips, forgetting the heat shrink, or accidentally releasing the smoke monster. But outside of our homes and workshops, there’s a lot of extreme joining of metals going on. No matter where it’s done, welding and brazing in the field requires a lot of equipment, some of which is unwieldy and even more difficult to move around in harsh conditions.

Welding railroad tracks with thermite. Image via YouTube

The utility of brazing is limited by all the complex scaffolding of hardware required to support it. This limiting factor and the discovery of thermite led to exothermic welding, which uses an energetic material to provide enough heat to melt a filler metal and join the pieces. Energetic materials can store a lot of chemical energy and forcefully release it in a short period of time.

Thermites are made of metal oxide and metal powder, often iron oxide and aluminium. When ignited by a source of high heat, thermite compounds undergo an exothermic reduction-oxidation (redox) reaction as the aluminium reduces the number of electrons in the iron oxide atoms. More heat makes the reaction run faster, generating more heat, and so on. The result is molten iron and aluminium oxide slag.

Continue reading “3D-Printed Thermite Brings The Heat, And The Safety”

Teardown: Orthofix SpinalStim

If you’ve ever had a particularly nasty fracture, your doctor may have prescribed the use of an electronic bone growth stimulator. These wearable devices produce a pulsed electromagnetic field (PEMF) around the bone, which has been shown to speed up the natural healing process in a statistically significant number of patients. That’s not to say there isn’t a debate about how effective they actually are, but studies haven’t shown any downsides to the therapy, so it’s worth trying at least.

Image from SpinalStim manual.

When you receive one of these devices, it will be programmed to only operate for a certain amount of time or number of sessions. Once you’ve “used up” the bone stimulator, it’s functionally worthless. As you might imagine, there’s no technical reason this has to be the case. The cynic would say the only reason these devices have an expiration date on them is because the manufacturer wants to keep them from hitting the second hand market, but such a debate is perhaps outside the scope of these pages.

The Orthofix SpinalStim you’re seeing here was given to me by a friend after their doctor said the therapy could be cut short. This provided a somewhat rare opportunity to observe the device before it deactivated itself, which I’d hoped would let me take a closer look at how it actually operated.

As you’ll soon see, things unfortunately didn’t work out that way. But that doesn’t mean the effort was fruitless, and there may yet be hope for hacking these devices should anyone feel like taking up the challenge.

Continue reading “Teardown: Orthofix SpinalStim”

Ironclad Tips For Copper-Clad Prototyping

The idea of trying to prototype with SMD parts on the fly sounds like insanity, right? But then we watched [Leo Fernekes] walk calmly and carefully through his process (video, embedded below). Suddenly, SMD prototyping jumped onto our list of things to try soon.

[Leo] speaks from a lot of experience and tight client timelines, so this video is a fourteen-minute masterclass in using copper-clad board as a Manhattan-style scratch pad. He starts by making a renewable tool for scraping away copper by grinding down and shaping an old X-Acto blade into a kind of sharpened Swiss Army knife bottle opener shape. That alone is mind-blowing, but [Leo] keeps on going.

In these prototypes, he uses the through-hole version of whatever microcontroller is in the design. For everything else, he uses the exact SMT part that will end up on the PCB that someone else is busy designing in the meantime.

After laying the board out on paper, [Leo] carves out the islands of conductivity, beep-checks them for shorts, shines the whole thing with steel wool, and goes to town.

The tips and tricks keep coming as he makes jumps and joins ground planes with bare copper wire insulated with heat-proof Teflon tubing, and lays out the benefits of building up a stash of connectors and shelling out the money for a good crimp tool.

And why do you need a good crimp tool? Because when they’re done properly, crimped connections are stronger and more reliable than solder. There’s a lot more to them than you might think.

Continue reading “Ironclad Tips For Copper-Clad Prototyping”

Review: The Riden RD6006W DC Power Supply Module

You may have seen the Ruideng range of programmable power supply modules from China: small and relatively inexpensive switch-mode buck converters, with microprocessor control and a front panel featuring a large colour OLED screen. Given 30 volts or so they can supply any lower voltage with the extra bonus of current limiting. They’ve been so successful over the several years they’ve been available that they’ve even spawned their own Chinese clones, and countless hacker projects, for instance on the DPS300X and DPS500X models.

Late last year a new module came from Ruideng, the Riden-branded RD6006 combines the basic idea of the previous modules with an extremely flexible front panel with full keypad and rotary encoder, creating something like the front panel to a decent bench power supply but without the accompanying power supply. I ordered one, waited for it to clear customs, took it to my bench, and reviewed it. Continue reading “Review: The Riden RD6006W DC Power Supply Module”

Hackaday Links Column Banner

Hackaday Links: March 15, 2020

Just a few weeks ago in the Links article, we ran a story about Tanner Electronics, the Dallas-area surplus store that was a mainstay of the hacker and maker scene in the area. At the time, Tanner’s owners were actively looking for a new, downsized space to move into, and they were optimistic that they’d be able to find something. But it appears not to be, as we got word this week from James Tanner that the store would be shutting its doors after 40 years in business. We’re sad to see anyone who’s supported the hardware hacking scene be unable to make a go of it, especially after four decades of service. But as we pointed out in “The Death of Surplus”, the center of gravity of electronics manufacturing has shifted dramatically in that time, and that’s changed the surplus market forever. We wish the Tanner’s the best of luck, and ask those in the area to stop by and perhaps help them sell off some of their inventory before they close the doors on May 31.

Feel like getting your inner Gollum on video but don’t know where to begin? Open source motion capture might be the place to start, and Chordata will soon be here to help. We saw Chordata as an entry in the 2018 Hackaday Prize; they’ve come a long way since then and are just about to open up their Kickstarter. Check out the video for an overview of what Chordata can do.

Another big name in the open-source movement has been forced out of the organization he co-founded. Eric S. Raymond, author of The Cathedral and the Bazaar and co-founder and former president of the Open Source Initiative has been removed from mailing lists and banned from communicating with the group. Raymond, known simply as ESR, reports that this was in response to “being too rhetorically forceful” in his dissent from proposed changes to OSD, the core documents that OSI uses to determine if software is truly open source. Nobody seems to be saying much about the behavior that started the fracas.

COVID-19, the respiratory disease caused by the newly emerged SARS-CoV-2 virus, has been spreading across the globe, causing panic and claiming lives. It’s not without its second-order effects either, of course, as everything from global supply chains to conferences and meetings have been disrupted. And now, coronavirus can be blamed for delaying the ESA/Russian joint ExoMars mission. The mission is to include a Russian-built surface platform for meteorological and biochemical surveys, plus the ESA’s Rosalind Franklin rover. Program scientists are no longer able to travel and meet with their counterparts to sort out issues, severely crimping productivity and forcing the delay. Social distancing and working from home can only take you so far, especially when you’re trying to get to Mars. We wonder if NASA’s Perseverance will suffer a similar fate.

Speaking of social distancing, if you’ve already decided to lock the doors and hunker down to wait out COVID-19, you’ll need something to keep you from going stir crazy. One suggestion: learn a new skill, like PCB design. TeachMePCB is offering a free rigid PCB design course starting March 28. If you’re a newbie, or even if you’ve had some ad hoc design experience, this could be a great way to productively while away some time. And if that doesn’t work for you, check out Bartosz Ciechanowski’s Gears page. It’s an interactive lesson on why gears look like they do, and the math behind power transmission. Ever wonder why gear teeth have an involute shape? Bartosz will fix you up.

Stay safe out there, everyone. And wash those hands!

Stomp Switches Let You Skip Tracks Hands-Free

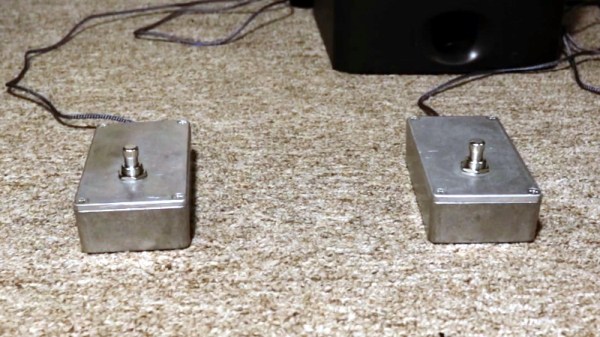
You’ve (probably) got four limbs, so why are you only using half of them when you’re working on the computer? Just because your toes don’t have the dexterity to type (again, probably) doesn’t mean your feet should get to just sit there doing nothing all day. In a recent project, [MacCraiger] shows you just how easy it can be to put some functionality under foot by building a pair of media control stomp switches.

Crimp pin connectors grant +50 professionalism.

If the devices pictured above look a lot like guitar effects, that’s because they share a lot of parts. [MacCraiger] used the same sort of switch and aluminum case that you might see on a pedal board, as he figured they’d be better suited to a lifetime of being stepped on than something he 3D printed.

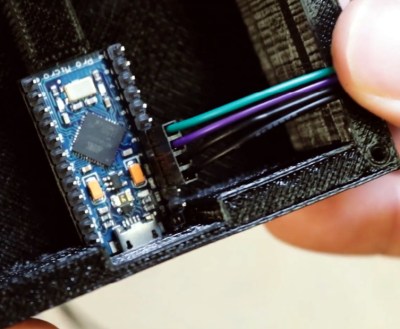
Up on the desk, and this time in a printed case, is the Arduino Leonardo that they connect to. The wiring for this project is very straightforward, with the switches connected directly to the GPIO pins. From there, the Arduino firmware emulates a USB Human Interface Device and fires off the appropriate media control keystrokes to skip to the next track or pause playback depending on which switch has been engaged.

This hardware isn’t exactly breaking any new ground here, but we did like how [MacCraiger] used standard 3.5 mm audio cable and the associated jacks to connect everything up. It’s obviously on-theme for what’s essentially a music project, but more importantly, gives the whole thing a very professional look. Definitely a tip to mentally file away for the future.

For the more accomplished toe-tapper, our very own [Kristina Panos] recently recently took us through the construction of her macro slinging footstool. Between these two examples of bespoke peripherals, you should have everything you need to create your own custom input devices. We suppose you could even make one that’s hand operated if you’re into that sort of thing.

Continue reading “Stomp Switches Let You Skip Tracks Hands-Free”

BBQ Burners Built From Scratch

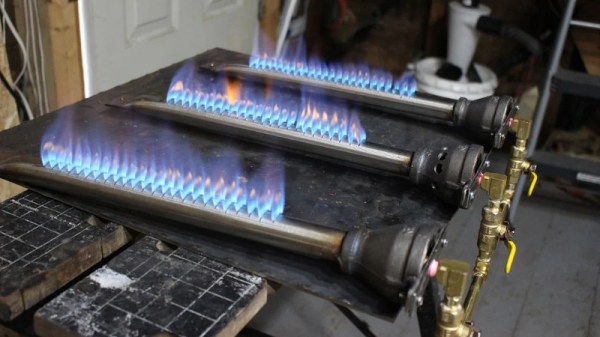
Building a barbecue is a common DIY pursuit, and one that comes with a tasty payoff at completion. While many projects focus on charcoal or wood-fired designs, [Andrew] is more of a gas man. Not one to simply buy off the shelf, he designed his own burners from scratch.

This quest wasn’t just unnecessary yak shaving; burners to suit [Andrew]’s desired size and power simply weren’t available. The burner is designed around the Venturi effect, wherein the propane gas is passed through a small orifice, creating a jet and pulling air along with it as it enters the burner tube. This causes the gases to mix, and they can then be ignited when passing through the outlet holes of the burner. Get the orifice and outlet holes sized just right, and you’ll have a burner that produces a hot, blue flame, perfect for efficient cooking.

The orifice was produced with brass plumbing components, and hooked up to a valve rated for use with gas lines. The burner tube itself was created from stainless steel tube, with slots cut to act as outlet holes and with the end crimped and welded shut. A black iron pipe reducer was then used as the air inlet and orifice mount.

The final result is a powerful barbecue burner that is perfectly sized to [Andrew]’s needs. If you’re keen to build your own custom rig, you may find this a useful and cheap way to go versus sourcing parts off the shelf. We’ve seen [Andrew]’s work before, too. Video after the break.

Continue reading “BBQ Burners Built From Scratch”