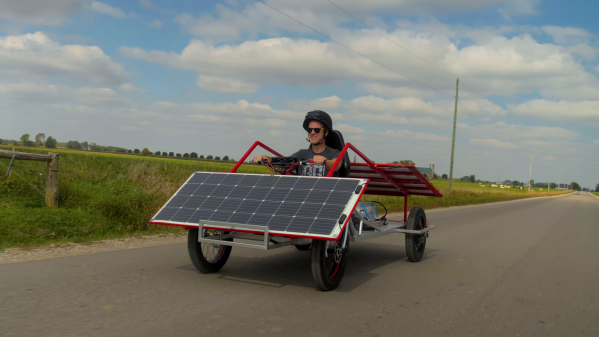
If you’ve ever owned a shortwave radio, you’ve probably listened at least a little to the BBC World Service. After all, they are a major broadcasting force, and with the British Empire or the Commonwealth spanning the globe, they probably had a transmitter close to your backyard. Recently, the BBC had a documentary about their early years of shortwave broadcasting. It is amazing both because it started so simply and when you think how far communications have progressed in just a scant 100 years.
Today, the BBC World Service broadcasts in over 40 languages distributing content via radio, TV, satellite, and the Internet. Hard to imagine it started with four people who were authorized to spend 10 pounds a week.
Input Labs’ mission is to produce open-source Creative Commons hardware and software for creating gaming controllers that can be adapted to anyone. Alpakka is their current take on a generic controller, looking similar to a modern Xbox or PlayStation controller but with quite a few differences. The 3D printed casing has a low-poly count, angular feel to it, but if you don’t like that you can tweak that in blender to just how you want it. Alpakka emulates a standard USB-attached keyboard, mouse, and Xinput gamepad in parallel so should just work out of the box for both Linux and Windows PC platforms. The firmware includes some built-in game profiles, which can be selected on the controller.
No special parts here, just 3D prints, a PCB and some nuts and bolts
The dual D-pads, augmented with an analog stick, is not an unusual arrangement, but what is a bit special is the inventive dual-gyro sensor arrangement –which when used in conjunction with a touch-sensitive pad — emulates a mouse input. Rest your thumb on the right-hand directional pad and the mouse moves, or else it stays fixed, kind of like lifting a mouse off the pad to re-center it.
The wired-only controller is based around a Raspberry Pi Pico, which has plenty of resources for this type of application giving a fast 250 Hz update rate. But to handle no fewer than nineteen button inputs, as well as a scroll wheel, directional switch, and that analog stick, the Pico doesn’t have enough I/O, needing a pair of NXP PCAL6416A I2C IO expanders to deal with it.
The PCB design is done with KiCAD, using a simple 3D printed stand to hold the PCB flat and the through-hole components in place while soldering. Other than a few QFN packages which might be a problem for some people, there is nothing tricky about hand-soldering this design.
Infill has an effect on appearance. 20% infill on the left, 100% infill on the right.
For some problems the Goldilocks approach is the way to go. [Tommy] designed a small array of different LED cover options, and tested each to see what yielded the best results for his printed kit. Some of the biggest takeaways include:
100% infill is best for even results (although interesting shadows happen at less than 100% infill.)
Interesting things happen with 7 to 11 mm of top layers of clear PLA, when illuminated from below with a 5 mm high-brightness LED. An even diffusion of light starts to give way to a circular gradient as the upper layer gets thicker.
LEDs emit their light mainly upward in a round pattern. Corners will always be darker, even more so if the guide is not round. This effect becomes noticeably more pronounced as the light guide grows in size, putting a practical upper limit on its effective dimensions.
Of course, the usual ways to deal with an overly-bright LED are to limit its current or control its brightness by driving it with a PWM signal. The right approach depends on the application and the scale of the design, and there are actually quite a few ways to crack this nut. Luckily, our own [Inderpreet Singh] is here to tell you all about how best to control LED brightness.
The HP-16C Computer Scientist is much beloved as the only dedicated programmer’s calculator that Hewlett-Packard ever made. Most surviving examples in the world are well-used, and you haven’t been able to order one from HP since 1989. Thus, [K Johansen] set about building a tribute to the HP-16C using modern hardware.
The build relies on a Raspberry Pi Pico as the brains of the operation. As with so many classic HP calculators, it operates in Reverse Polish Notation, and includes the customary stack operations. To serve a programmer well, it’s set up to accept entry in hexadecimal, octal, decimal, and binary formats, and can readily convert between them. Beyond that, it’s equipped with the usual arithmetic operators, as well as bitwise operations like NOT, AND, and so on.
Perhaps what we love most, though, is the keypad. It was all put together with a combination of cheap AliExpress keypads, a label maker, and a laser printer. It’s a wholly DIY job, and a little rough around the edges, but it makes the calculator far easier to use.
If you missed the Chumby, we’re sorry. They were relatively inexpensive Linux appliances that acted as a clock, Internet radio, and feed reader. The company went belly up, although there was some functionality remaining thanks to one of the founders and now, for a subscription fee, you can still keep your Chumby operating. However, [Doug Brown] bought one with the goal of using it for his own applications. But the 2.6.28 kernel is showing its age. So he decided to push a new kernel on the device.
If you are a Chumby enthusiast, don’t get too excited. The goal isn’t to provide the existing Chumby apps with a new kernel, [Doug] says that’s probably impossible. Instead, he wants a modern booting infrastructure and kernel on the device for his own software.
[Ben Conrad] received an interesting tool as a gift that purported to be a better mousetrap. It was a crescent wrench (made by the Crescent company, even) that didn’t have a tiny adjusting wheel like a traditional wrench. Instead, it had a slide running down the length of the handle. The idea is that you would push the slide to snug the wrench jaws against the bolt or nut, and that would be fast and easy compared to a conventional wrench. As [Ben] notes, though, it doesn’t work very well. Most of us would have just dumped it in the back of the tool chest or regifted it. [Ben] tore his apart to find out what was wrong with it.
A typical adjustable wrench has four parts. This one has 19 parts and looks like a conventional wrench with an extra slide and screw running down the length of the handle. [Ben] found the parts were poorly made, but that wasn’t the main problem.
The program is known as TwinkleFOX, and relies on the popular FastLED library for addressable LEDs. [Mark’s] demo setup is built around using WS2811 LEDs, put together in a string with plastic diffusers on each bulb. The Arduino is programmed to vary the brightness of each LED according to a triangle wave function. To create the twinkling effect, each LED has its own unique clock signal, so they vary in brightness at different times and at different rates.
Using an Arduino Uno or Leonardo, [Mark] reports its possible to twinkle 300 individual LEDs at a rate of over 50 updates a second. Using a faster microcontroller should net reliable performance with longer strings. Meanwhile, if you’re wondering how the older-style lights used to twinkle, we’ve covered that before too. Video after the break.