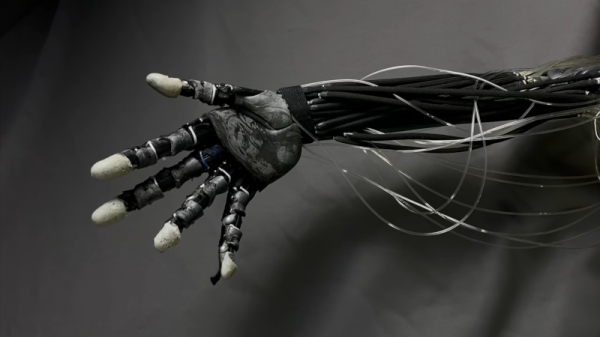
Hacking The RF Protocol Of An Obscure Handheld Game

When you think old school handheld games, you probably imagine something like Nintendo’s Game Boy line or the Sega Game Gear. But outside of those now iconic systems, there was a vast subculture of oddball handheld games vying for a chunk of an adolescent’s weekly allowance. Many of these were legitimately terrible and frankly aren’t worth remembering, but a few offered unique features that were arguably ahead of their time.

One such game was Hasbro’s short-lived P-O-X. As explained by [Zachary Ennenga], the game didn’t spend much time on store shelves as its core concept of defeating undetectable alien invaders hell-bent on destroying our way of life proved to be more than a little problematic when it launched in September of 2001. But that doesn’t mean it didn’t have some cool ideas, such as a wireless ad-hoc multiplayer capability that let your game autonomously battle it out with other units that got close by.

Fascinated by this feature since his youth, [Zach] set out to study how this relatively cheap kid’s toy was able to pull this off back when even the flagship handheld consoles were still using physical link cables for multiplayer. He was aided in his quest by a particularly helpful patent, which not only gave him clues as to the frequency, data rate, modulation, and encoding of the RF signal, but even explained the game’s logic and overall structure. A lot of what was in the document seemed wishful thinking on the part of Hasbro, but reading through the marketing speak still uncovered some salient technical details.

A decoded P-O-X packet.

Armed with an RTL-SDR, GNU Radio, Inspectrum, and a bit of Python, [Zach] was able to identify the signal and begin the process of decoding it. This is where things get really interesting, as the details of his reverse engineering process are widely applicable for all sorts of unknown RF signals. Even if you’re like most people and have nearly zero interest in failed handheld games of the early 2000s, it’s well worth a read. The same techniques he uses to figure out the name and physical characteristics of the invisible foe his game is transmitting could one day help you figure out how to manipulate the data from that wireless weather station you’ve got in the backyard.

Once he figured out the major parts of the protocol, [Zach] moves on to creating his own packets and broadcasting them out in such a way that the real hardware will recognize it. He even comes up with some code that will automatically battle games which wander within range of his Yardstick One, which may come in handy during the inevitable P-O-X Renaissance.

While this might seem like a lot of effort to put into a game that most people have never even heard of, we’ll remind you that some of the greatest hacks to ever grace these pages have been born of similar pursuits. Even if you’re the only person in the world to directly benefit from your current line of research and experimentation, there’s still plenty of like-minded folks in this community that are all to happy to cheer you on from the sidelines.

Windows 98 For Spaceships? Not Quite!

One of the news items that generated the most chatter among Hackaday editors this week was that ESA’s Mars Express mission is receiving a software update. And they’re updating the operating system to…Windows 98.

Microsoft’s late-90s consumer desktop operating system wouldn’t have been the first to come to mind as appropriate for a spacecraft, but ESA were quick to remind us that it was the development toolchain, not the craft itself, that depended upon it. It’s still quite a surprise to find Windows 98 being dusted off for such an unexpected purpose, and it’s led us to consider those now-almost-forgotten operating systems once more, and to question where else it might still be found. Continue reading “Windows 98 For Spaceships? Not Quite!”

3D Printed Splint Goes Toe To Toe With Medical Grade Equipment

When you think of medical devices, the idea of high end, well, pretty much everything, comes to mind. This is definitely the case when it comes to prosthetics, or in this similar case, custom fit splints. A hacker by the name of [sammyizimmy] wasn’t put off by the complexity of a custom splint for his fractured big toe, and a great hack made it all possible.

InVesalius reconstructs the CT Scan imagery

The story starts with a fractured toe, and an open source project called InVesalius. Instead of doing an X-Ray on his toe, [sammyizimmy]’s doctor decided to do a Computed Tomography scan (aka CT Scan) to get a look at the damage. For being as ubiquitous as they are, it’s easy to forget that a CT scan is an extremely detailed look at both internal and external parts.

The hack really began when [sammyizimmy] asked his radiologist for a copy of the CT Scan. This is something most radiologists will provide upon request, although many people don’t know you can even ask. [sammyizimmy] took his CT scan and opened it up in InVesalius, and then reconstructed the skin layer only, and then… head over to the “3d printed Toe Splint” page at Hackaday.io for the rest!

If medical hacks are are your kind of medicine, you might appreciate this HDD-Turned-Centrifuge too!

3D Print Your Own Multi-Color Filament

Interested in experimenting with your own multi-color filament? [Turbo_SunShine] says to just print your own, and experiment away! Now, if you’re thinking that 3D printing some filament sounds inefficient at best (and a gimmick at worst) you’re not alone. But there’s at least one use case that it makes sense for, and maybe others as well.

Printing with bi-color filament results in an object whose color depends on viewing angle, and part geometry.

There is such a thing as bi-color filament (like MatterHackers Quantum PLA) which can be thought of as filament that is split down the center into two different colors. Printing with such filament can result in some trippy visuals, like objects whose color depends in part on the angle from which they are viewed. Of course, for best results it makes sense to purchase a factory-made spool, but for light experimenting, it’s entirely possible to 3D print your own bi-color filament. Back when [Turbo_SunShine] first shared his results, this kind of stuff wasn’t available off the shelf like it is today, but the technique can still make sense in cases where buying a whole spool isn’t called for.

Here is how it works: the 3D model for filament is a spiral that is the right diameter for filament, printed as a solid object. The cross-section of this printed “filament” is a hexagon rather than a circle, which helps get consistent results. To make bi-color filament, one simply prints the first half of the object in one color, then performs a color change, and finishes the print with a second color. End result? A short coil of printed “filament”, in two colors, that is similar enough to the normal thing to be fed right back into the printer that created it. This gallery of photos from [_Icarus] showcases the kind of results that are possible.

What do you think? Is 3D printing filament mainly an exercise in inefficiency, or is it a clever leveraging of a printer’s capabilities? You be the judge, but it’s pretty clear that some interesting results can be had from the process. Take a few minutes to check out the video (embedded below) for some additional background.

Continue reading “3D Print Your Own Multi-Color Filament”

Scratch-Built Electric Buggy Tears Up The Dunes

It’s a fair bet to say that the future of personal transportation will probably be electric. In support of that, every major car manufacturer either has an electric drivetrain option available now, or they’re working furiously on developing one. And while it’s good that your suburban grocery grabber will someday be powered by the sun, what about the pressing need for EVs that are just plain fun to drive?

To fill the fun gap, at least for now, [James Biggar] built what you can’t buy: an all-electric dune buggy. And lest you think this was a kit build, be assured that the summary video below shows this little sand rail was 100% scratch-built. The chassis is fabricated from bent tubing, and welded up using a clever plywood template to get the angles just right. The buggy has four-wheel independent suspension and a wide, aggressive stance to handle rough terrain. The body panels are sheet aluminum bent on a custom-built brake, which was also used to form the Plexiglas windshield with a little help from a heat gun.

While the bodywork makes the buggy pretty sick looking, the drivetrain is just as impressive. [James] used an ME1616, a liquid-cooled 55-kW beast. A chain drive couples the motor to a differential from a Honda CR-V which has a limited-slip modification installed. The batteries are impressive, too — 32 custom-made lithium-iron-phosphate batteries made from 32650 cells in vacuum-formed ABS plastic shells that nest together compactly. It all adds up to a lot of fun in the dirt; skip to 23:37 in the video to see what this thing can do.

Honestly, the level of craftsmanship here is top-notch, and is all the more impressive in that it’s not fancy — just good, solid methods and lots of hard work. We’d love to have the time and resources to put into something like this — although a drop-in crate motor EV might be a satisfying build too.

Continue reading “Scratch-Built Electric Buggy Tears Up The Dunes”

Classic Amp Revived With A Pi

Guitar amplifiers have a hard life, and as anyone who’s run a venue can tell you, they often have significant electrical issues after a life on the road. [Dsagman] had a Vox amplifier with fried internals, and rather than repair the original he rebuilt it with a Raspberry Pi inside to provide a fully-loaded array of effects.

Though the subject is the Vox, it’s best to see this as more a tale of how to create a guitar effect array in a Pi than specifically put it in an amplifier. The Pi has an audio board and an MCP3008 ADC added to it, and using those two it takes its inputs from a series of potentiometers and process the audio passing through the audio board. In addition there are a series of LED indicators and an LED bar graph to keep the user in touch with what’s going on.

The whole lot is nicely integrated in the VOX case with all the potentiometers on an aluminium panel. He discusses amplifier choice, but as you might expect the final choice is a Class D module. All in all an amp many readers would probably go for.

As long-time readers will remember, guitar effects have made quite a few appearances around here. Continue reading “Classic Amp Revived With A Pi”

A clock with a VFD display in an orange TV-like case

Never Miss An Email With This 1970s Style Desktop Notifier

If you like the 1970s aesthetic but think bell-bottoms, big hair and psychedelic wallpaper are a bit too much in this day and age, you might want to have a look at [Pierre Muth]’s latest build, The Absurd Notifier. It’s a useful desk accessory that adds just a little bit of ’70s flair to your office: housed inside what looks like an orange TV standing on shiny metal feet is a little gadget that can tell you if you’ve got important email messages waiting or an appointment coming up.

[Pierre] built the system around a Garmin Vivosmart 3 smartwatch that he bought very cheaply because it had a broken display. The display’s pinout and protocol were of course undocumented, so [Pierre] hooked up his logic analyzer to try and figure out how it worked. It turned out to be a simple SPI setup, and with a bit of trial and error he was able to extract the images that the watch was sending out.

To replace the broken screen, [Pierre] turned to some 128×64 pixel VFD displays that he had left over from an earlier project. Their resolution was exactly the same as the Garmin’s original OLED display, but their interface wasn’t: the VFDs expected 115k2 serial data. Programming a PIC microcontroller with an SPI port on one side and a UART port on the other made for a simple bridge between the two.

[Pierre] then designed and 3D printed a case reminiscent of a 1970s TV, with matching bright orange color. The end result is a funky little retro clock that shows notifications on a vintage green display. If you like desktop notifiers, we seen several neat ones alerting their owners about things ranging from new YouTube subscribers to the ISS passing by.

Continue reading “Never Miss An Email With This 1970s Style Desktop Notifier”