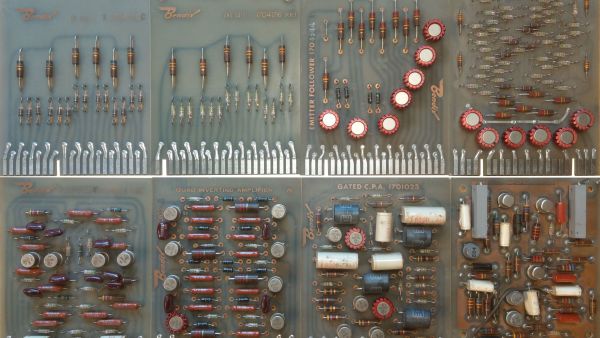
This Week In Security: Printing Shellz, Ms-officecmd, And AI Security

Researchers at f-secure have developed an impressive new attack, leveraging HP printers as an unexpected attack surface. Printing Shellz (PDF) is a one-click attack, where simply visiting a malicious webpage is enough to get a shell and reverse proxy installed to a printer on the same network. The demo below uses a cross-site printing (XSP) attack to send the malicious print job to the printer without any further interactions.
Continue reading “This Week In Security: Printing Shellz, Ms-officecmd, And AI Security”

Digital Painting On An IPad With Real Brushes

Drawing tablets are a great way to make digital art, and iPads and other tablets are similarly popular in this area. However, they all typically involve using some sort of special stylus for input. [Richard Greene] developed another method, with Light Strokes for the iPad letting one “paint” with real paint brushes instead!

The system uses a Fresnel prism in view of the iPad’s camera. This allows the camera to see only the parts of a paint brush, sponge, or other implement, as they make contact with the surface of the prism itself. This is via the principle known as total internal reflection.

Thus, simply wetting a paintbrush, sponge, or even a finger, allows one to paint quite authentically on the surface of the prism. The corresponding Light Strokes app on the iPad turns this into the pretty pixels of your creation. The app also allows one to experiment with all manner of fancy brush effects, too.

The build requires some finesse, with the lamination of the special Fresnel film onto glass using liquid optically clear adhesive, or LOCA. A series of mirrors are then assembled in an enclosure, allowing the iPad to be mounted with the camera having a good view of the glass painting area.

The project takes advantage of a simple physical effect in order to create a great artistic tool. Alternatively, if you prefer to draw directly, consider whipping up your own screen-based drawing tablet. Video after the break.

Continue reading “Digital Painting On An IPad With Real Brushes”

3D Printing Delivers “Glass” Eyes In Record Time

Obviously, losing an eye would be bad for your vision. But if you think about it, it is also a detriment to your appearance. You might not need a prosthetic eye, and you can certainly rock an eye patch, but a lot of people with this problem get an artificial or “glass” eye. These glass eyes are hand-painted disks that fit into the eye socket. However, a British man now has a new kind of eye prosthesis that is 3D printed, a technology that can potentially cut waiting time for patients in half.

The existing process is lengthy because it requires taking a mold of the eye socket and manually matching the remaining eye with the new artificial eye. With the 3D printed technology, scans of the eye socket and the other eye make this process much simpler.

Moorfields Eye Hospital, the source of the eye, says that a conventional eye takes about six weeks, but the new ones take no more than three weeks. The patient only needs to spend about a half-hour doing the scans before the wait starts. We presume it can be made for less cost, as well.

Medicine is embracing 3D printing and we’ve seen a 3D ear. We are waiting for our personal exoskeleton. Some of the medical 3D printing we’ve seen is for the birds.

Sound-Reactive Mannequin Arms Make For Creepy Lounge Decor

Music visualizers were all the rage back in era of Winamp and Windows Media Player. They’re even cooler when they don’t just live on your computer screen, though, as [Emily Velasco’s] latest project demonstrates.

The build consists of two mannequin arms on a board mounted on the wall. The arms were sourced for just $5 from a Sears that went out of business, and originally fastened to the mannequin thanks to magnets inside. Thus, putting two steel plates on the board allowed the arms to be attached, and they can be freely arranged as [Emily] sees fit.

The ESP32-based Pixelblaze LED controller serves as the brains of the operation, controlling LEDs mounted inside the arms themselves. Using a dedicated controller makes working with addressable LEDs a cinch. As a further bonus, the board serves up a web interface, allowing patterns to be changed without having to hook up a cable to the device. Meanwhile, a sensor board inside the arms uses a microphone to enable the light show to react to sound and music.

It’s one of the more obscure uses for an old mannequin, but definitely one that appeals to our love of everything that flickers and glows. It’s a build very much up [Emily’s] alley; as a prolific maker, she loves to build weird and wonderful creations, as shared during her talk at the 2019 Hackaday Superconference. Video after the break.

Continue reading “Sound-Reactive Mannequin Arms Make For Creepy Lounge Decor”

Apple Falling Division

[Paul Curtis] over at Segger has an interesting series of blog posts about calculating division. This used to be a hotter topic, but nowadays many computers or computer languages have support for multiplication and division built-in. But some processors lack the instructions and a library to do it might be less than ideal. Knowing how to roll your own might allow you to optimize for speed or space. The current installment covers using Newton’s algorithm to do division.

Steve Martin had a famous bit about how to be a millionaire and never pay taxes. He started out by saying, “First… get a million dollar. Then…” This method is a bit like that since you first have to know how to multiply before you can divide. The basic premise is twofold: Newton’s method let you refine an estimate of a reciprocal by successive multiplications and then multiplying a number a reciprocal is the same as dividing. In other words, if we need to divide 34 by 6, you could rewrite 34/6 to 34 * 1/6 and the answer is the same.

Continue reading “Apple Falling Division”

Solar-powered pendant chirps like a bird.

BEAM Bird Pendant Really Chirps

[NanoRobotGeek] had a single glorious weekend between the end of the term and the start of exams. Did they buy a keg and party it up? No, in fact, quite the opposite — they probably gained a few brain cells by free-form soldering this beautiful chirping bird pendant at 0603 instead.

Three versions of basically the same circuit.The circuit is a standard BEAM project built around a 74HC14, but [NanoRobotGeek] made a few changes to achieve the ideal chirp sound. As you can see in the video after the break, it chirps for around 30 seconds and then shuts off for 1-2 minutes before starting up again.

What is better than a BEAM project? A portable one, we say. Although the chirping would probably get old pretty quickly, there’s just no substitute for working so small that you can carry it around your neck and show it off.

This one is kind of a long time coming, because [NanoRobotGeek] started by breadboarding the circuit and then made a PCB version way back in 2019, which they were attempting to miniaturize with this project. We think they did a fantastic job of it, and the documentation is stellar if you are crazy enough to attempt this one. You will need a lot of blu tack and patience, and pre-tinning is your friend. Be sure to check out the demo after the break.

The name checks out, and this isn’t [NanoRobotGeek]’s first foray into tiny circuit sculpture — just take a look at all we’ve covered.

Continue reading “BEAM Bird Pendant Really Chirps”

Epoxy lenses

The Ins And Outs Of Casting Lenses From Epoxy

If you need a lens for a project, chances are pretty good that you pick up a catalog or look up an optics vendor online and just order something. Practical, no doubt, but pretty unsporting, especially when it’s possible to cast custom lenses at home using silicone molds and epoxy resins.

Possible, but not exactly easy, as [Zachary Tong] relates. His journey into custom DIY optics began while looking for ways to make copies of existing mirrors using carbon fiber and resin, using the technique of replication molding. While playing with that, he realized that an inexpensive glass or plastic lens could stand in for the precision-machined metal mandrel which is usually used in this technique. Pretty soon he was using silicone rubber to make two-piece, high-quality molds of lenses, good enough to try a few casting shots with epoxy resin. [Zach] ran into a few problems along the way, like proper resin selection, temperature control, mold release agent compatibility, and even dealing with shrinkage in both the mold material and the resin. But he’s had some pretty good results, which he shares in the video below.

[Zach] is clear that this isn’t really a tutorial, but rather a summary of the highs and lows he experienced while he was working on these casting methods. It’s not his first time casting lenses, of course, and we doubt it’ll be his last — something tells us he won’t be able to resist trying this all-liquid lens casting method in his lab.

Continue reading “The Ins And Outs Of Casting Lenses From Epoxy”