5-Axis 3D Printing For The Rest Of Us

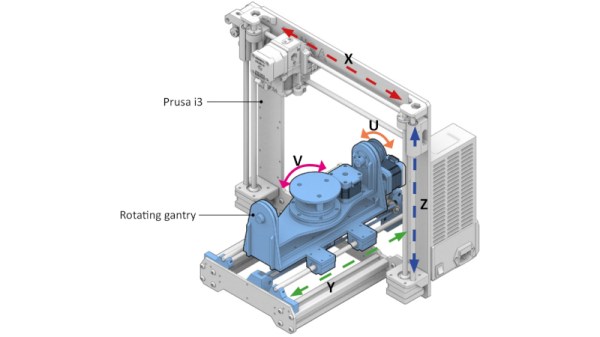
By now we’re all used to the idea of three dimensional printing, as over the last fifteen years or so it’s become an indispensable tool for anyone with an interest in making things without an industrial scale budget. There are still a few limitations to the techniques used in a common 3D printer though, in particular being tied to layers in a single orientation. It’s something that can be addressed by adding tilt and rotational axes to the printer to deliver a five-axis device, but this has not been available in an affordable form. [Freddie Hong] and colleagues have tackled the production of an affordable printer, and his solution fits neatly on the bed of a Prusa i3 to convert it to five-axis machine without breaking the bank.

The quantity and quality of the work is certainly impressive, with suitable slicing software being developed alongside the 3D printed parts to fit the two extra axes. For now all we can do is look at the pictures and the video below the break, but once the work has been presented the promise that all the necessary files will be made public. We can see versions of the hardware finding their way onto printers other  than the Prusa, and we can see this becoming yet another piece of the regular armory available to those of us who make things.

Continue reading “5-Axis 3D Printing For The Rest Of Us”

Haptic Smart Knob Does Several Jobs

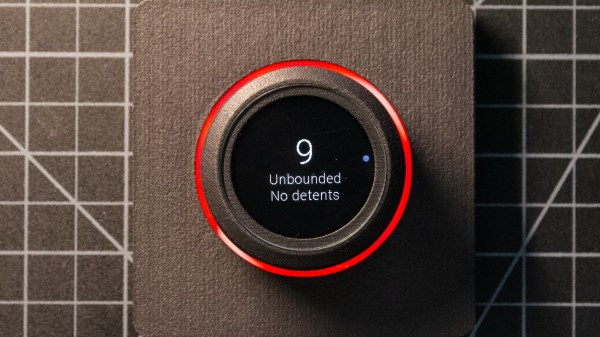
A knob is a knob, a switch is a switch, and that’s that, right? And what about those knobs that have detents, set in stone at the time of manufacturing? Oh, and those knobs that let you jog left to right and then snap back to center — that can’t be modified…right? Well, you likely know where this is going, and in the video below the break, [scottbez1] shows off a new open source haptic input knob that can be all of these things with just some configuration changes!

The list of possibilities is long: virtual snap points, virtual spring loading, virtual detents, virtual end points. It’s a virtual smörgåsbord of configuration options that make this haptic smart knob a one stop shop for all of your knob needs. This is all possible because the knob contains a high resolution magnetic encoder chip that has a single degree resolution. The sensor is coupled, through software, to a brushless DC motor. The round LCD gives visual feedback as well.

As [Myself] on the Hackaday Discord channel noted, having configurable spacing and strength for detents, springs, and stops, is nothing short of incredible. Being able to reconfigure the knob at-will means that it can become context sensitive. It’s wonderfully unique and it’s open source, so you can make your own with the information available at GitHub.

And according to its creator, the only thing the Haptic Smart Knob can’t do is do your taxes or blend your margarita. Well, it’s open source, so perhaps some of our more enterprising readers can submit just the right pull request.

This isn’t Hackaday’s first Motorized Volume Knob feature, but it might be one of the neatest we have seen so far. Thanks to [mattvenn] on the Hackaday Discord server for the great tip!

Continue reading “Haptic Smart Knob Does Several Jobs”

retro breadboard

Retro Breadboard Gives Up Its 1960s Secrets

When we see [Ken Shirriff] reverse engineering something, it tends to be on the microscopic level. His usual forte is looking at die photos of strange and obsolete chips and figuring out how they work. And while we love those efforts, it’s nice to see him in the macro world this time with a teardown and repair of a 1960s-era solderless breadboard system.

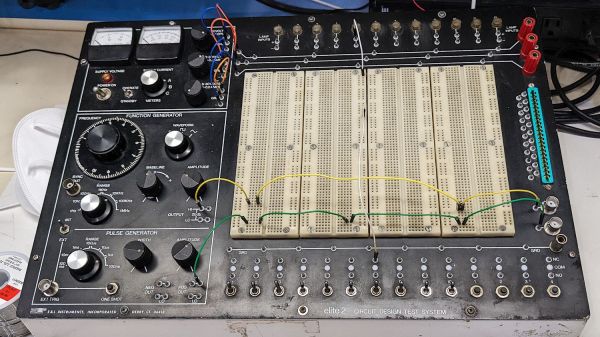
If you’d swear the “Elite 2 Circuit Design Test System” featured in [Ken]’s post looks familiar, it’s probably because you caught his partner-in-crime [CuriousMarc]’s video on the very same unit, an eBay score that arrived in non-working condition. The breadboard, which retailed for $1,300 in 1969 — an eye-watering $10,000 today — was clearly not aimed at the hobbyist market. Truth be told, we didn’t even know that solderless breadboards were a thing until the mid-70s, but live and learn. This unit has all the bells and whistles, including three variable power supplies, an array of switches, buttons, indicator lamps, and jacks for external connections, and a pulse generator as well as a legit function generator.

Legit, that would be, if it actually worked. [Ken]’s contribution to the repair was a thorough teardown of the device followed by reverse-engineering the design. Seeing how this thing was designed around the constraints of 1969 technology is a real treat; the metal can transistor and ICs and the neat and tidy PCB layout are worth the price of admission alone. And the fact that neon lamps and their drivers were cheaper and easier to use than LEDs says a lot about the state of the art at the time.

As for the necessary repairs, [Marc]’s video leaves off before getting there. That’s fine, we’re sure he’ll put [Ken]’s analysis to good use, and we always enjoy [Marc]’s video series anyway. The Apollo flight comms series was a great one, too. Continue reading “Retro Breadboard Gives Up Its 1960s Secrets”

Remote MQTT Temperature Sensor Shows How It’s Done

First of all, there are definitely simpler ways to monitor remote temperatures, but [Mike]’s remote MQTT temperature sensor and display project is useful in a few ways. Not only does it lay out how to roll such a system from scratch, but it also showcases system features like solar power.

After all, if one simply wants to monitor temperature that’s easily done, but once one wishes to log those temperatures and use them to trigger other things, then rolling one’s own solution starts to get more attractive. That’s where using someone else’s project as a design reference can come in handy.

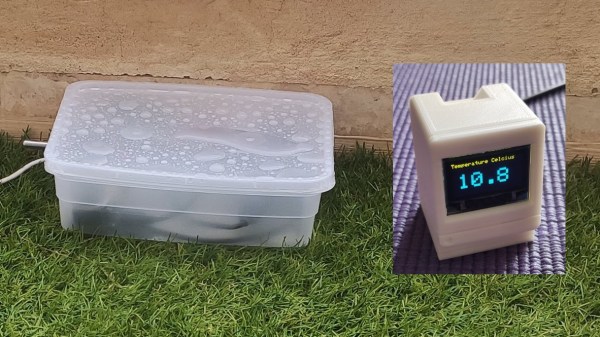
[Mike’s] solution uses two Wemos D1 boards: one with a DS18B20 temperature sensor for outdoors, and one with a small OLED screen for an interior display. The external sensor relies on a rechargeable 18650 cell and a solar panel for a hassle-free power supply, and the internal sensor (of which there can be many) has a cute enclosure and is powered by USB. On the back end, a Raspberry Pi running an MQTT gateway and Node Red takes care of the operational side of things. The whole system has been happily running for over two years.

What is MQTT? It is essentially a messaging protocol, and takes care of the whole business of reliably communicating data back and forth between IoT devices. It scales very well and doesn’t need to be hard or intimidating; our own [Elliot Williams] can tell you all about implementing it.

ice fishing tent and antenna in a snowy field

Ice Fishing Tent Makes Winter Ham Radio Comfy

Cross-pollination between different activities and industries can yield some pretty useful techniques or product combinations, and [Steve] shares some details on using ice fishing gear to make winter ham radio activities more comfortable and portable.

Radio operator inside ice fishing tent in winterWith the help of a folding tent shelter, [Steve] was able to create a minimal and self-contained field station that hosted all his needed equipment, and with the help of a small propane heater, stayed quite comfortable during a 24 hour winter event.

For those interested in the radio end of what [Steve] was doing, he goes into detail about the radio equipment and antenna he used, which itself stows easily into a bag and withstood high winds with success. The goal of the event after all was emergency preparedness, and while radio can operate without a wider infrastructure to support it, antenna design is crucial for best results.

As for keeping the operator safe and sound during all this, it turns out that the problem of a pop-up winter shelter that is both light and compact has already been solved by ice fishers; and while it can be fun to roll one’s own solutions, there’s not always a need to re-invent the wheel.

Retrotechtacular: Measuring TV Audiences With The “Poll-O-Meter”

It may come as a shock to some, but TV used to be a big deal — a very big deal. Sitting down in front of the glowing tube for an evening’s entertainment was pretty much all one had to do after work, and while taking in this content was perhaps not that great for us, it was a goldmine for anyone with the ability to monetize it. And monetize it they did, “they” being the advertisers and marketers who saw the potential of the new medium as it ramped up in early 1950s America.

They faced a bit of a problem, though: proving to their customers exactly how many people they were reaching with their ads. The 1956 film below shows one attempt to answer that question with technology, rather than guesswork. The film features the “Poll-O-Meter System,” a mobile electronic tuning recorder built by the Calbest Electronics Company. Not a lot of technical detail is offered in the film, which appears aimed more at the advertising types, but from a shot of the Poll-O-Meter front panel (at 4:12) and a look at its comically outsized rooftop antenna (12:27), it seems safe to assume that it worked by receiving emissions from the TV set’s local oscillator, which would leak a signal from the TV antenna — perhaps similar to the approach used by the UK’s TV locator vans.

The Poll-O-Meter seems to have supported seven channels; even though there were twelve channels back in the day, licenses were rarely granted for stations on adjacent channels in a given market, so getting a hit on the “2-3” channel would have to be considered in the context of the local market. The Poll-O-Meter had a charming, homebrew look to it, right down to the hand-painted logos and panel lettering. Each channel had an electromechanical totalizing counter, plus a patch panel that looks like it could be used to connect different counters to different channels. There even appears to be a way to subtract counts from a channel, although why that would be necessary is unclear. The whole thing lived in the back of a 1954 VW van, and was driven around neighborhoods turning heads and gathering data about what channels were being watched “without enlisting aid or cooperation of … users.” Or, you know, their consent.

It was a different time, though, which is abundantly clear from watching this film, as well as the bonus ad for Westinghouse TVs at the end. The Poll-O-Meter seems a little silly now, but don’t judge 1956 too hard — after all, our world is regularly prowled by equally intrusive and consent-free Google Street View cars. Still, it’s an interesting glimpse into how one outfit tried to hang a price tag on the eyeballs that were silently taking in the “Vast Wasteland.”

Continue reading “Retrotechtacular: Measuring TV Audiences With The “Poll-O-Meter””

How To Make Laser-cut Decals On The Cheap

Want to make a sweet adhesive decal with a complex design and floating elements, but all you have is a laser cutter and some tape? Good news, because that’s all you need with this method of creating adhesive tape decals on a laser cutter demonstrated by the folks at [Lasers Over Los Angeles]. The overall technique is very similar to creating vinyl decals and using tape transfer to apply them, but is geared towards laser cutters and nice, cheap tape.

This method also makes applying to non-flat surfaces a breeze.

The way it works is this: paper-based tape (such as blue painter’s tape) is laid down in strips on the laser cutter’s honeycomb bed, forming a nice big rectangle big enough for the intended design. Then, the laser cutter cuts vector art into the tape, resulting in an adhesive decal ready to be stuck to some other surface. Transferring is done by using good quality clear packing tape to “pick up” the decal, then move it to where it needs to be.

To do this, one lays strips of packing tape onto the top of the design on the laser bed, then lifts the design up and away. Move the design to its destination (the clear packing tape helps in eyeballing the final position), press the decal onto the final surface, and carefully peel away the clear packing tape. This works because the packing tape sticks only weakly to the back of the painter’s tape; it’s a strong enough bond to hold the decal, but weak enough that the decal will stick to a surface even better.

It’s true that painter’s tape isn’t as durable as vinyl and the color selection is a bit limited, but design-wise one can go as big as the laser bed allows, and the price is certainly right. Plus it’s easily cut by even the most anemic of diode lasers.

Speaking of desktop vinyl cutters, they may have small working areas compared to most laser cutters, but they have some fantastic workshop applications. They can even do home PCB fabrication, by way of knocking out three essential pieces: the etching mask, solder mask, and solder stencil.