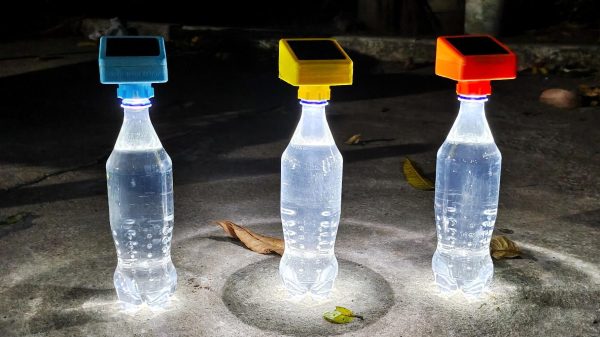
Ten Winners Of The Hackaday Prize Supportive Tech Challenge

Congratulations to the ten projects that have been selected to receive $500, and continue to the finals of the 2021 Hackaday Prize! Each of these are a different take on the Reimagine Supportive Tech Challenge that sought ways to make great hardware ideas work for more people.

Ebooks have made it possible for everyone to have a library in their pocket, and that has included the visually impaired as text-to-speech can read the printed word. But that’s not a complete replacement for reading for yourself and so the Thenar steps in as an affordable, portable braille ebook reader. It leverages a single braille cell on the edge of the device, and a tank-track-style scroll wheel for user input. Complete with a docking station to inductively charge the battery, it’s a high-end reader for those who need an alternative to epaper.

Okay, pop-quiz; how many of us want to have a future involving solar-powered everything? Most of us now have our hands up, but how many of us can set up a high-efficiency solar charge controller ourselves? If this next finalist (pictured at the top) has its way the answer will be just about everyone. The 2.5 kilowatt solar generator in a rugged brief case is packing a whopping 160 (!) 18650 lithium cells. The charging side of the design handles the maximum power-point tracking (MPPT) while the discharging side protects the user with a circuit breaker and all kinds of regulated outputs like 120 V, 24 V, 12 V, and of course all of the USB-C functionality you’d expect from a system like this.

Ten Finalists, Eight Dozen Entries

We cherry-picked two excellent finalists above, but all ten of these are easily worth their own mention (and many have already been individually featured on these pages). Congrats to the folks who will be headed to the finals in October!

It was a tight field of nearly 100 entries for this round, make sure to take some time to check those out and offer kudos in the comment sections of each project. We’re excited to see what comes of the robotics-oriented challenge currently underway!

Better 3D Scans Through A Slowed Down Turntable

3D scanners aren’t cheap, and the last thing you want to see after purchasing one is bad data. But that’s what [Dave Does] and others were getting from their Revopoint POP scanners until some communal brainstorming uncovered the reason: the motorized turntable that came with the Kickstarter edition of the product was spinning too fast for the software to accurately keep track of the object. So he decided to replace the stepper motor controller in his turntable and document the process for anyone else who’s scanner might be struggling.

Plenty of room for expansion.

In the video below, [Dave] pops open the plastic case of the turntable and reveals a pretty sparse interior. There’s an incredible amount of empty space inside, and even some mounting studs to screw down new components, should you want to get into some hardcore upgrades. But for his purposes, a generic stepper motor controller that featured a potentiometer to adjust the speed was enough. He found a suitable board online for around $5 USD, and got to designing a 3D printed bracket that mates up to the existing screw holes on the turntable.

But it’s not exactly a drop-in replacement. For one thing, you’ve got to pop a hole in the side of the enclosure for the potentiometer knob to stick out of. You’ve also got to solder wires coming from the original DC jack and power switch to the new board to get it hooked up, but at least the motor plugs right in. In the video below, you can see [Dave] demonstrate the impressively deep throttle capability of the new driver.

If you’d rather build than buy, we’ve covered some impressive DIY turntables in the past that could fit the bill nicely, from automatic models that handle camera control to fully 3D printed versions that you’ve got to crank yourself.

Continue reading “Better 3D Scans Through A Slowed Down Turntable”

Linux Fu: User Space File Systems — Now For Windows, Too!

One of the nice things about the Unix philosophy that Linux inherited is that the filesystem is very modular. That’s good, too, because a typical system might want a choice of filesystems like ext4, reiserfs, btrfs, and even network systems like nfs. Besides that, there are fake file systems like /sys and /dev that help Linux make everything look like a file. The downside is that building a filesystem required changing the kernel or, at least, writing a loadable module. That’s not as hard as it sounds, but it is a little more difficult than writing a normal program. Then came FUSE — file system in user space. This is a single file system module that allows you to create new file systems by writing ordinary code.

Continue reading “Linux Fu: User Space File Systems — Now For Windows, Too!”

MC68k SBC with a monitor, keyboard and mouse

Motorola 68000 SBC Runs Again With A Raspberry Pi On Top

Single-board computers have been around a long time: today you might be using a Raspberry Pi, an Arduino, or an ESP32, but three decades ago you might find yourself programming a KIM-1, an Intel SDK-85, or a Motorola 68000 Educational Computer Board. These kind of boards were usually made by processor manufacturers to show off their latest chips and to train engineers who might use these chips in their designs.

[Adam Podstawczyński] found himself trying to operate one of these Motorola ECBs from 1981. This board contains a 68000 CPU (as used in several Macintoshes and Amigas), 32 kB of RAM, and a ROM program called TUTOR. Lacking any keyboard or monitor connections, the only way to communicate with this system is a pair of serial ports. [Adam] decided to make the board more accessible by adding a Raspberry Pi extended with an RS232 Hat. This add-on board comes with two serial ports supporting the +/- 12 V signal levels used in older equipment.

It took several hours of experimenting, debugging, and reading the extensive ECB documentation to set up a reliable connection; as it turns out, the serial ports can operate in different modes depending on the state of the handshake lines. When the Pi’s serial ports were finally set up in the right mode, the old computer started to respond to commands entered in the terminal window. The audio interface, meant for recording programs on tape, proved more difficult to operate reliably, possibly due to deteriorating capacitors. This was not a great issue, because the ECB’s second serial port could also be used to save and load programs directly into its memory.

With the serial connections working, [Adam] then turned to the aesthetics of his setup and decided to make a simple case out of laser-cut acrylic and metal spacers. Custom ribbon cables for the serial ports and an ATX break-out board for power connections completed the project, and the 40-year-old educational computer is now ready to educate its new owner on all the finer points of 68000 programming. In the video (embedded after the break) he shows the whole process of getting the ECB up and running.

[Adam] made a similarly clever setup with a Commodore 64 and an Arduino earlier. [Jeff Tranter] recreated a similar 68000 development board from scratch. And a few years ago we even featured our own custom-built 68k computer.

Continue reading “Motorola 68000 SBC Runs Again With A Raspberry Pi On Top”

Small Footprint Scara Laser Engraver Has Massive Build Area

One of the limitations of the conventional Cartesian CNC platforms is that the working area will usually be smaller than its footprint. SCARA arms are one of the options to get around this, as demonstrated by [How To Mechatronics], with his SCARA laser engraver.

This robot arm is modified from the original build we featured a while back, which had a gripper mounted. It uses mainly standard 3D printer components with 3D printed frame parts. The arms lengths are sized to fold over the base and take up little table horizontal space when not in use. It can work in a large semi-circular area around itself, and if a proper locating and homing method is implemented, it can be moved around and engrave a large area section by section.

One of the challenges of SCARA arms is rigidity. As the cantilevered arm extends, it tends to lean over under its weight. In [How To Mechatronics]’s case, it showed up as skewed engravings, which he managed to mitigate to some degree in the Marlin firmware.

Another possible solution is to reduce the weight of the arms by moving the motors to the base, as was done with the Pybot or dual-arm SCARA printers like the RepRap Morgan.

Continue reading “Small Footprint Scara Laser Engraver Has Massive Build Area”

CRISS CP/M Provides Modern Hardware For A Classic OS

Today you might choose run Windows, Linux, MacOS or some other OS on your computer. Back in the 1980s however, you generally had little choice: a certain home computer came with a certain OS, and that was it. If yours was based on a Z80 processor, chances are it ran CP/M. While differences in hardware often made direct data exchange difficult, CP/M provided at least a basic level of software compatibility between various Z80-based computers. Although eventually supplanted by MS-DOS (which initially aimed to be compatible with CP/M), enthusiasts kept the classic OS running on old hardware throughout the 90s and even beyond.

[Igor] decided to make a 21st-century CP/M machine by designing the CRISS, a single-board computer based mainly on AVR microcontrollers. The CPU is a 20 MHz ATMEGA1284P, which imitates a 4 MHz Z80 through machine-code emulation. A pair of ATMEGA328s run the peripheral controller and a VGA output, so the CRISS can be used with modern monitors. True to its heritage however, the image is monochrome green-on-black, looking instantly familiar to users of Kaypros, Osbornes and other contemporary CP/M machines.

Software is loaded through an SD card that holds floppy images. The CRISS can directly run programs written for the Kaypro II and Robotron 1715 computers, although other platforms can be supported as well with a software upgrade. [Igor] shows it running programs ranging from the Turbo Pascal compiler to games like Xonix and Tetris.

Housed in a neat little case, the CRISS can communicate with standard PS/2 keyboards and serial printers. Even an Ethernet port is provided for those willing to experiment with network connectivity (a rare feature in the 1980s).

We love seeing modern retro builds like this; similar projects we’ve covered before include the compact ZZ80MB and the huge Z20X. Others have used different ways of running CP/M on modern hardware, such as booting it directly on a Raspberry Pi or emulating an Altair on an ESP32.

Printing Ceramics Made Easier

Creating things with ceramics is nothing new — people have done it for centuries. There are ways to 3D print ceramics, too. Well, you typically 3D print the wet ceramic and then fire it in a kiln. However, recent research is proposing a new way to produce 3D printed ceramics. The idea is to print using TPU which is infused with polysilazane, a preceramic polymer. Then the resulting print is fired to create the final ceramic product.

The process relies on a specific type of infill to create small channels inside the print to assist in the update of the polysilazane. The printer was a garden-variety Lulzbot TAZ 6 with ordinary 0.15mm and 0.25mm nozzles.

Continue reading “Printing Ceramics Made Easier”