BlueRetro Is The Ultimate Console Controller Adapter

Retro consoles are great fun, packed with classic games and plenty of nostalgia. However, they also lack the polish and ergonomics of more modern hardware. Serious gamers will often find their original gamepads wearing out, too. A solution to all these problems and more is BlueRetro.

BlueRetro is a Bluetooth controller adapter for a wide variety of vintage console platforms. Developed by [Jacques Gagnon], it uses an ESP32 for its powerful wireless capabilities. One core of the ESP32 is used to speak Bluetooth and handle controller interfacing, while the other processor core handles speaking to the attached console.

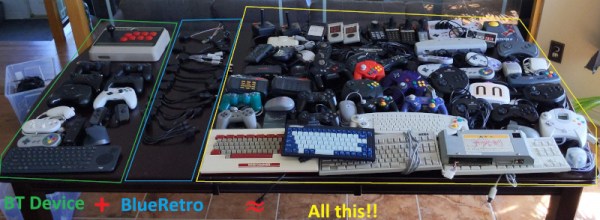
The level of attention to detail is where this project really shines. [Jacques] has implemented many advanced features, like mapping axes to buttons and vice versa – essential when swapping controllers across varied systems. The output of BlueRetro is a DB25 connector, which is then used with adapter cabling to hook up to the controller ports of various consoles. It’s even capable of emulating multitap adapters for up to 7-player action.

In a video, [Jacques] shows off the hardware in use with his collection of vintage consoles, hooked up on a shelf with an impressive A/V switcher setup. It’s clear that this is the build of a hacker that doesn’t skimp on doing things the right way. We’ve seen his work before too, with a tidy RGB input mod for CRT TVs. Video after the break.

Continue reading “BlueRetro Is The Ultimate Console Controller Adapter”

Why Are Digital Cameras Still Boring?

In the matter of technological advancement, we are as a species, mostly insatiable. The latest toy, the fastest silicon, the largest storage, the list goes on. Take digital cameras as an example, what was your first one? Mine was a Casio QV200 in about 1997, I still have it somewhere though I can’t immediately lay my hands on it, and it could hold a what was for its time a whopping 64 VGA-resolution pictures in its 4Mb of onboard memory.

The QV200 showing off its VGA capabilities. It's March 1998, and this is a brand-new PlayStation that I'm about to install a mod chip inside.
The QV200 showing off its VGA photography capabilities. It’s March 1998, and this is a brand-new PlayStation that I’m about to install a mod chip inside.

It’s a shock to realise that nearly a quarter century has passed since then, and its fixed-focus 640×480 camera module with a UV-sensitive CMOS sensor that gave everything a slight blue tint would not even grace the cheapest of feature phones in 2020. Every aspect of a digital camera has improved beyond measure since the first models in the 1980s and early 1990s that started to resemble what we’d know today as a standalone digital camera, they have near-limitless storage, excellent lenses, huge and faithfully-reproducing sensors, and broadcast-quality video capability.

But how playful have camera manufacturers been with the form factor? We see reporters in sci-fi movies toting cameras that look nothing like their film-based ancestors. What do our real-life digital cameras have on offer as far as creative body design goes?

Continue reading “Why Are Digital Cameras Still Boring?”

Breadboard Breaks The Speed Barrier

It is common wisdom that solderless breadboards are only good for low frequencies. But how fast can they really go? There’s been a contest going on to see who can make the fastest breadboard-mounted oscillator and [Joe Smith] has been trying to keep his leading position. He’s already managed 6 GHz and now he’s shooting for 20 GHz, as you can see in the video below.

One of the biggest challenges at these frequencies is just measuring your output. You may have a scope, but how does it do at 20 GHz? So half of the story is how [Joe] managed to monitor his output.

Continue reading “Breadboard Breaks The Speed Barrier”

The ISS Is Getting A New WC

Every home needs renovations after a few decades, and the International Space Station is no different. This fall, they’ll be getting a new Universal Waste Management System (UWMS), aka a new toilet.

Though the news coincides with increased traffic to the ISS, this move stems from a more serious issue with bacterial contamination during longer-term space travel. Today’s ISS toilets already recycle urine back into potable water and scrub the air reclaimed from solid waste as it gets compacted and stored. The new UWMS will act more like a food dehydrator, reducing the water content as much as possible to save on space, and petrifying the poo to inactivate the bacteria.

The current commode on the American side of the ISS was designed in the 1990s and is based on the Space Shuttle’s facilities. It has a funnel with a hose for urine and a bag-lined canister with a seat for solid waste, both of which are heavily vacuum-assisted.

Though the current toilet still does everything it’s supposed to do, there is room for improvement. For instance, women find it difficult to engage both parts of the system at the same time, and almost everyone prefers the toe bars on the Russian toilet to the more encumbering thigh bars on the American throne. Also, the current commode’s interface is more complicated than it needs to be, which takes up valuable crew time. Continue reading “The ISS Is Getting A New WC”

Adding PCIe To Your Raspberry Pi 4, The Easier Way

Ever since people figured out that the Raspberry Pi 4 has a PCIe bus, the race was on to be the first to connect a regular PCIe expansion card to a Raspberry Pi 4 SBC. Now [Zak Kemble] has created a new approach, using a bridge PCB that replaces the VL805 USB 3 controller IC. This was also how the original modification by [Tomasz Mloduchowski] worked, only now it comes in a handy (OSHPark) PCB format.

After removing the VL805 QFN package and soldering in the bridge PCB, [Zak] confirmed that everything was hooked up properly and attempted to use the Raspberry Pi 4 with a PCIe extender. This showed that the Raspberry Pi would happily talk with a VL805-based USB 3.0 PCIe expansion card, as well as a Realtek RTL8111-based Ethernet card, but not a number of other PCIe cards. Exactly why this is is still unclear at this point.

As a bonus, [Zak] also found that despite the removal of the VL805 IC from the Raspberry Pi rendering its USB 3 ports useless, one can still use the USB-C ‘power input’ on the SBC as a host controller. This way one can have both PCIe x1 and USB on a Raspberry Pi 4.

This is the third iteration we’ve seen for using PCIe with the Pi. If you’re building on the work of [Thomasz Mloduchowski], which inspired [Colin Riley] to add expanders, and now this excellent hack by [Zak], we want to hear about it!

(Thanks to Itay for the tip)

Unrolling The Mystery Inside An Aluminum Electrolytic Capacitor

When we remove the enclosure of modern electronics, we see a lot of little silvery cylinders wrapped with heat shrink plastic. These aluminum electrolytic capacitors are common residents on circuit boards. We may have cut one open to satisfy our curiosity of what’s inside, but that doesn’t necessarily mean we understood everything we saw. For a more detailed guided tour, follow [TubeTime]’s informative illustrated Twitter thread.

Electronics beginners are taught the basic canonical capacitor: two metal plates and an insulator separating them. This is enough to understand the theory of capacitor operation, but there were hints the real world is not quite that simple. We don’t even need to disassemble an electrolytic capacitor to get our first hint: these cylinders have markings to indicate polarity, differentiating them from the basic capacitor which is symmetric and indifferent to polarity. Once taken apart and unrolled, we would find two thin aluminum foils separated by a sheet of paper. It would be tempting to decide the foil were our two plates and the paper is our insulator, except for the fact those two metal plates are different sizes further deviating from the basic capacitor.

Electronics veterans know the conductor–insulator–conductor pattern is not foil–paper–foil, but actually foil–oxide–electrolyte. But there is more to [TubeTime]’s tour than this answer, which includes pictures of industrial machinery, a side adventure in electrolytic chemistry using a tiny glass beaker, concluding with links to more information. And once armed with knowledge, we can better understand why electrolytic capacitors don’t necessarily need to be replaced in old equipment and appreciate them within the larger history of capacitors context.

Commodore SX-64 Keyboard Upgraded From Trash To Treasure

Released in 1984, the Commodore SX-64 Executive Computer was one of the first portable luggable color computers. It cost twice as much as a Commodore 64, had a tiny 5″ diagonal screen, and couldn’t actually support both 5¼” drives as advertised. On the upside, people say it had a slightly better keyboard than its classic cousin.

[Drygol] agreed to restore the keyboard from a friend’s Commodore SX-64 sight-unseen, and boy was this thing in bad shape. Most people would probably consider the condition a shame and write it off as a lost cause, since two of the corners were missing most of their plastic. But [Drygol] isn’t most people. [Drygol] had mad restoration skills to begin with, and this project honed them to a razor’s edge.

Plenty of the other vintage computer restorations [Drygol] has done required plastic welding, which uses heat or a lot of friction to smooth over cracks. Some of those have not stood the test of time, so he’s now in the habit of stabilizing cracks with brass mesh before filling them with fiberglass putty.

The best part is how [Drygol] managed to rebuild the corners using the same methods, soldering the brass mesh at the 90° joins, and reinforcing them with thick copper wire before beginning the painstaking putty/sand/putty process. The use of blank copper clad boards as straight edges and thickness gauges is genius.

There’s a whole lot to learn here, and the adventure beings with something that probably keeps a lot of people from trying stuff like this in the first place: how do you safely remove the badges?

You’re right, plastic welding is awesome. There even used to be a toy plastic welder. But there’s no need to troll the electronic auction bay to give it a try — just use a cheap soldering iron.