Tesla Coil Makes Sodium Plasma

Looking for a neat trick to do with your Tesla coil? [The Action Lab] uses his coil to make a metal plasma — in particular, sodium. You can see the results in the video below.

To create a metal plasma, you need a metal vapor and sodium can create a vapor at a relatively low temperature, especially in a vacuum. The resulting glow is pretty to look at, but you will need a bit of lab gear to pull it off.

Continue reading “Tesla Coil Makes Sodium Plasma”

Junkbox Build Keeps Tesla Coils Perfectly Varnished

Admittedly, not a lot of people have a regular need to varnish coils. It’s mainly something that Tesla coil builders and other high-voltage experimenters are concerned with. But since that group probably constitutes a not insignificant fraction of the Hackaday audience, and because there are probably more applications for this homebrew coil varnishing setup, we figured it would be a good idea to share it.

For [Mads Barnkob], coil maintenance isn’t something to take lightly. If you check out his Kaizer Power Electronics channel on YouTube, you’ll see that he has quite a collection of large, powerful Tesla coils, some of which are used for demos and shows, and others that seem to be reserved mainly for blowing stuff up. To prevent one of his coils from joining the latter group, keeping the coat of insulating varnish on the secondary coil windings in tip-top condition is essential.

The setup seen in the video below helps with that tedious chore. Built entirely from scraps and junk bin parts, the low-speed, low-precision lathe can be set up to accommodate coils of all sizes. In use, the lathe turns the coil very slowly, allowing [Mads] to apply an even coat of varnish over the coil surface, and to keep it from sagging while it dries.

[Mads]’ setup is probably not great for coil winding as it is, but for coil maintenance, it’s just the thing. If your needs are more along the lines of a coil winder, we’ve got a fully automated winder that might work for you.

Continue reading “Junkbox Build Keeps Tesla Coils Perfectly Varnished”

High Tech Pancake Tesla Coil Brings The Lightning

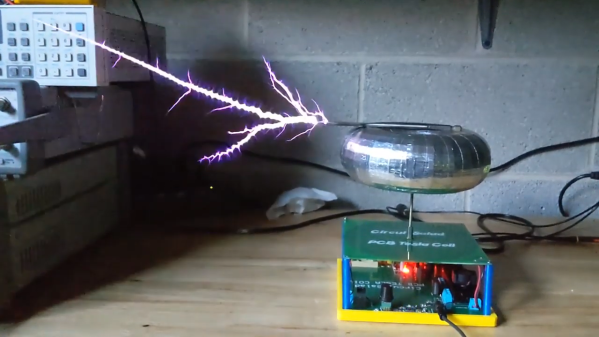
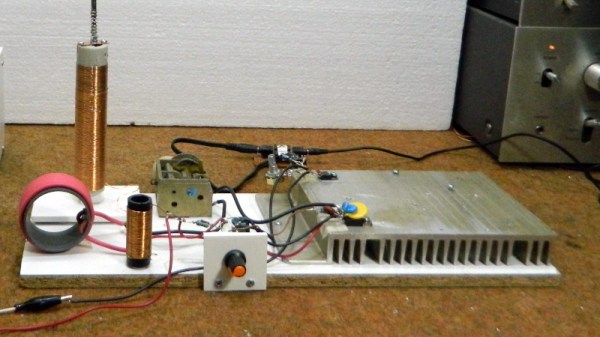
For several years now we’ve been following [Jay Bowles] as he brings high-voltage down to Earth on his Plasma Channel YouTube channel. From spark gaps made of bits of copper pipe to automotive ignition coils driven by the stalwart 555 timer, he’s got a real knack for keeping his builds affordable and approachable. But once in a while you’ve got to step out of your comfort zone, and although the dedicated DIY’er could still replicate the solid state “pancake” Tesla coil he documents in his latest video, we’d say this one is better left for the professionals.

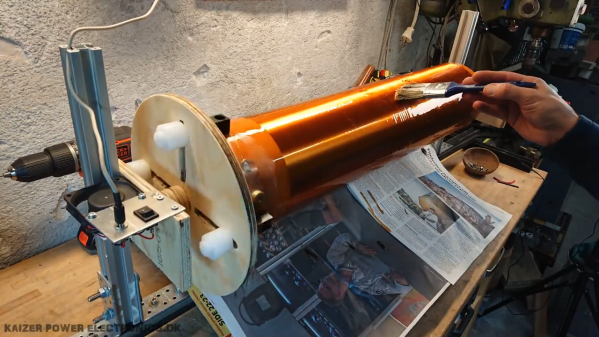
The story starts about nine months ago, when [Jay] was approached by fellow YouTuber [LabCoatz] to collaborate on a PCB design for a solid state Tesla coil (SSTC). Rather than a traditional spark gap, a SSTC uses insulated-gate bipolar transistors (IGBTs) triggered by an oscillator, which is not only more efficient but allows for fine control of the primary coil. The idea was to develop an AC-powered coil that was compact, easy to repair, and could be controlled with just a couple dials on the front panel. The device would also make use of an antenna feedback system that would pick up the resonant frequency of the secondary coil and automatically adjust the IGBT drive to match.

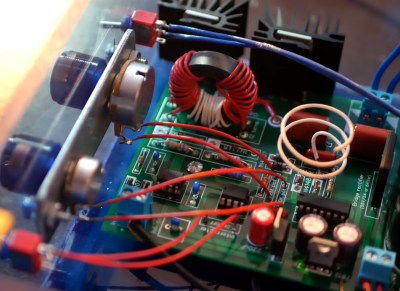
Being considerably more complex than many of the previous builds featured on Plasma Channel, it took some time to work out all the kinks. In fact, the majority of the video is [Jay] walking the viewer through the various failure modes that he ran into while developing the SSTC. Even for somebody with his experience in high-voltage, there were a number of headscratchers that had to be solved.

For example, the first version of the design used metal bolts to attach the primary and secondary coils, until he realized that was leading to capacitive coupling and replaced them with acrylic blocks instead. If his previous videos surprised you by showing how easy it could be to experiment with high-voltages, this one is a reminder that it’s not always so simple.

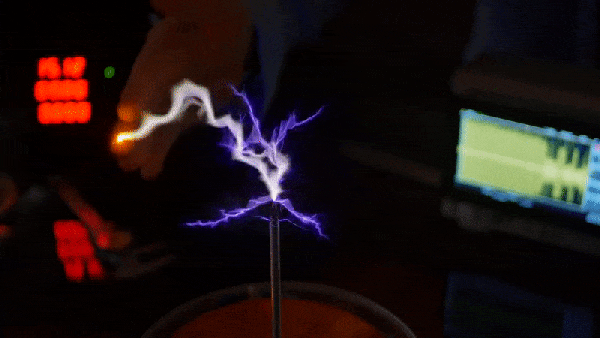
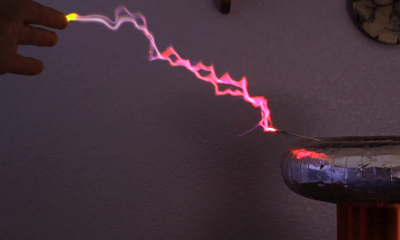
But in the end [Jay] does get everything sorted out, and the results are nothing short of spectacular. Even on the lower power levels it throws some impressive sparks, but when cranked up to max, it offers some of the most impressive visuals we’ve seen so far from Plasma Channel. It was a lot of work, but it certainly wasn’t wasted effort.

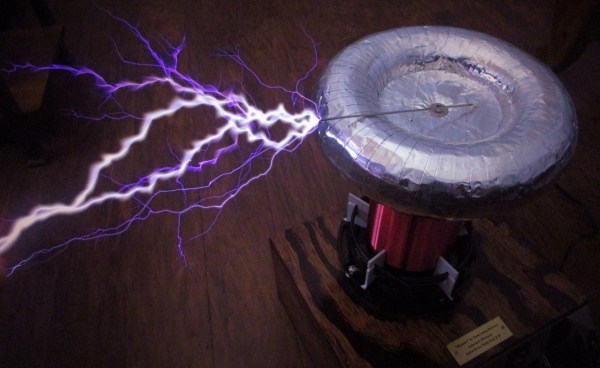
Fascinated by the results, but not quite ready to jump into the deep end? This affordable and easy to build high-voltage generator featured on Plasma Channel back in 2020 is a great way to get started. If you still need more inspiration, check out the fantastic presentation [Jay] gave during the 2021 Remoticon.

Continue reading “High Tech Pancake Tesla Coil Brings The Lightning”

A Builders Guide For The Perfect Solid-State Tesla Coil

[Zach Armstrong] presents for your viewing pleasure a simple guide to building a solid-state Tesla coil. The design is based around a self-resonant setup using the UCC2742x gate driver IC, which is used in a transformer-coupled full-wave configuration for delivering maximum power from the line input. The self-resonant bit is implemented by using a small antenna nearby the coil to pick up the EM field, and by suitably clamping and squaring it up, it is fed back into the gate driver to close the feedback loop. Such a setup within reason allows the circuit to oscillate with a wide range of Tesla coil designs, and track any small changes, minimizing the need for fiddly manual tuning that is the usual path you follow building these things.

Since the primary is driven with IGBTs, bigger is better. If the coil is too small, the resonant frequency would surpass the recommended 400 kHz, which could damage the IGBTs since they can’t switch much faster with the relatively large currents needed. An important part of designing Tesla coil driver circuits is matching the primary coil to the driver. You could do worse than checkout JavaTC to help with the calculations, as this is an area of the design where mistakes often result in destructive failure. The secondary coil design is simpler, where a little experimentation is needed to get the appropriate degree of coil coupling. Too much coupling is unhelpful, as you’ll just get breakdown between the two sides. Too little coupling and efficiency is compromised. This is why you often see a Tesla coil with a sizeable gap between the primary and secondary coils. There is a science to this magic!

Pretty Lithium Carbonate plasma

A 555 timer wired to produce adjustable pulses feeds into the driver enable to allow easily changing the discharge properties. This enables it to produce discharges that look a bit like a Van De Graaff discharge at one extreme, and produce some lovely plasma ‘fire’ at the other.

We’ve covered Tesla coils from many angles over the years, recently this plasma tweeter made sweet sounds, and somehow we missed an insanely dangerous Tesla build by [StyroPyro] just checkout that rotary spark gap – from a distance.

Continue reading “A Builders Guide For The Perfect Solid-State Tesla Coil”

Is It A Plasma Tweeter Or A Singing Tesla Coil?

When our ears resolve spatial information, we do so at the higher treble frequencies rather than the bass. Thus when setting up your home cinema you can put the subwoofer almost anywhere, but the main speakers have to project a good image. The theoretical perfect tweeter for spatial audio is a zero mass point source, something that a traditional speaker doesn’t quite achieve, but to which audio engineers have come much closer with the plasma tweeter. This produces sound by modulating a small ball of plasma produced through high-voltage discharge, and it’s this effect that [mircemk] has recreated with his HF plasma tweeter.

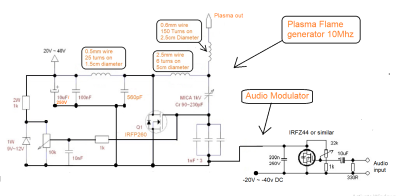
A look at the circuit diagram and construction will probably elicit the response from most of you that it looks a lot like a Tesla coil, and in fact that’s exactly what it is without the usual large capacitor “hat” on top. This arrangement has been used for commercial plasma tweeters using both tubes and semiconductors, and differs somewhat from the singing Tesla coils you may have seen giving live performances in that it’s designed to maintain a consistent small volume of discharge rather than a spectacular lightning show to thrill an audience.

You can see it in operation in the video below the break, and it’s obvious that this is more of a benchtop demonstration than a final product with RF shielding, It’s not the most efficient of devices either, but given that audiophiles will stop at nothing in their pursuit of listening quality, we’d guess that’s a small price to pay. Efficiency can be improved with a flyback design, but for the ultimate in showing off how about a ring magnet to create the illusion of a plasma sheet?

Continue reading “Is It A Plasma Tweeter Or A Singing Tesla Coil?”

Flat Transformer Gives This PCB Tesla Coil Some Kick

Arguably, the most tedious part of any Tesla coil build is winding the transformer. Getting that fine wire wound onto a suitable form, making everything neat, and making sure it’s electrically and mechanically sound can be tricky, and it’s a make-or-break proposition, both in terms of the function and the aesthetics of the final product. So this high-output printed circuit Tesla should take away some of that tedium and uncertainty.

Now, PCB coils are nothing new — we’ve seen plenty of examples used for everything from motors to speakers. We’ve even seen a few PCB Tesla coils, but as [Ray Ring] points out, these have mostly been lower-output coils that fail to bring the heat, as it were. His printed coil generates some pretty serious streamers — a foot long (30 cm) in some cases. The secondary of the coil has 6-mil traces spaced 6 mils apart, for a total of 240 turns. The primary is a single 240-mil trace on the other side of the board, and the whole thing is potted in a clear, two-part epoxy resin to prevent arcing. Driven by the non-resonant half-bridge driver living on the PCB below it, the coil can really pack a punch. A complete schematic and build info can be found in the link above, while the video below shows off just what it can do.

Honestly, for the amount of work the PCB coil saves, we’re tempted to give this a try. It might not have the classic good looks of a hand-wound coil, but it certainly gets the job done. Continue reading “Flat Transformer Gives This PCB Tesla Coil Some Kick”

Extremely Simple Tesla Coil With Only 3 Components

Tesla Coils are a favourite here at Hackaday – just try searching through the archives, and see the number of results you get for all types of cool projects. [mircemk] adds to this list with his Extremely simple Tesla Coil with only 3 Components. But Be Warned — most Tesla coil designs can be dangerous and ought to be handled with care — and this one particularly so. It connects directly to the 220 V utility supply. If you touch any exposed, conductive part on the primary side, “Not only will it kill You, it will hurt the whole time you’re dying”. Making sure there is an ELCB in the supply line will ensure such an eventuality does not happen.

No prizes for guessing that the circuit is straight forward. It can be built with parts lying around the typical hacker den. Since the coil runs directly off 220 V, [mircemk] uses a pair of fluorescent lamp ballasts (chokes) to limit current flow. And if ballasts are hard to come by, you can use incandescent filament lamps instead. The function of the “spark gap” is done by either a modified door bell or a 220 V relay. This repeatedly charges the capacitor and connects it across the primary coil, setting up the resonant current flow between them. The rest of the parts are what you would expect to see in any Tesla coil. A high voltage rating capacitor and a few turns of heavy gauge copper wire form the primary LC oscillator tank circuit, while the secondary is about 1000 turns of thinner copper wire. Depending on the exact gauge of wires used, number of turns and the diameter of the coils, you may need to experiment with the value of the capacitor to obtain the most electrifying output.

If you have to look for one advantage of such a circuit, it’s that there is not much that can fail in terms of components, other than the doorbell / relay, making it a very robust, long lasting solution. If you’d rather build something less dangerous, do check out the huge collection of Tesla Coil projects that we have featured over the years.

Continue reading “Extremely Simple Tesla Coil With Only 3 Components”