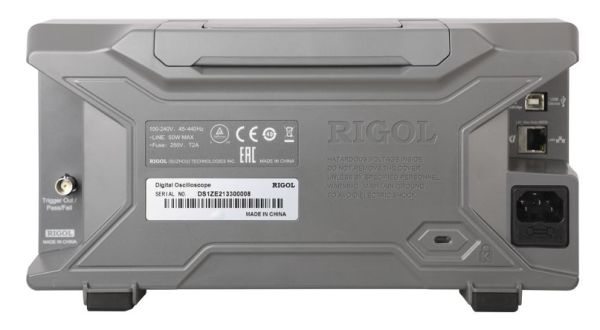
Back of Rigol DS1104Z oscilloscope with the Ethernet and USB ports visible.

SCPI: On Teaching Your Devices The Lingua Franca Of Laboratories

One could be excused for thinking sometimes that the concept of connecting devices with other devices for automation purposes is a fairly recent invention. Yet for all the (relatively) recent hype of the Internet of Things and the ‘smart home’, laboratories have been wiring up their gear to run complicated measurement and test sequences for many decades now, along with factories doing much the same for automating production processes.

Much like the chaotic universe of IoT devices, lab equipment from different manufacturers feature a wide number of incompatible protocol and interface standards. Ultimately these would coalesce into IEEE-488.1 (GPIB) as the physical layer and by 1990 the first Standard Commands for Programmable Instruments (SCPI) standard was released that built on top of IEEE-488.

SCPI defines (as the name suggests) standard commands to interact with instruments. It has over the past decades gone on to provide remote interaction capabilities to everything from oscilloscopes and power supplies to exotic scientific equipment. Many off the shelf devices a hobbyist can buy today feature an SCPI interface via its Ethernet, USB or RS-232C port(s) that combined with software can be used to automate one’s home lab.

Even better is that it’s relatively straightforward to add SCPI functionality to one’s own devices as well, so long as it has at least an MCU and some way to communicate with the outside world.

Continue reading “SCPI: On Teaching Your Devices The Lingua Franca Of Laboratories”

Linux Fu: PDF For Penguins

PostScript started out as a programming language for printers. While PostScript printers are still a thing, there are many other ways to send data to a printer. But PostScript also spawned the Portable Document Format or PDF and that has been crazy successful. Hardly a day goes by that you don’t see some kind of PDF document come across your computer screen. Sure, there are other competing formats but they hold a sliver of market share compared to PDF. Viewing PDFs under Linux is no problem. But what about editing them? Turns out, that’s easy, too, if you know how.

GUI Tools

You can use lots of tools to edit PDF files, but the trick is how good the results will look. Anything will work for this: LibreOffice Draw, Inkscape, or even GIMP. If all you want to do is remove something with a white box or make an annotation, these tools are usually great, but for more complicated changes, or pixel-perfect output, they may not be the right tool.

The biggest problem is that most of these tools deal with the PDF as an image or, at least, a collection of objects. For example, columns of text will probably turn into a collection of discrete lines. Changing something that causes a line to wrap will require you to change all the other lines to match. Sometimes text isn’t even text at all, but images. It largely depends on how the creator made the PDF to begin with. Continue reading “Linux Fu: PDF For Penguins”

Monitor SpaceX Rocket Launches With Software-Defined Radio

The amateur radio community has exploded with activity lately especially in the software-defined radio (SDR) area since it was found that a small inexpensive TV tuner could be wrangled to do what only expensive equipment was able to do before. One common build with these cards is monitoring air traffic, which send data about their flights out in packets over the radio and can easily be received and decoded now. It turns out another type of vehicle, SpaceX’s Falcon 9 spacecraft, reports data via radio as well and with some slightly upgraded hardware it’s possible to “listen in” to these flights in a similar way.

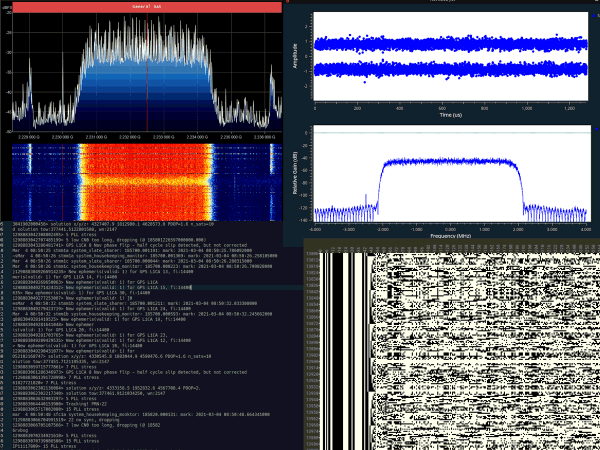
Reddit users [derekcz] and [Xerbot] used a HackRF module to listen in to the Falcon 9’s data transmissions during its latest launch. While the HackRF is a much more expensive piece of equipment compared to the RTL-SDR dongles used to listen in on aircraft, it is much more capable as well, with a range from 1 MHz to 6 GHz. Using this SDR peripheral as well as a 1.2 m repurposed satellite dish, the duo were able to intercept the radio transmissions from the in-flight rocket. From there, they were recorded with GNU Radio, converted into binary data, and then translated into text.

It seems as though the data feed included a number of different elements including time, location information, and other real-time data about the rocket’s flight. It’s a great build that demonstrates the wide appeal of software-defined radio, and if you want to get started it’s pretty easy to grab a much cheaper dongle and use it for all kinds of applications like this. Go check out [Tom Nardi]’s piece on the last seven years of RTL-SDR to get caught up to speed.

Thanks to [Adrian] for the tip!

The Seedy World Of Message Serialization

Look, I’ve been there too. First the project just prints debug information for a human in nice descriptive strings that are easy to understand. Then some tool needs to log a sensor value so the simple debug messages gain structure. Now your debug messages {{look like : this}}. This is great until a second sensor is added that uses floats instead of ints. Now there are sprinklings of even more magic characters between the curly braces. A couple days later and things are starting to look Turing complete. At some point you look up and realize, “I need a messaging serialization strategy”. Well you’ve come to the right place! Continue reading “The Seedy World Of Message Serialization”

Circuit VR: Advanced Falstad Logic With Geniac

I find that if I’m trying to make a point with a student or a colleague about a circuit, sometimes the Falstad online simulator is worth a few thousand words. You can draw the circuit, play with the values, and even see the current flow in an intuitive way as well as make traditional measurements. The simulator not only handles analog but also digital circuits. At first glance, though, the digital functions appear limited, but if you dig deeper, there is a custom logic block that can really help. I dug into this — and into how switches work in the simulator — the other day in response to a Hackaday post. If you use Falstad, read on!

Continue reading “Circuit VR: Advanced Falstad Logic With Geniac”

Make That Special Cup Of Coffee By Completely Tweaking The Coffee Machine

An interesting part of working on the Building Management and Control (BMaC) project – as previously covered on this site – was the reverse-engineering and ultimately the gaining of full control over the coffee machines at the office. Not the boring filter coffee machines, mind you, but the fully automatic espresso machine type that grinds beans, makes coffee, adds milk, and much more. Depending on one’s budget, naturally.

These little marvels of engineering contain meters of tubing, dozens of sensors, valves, ceramic grinders, and heating elements. The complexity of this machinery made us think that maybe there was more that we could do with these machines beyond what their existing programming and predefined products would allow. Naturally, there was.

Continue reading “Make That Special Cup Of Coffee By Completely Tweaking The Coffee Machine”

What’s Inside A Neonode Laser Sensor?

Every once in a while, you get your hands on a cool piece of hardware, and of course, it’s your first instinct to open it up and see how it works, right? Maybe see if it can be coaxed into doing just a little bit more than it says on the box? And so it was last Wednesday, when I was at the Embedded World trade fair, and stumbled on a cool touch display floating apparently in mid-air.

The display itself was a sort of focused Pepper’s Ghost illusion, reflected off of an expensive mirror made by Aska3D. I don’t know much more — I didn’t get to bring home one of the fancy glass plates — but it looked pretty good. But this display was interactive: you could touch the floating 2D projection as if it were actually there, and the software would respond. What was doing the touch response in mid-air? I’m a sucker for sensors, so I started asking questions and left with a small box of prototype Neonode zForce AIR sensor sticks to take apart.

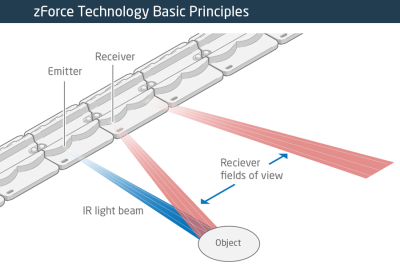
The zForce sensors are essentially an array of IR lasers and photodiodes with some lenses that limit their field of view. The IR light hits your finger and bounces back to the photodiodes on the bar. Because the photodiodes have a limited angle over which they respond, they can be used to triangulate the distance of the finger above the display. Scanning quickly among the IR lasers and noting which photodiodes receive a reflection can locate a few fingertips in a 2D space, which explained the interactive part of the floating display. With one of these sensors, you can add a 2D touch surface to anything. It’s like an invisible laser harp that can also sense distance.

The intended purpose is fingertip detection, and that’s what the firmware is good at, but it must also be the case that it could detect the shape of arbitrary (concave) objects within its range, and that was going to be my hack. I got 90% of the way there in one night, thanks to affordable tools and free software that every hardware hacker should have in their toolbox. So read on for the unfortunate destruction of nice hardware, a tour through some useful command-line hardware-hacking tools, and gratuitous creation of animations from sniffed SPI-like data pulled off of some test points.

Continue reading “What’s Inside A Neonode Laser Sensor?”