Screenshot of Pulseview showing capture and decode of some digital channels

Need A Logic Analyzer? Use Your Pico!

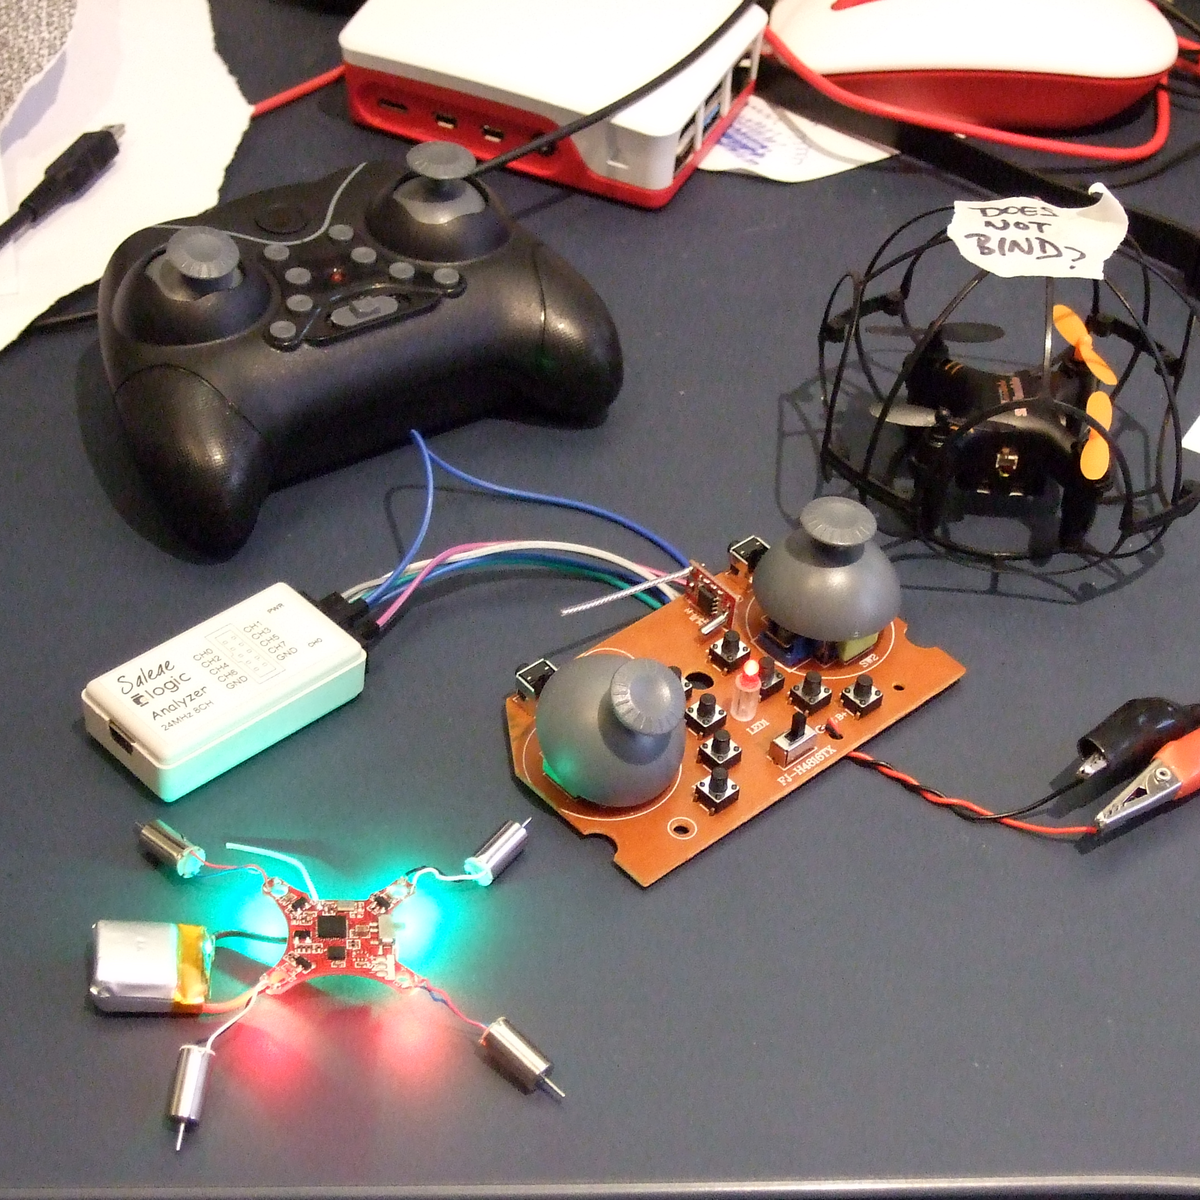
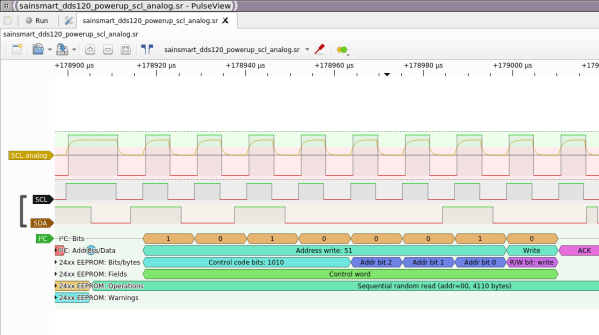
There’s a slew of hardware hacker problems that a logic analyzer is in a perfect position to solve. Whether you’re trying to understand why an SPI LCD screen doesn’t initialize, what’s up with your I2C bus, or determine the speed of an UART connection, you’ll really want to have a logic analyzer on hand. People have been using a Pi Pico as a logic analyzer in a pinch, and now [pico-coder] has shared a sigrok driver that adds proper support for a Pico to beloved tools like Pulseview.

The specs offered are impressive. Compared to the $10 “Saleae” clone analyzers we are so used to, this thing boasts 21 digital channels with up to 120 MHz capture speed, 3 ADC channels at up to 500 KHz, and hardware-based triggers. The GitHub repository linked above stores the driver files out-of-tree, but provides build instructions together with an easily flash-able uf2 firmware. It’s likely that you’ll soon see this driver in a stock Pulseview installation, however, given the submitter-friendly attitude we’ve witnessed on the sigrok mailing list. However, if you need a logic analyzer ASAP, you should follow the caringly offered quickstart guide.

We’ve covered Pulseview being used in combination with cheap accessible analyzers before — a must-watch if you need to get yourself up to speed on the value they provide to a hobbyist. If an oscilloscope is what you need and a smartphone is what you have, perhaps you’ll enjoy the Scoppy firmware for the Pico.

We thank [mip] for sharing this with us!

Back of Rigol DS1104Z oscilloscope with the Ethernet and USB ports visible.

SCPI: On Teaching Your Devices The Lingua Franca Of Laboratories

One could be excused for thinking sometimes that the concept of connecting devices with other devices for automation purposes is a fairly recent invention. Yet for all the (relatively) recent hype of the Internet of Things and the ‘smart home’, laboratories have been wiring up their gear to run complicated measurement and test sequences for many decades now, along with factories doing much the same for automating production processes.

Much like the chaotic universe of IoT devices, lab equipment from different manufacturers feature a wide number of incompatible protocol and interface standards. Ultimately these would coalesce into IEEE-488.1 (GPIB) as the physical layer and by 1990 the first Standard Commands for Programmable Instruments (SCPI) standard was released that built on top of IEEE-488.

SCPI defines (as the name suggests) standard commands to interact with instruments. It has over the past decades gone on to provide remote interaction capabilities to everything from oscilloscopes and power supplies to exotic scientific equipment. Many off the shelf devices a hobbyist can buy today feature an SCPI interface via its Ethernet, USB or RS-232C port(s) that combined with software can be used to automate one’s home lab.

Even better is that it’s relatively straightforward to add SCPI functionality to one’s own devices as well, so long as it has at least an MCU and some way to communicate with the outside world.

Continue reading “SCPI: On Teaching Your Devices The Lingua Franca Of Laboratories”

Scratching That Itch

I did something silly. I bought a lot of ten “broken” cheesy indoor quadcopters on eBay — to hopefully cobble one working one together and to amuse my son. At this point, I’ve got eight working. The bad news is that they all come with dirt-cheap transmitters that aren’t really conducive to flying at all. They’d be a lot more fun if they could be controlled with a real remote. Enter the hackers.

Most all of the cheap quads are based on one of a handful of radio chipsets, although they use different protocols. An enterprising hacker could conceivably just bundle together this handful of radio modules, and the rest would be a simple matter of software. That’s exactly what Pascal Langer’s DIY Multiprotocol TX and supporting firmware does. This hobby project was so successful that compatible hardware is manufactured by more than a few Chinese companies, and non-geeks have them installed in their radios. The module lets you control virtually anything that uses 2.4 GHz. Of course, I’ve got one of them.

I opened up the cheesy drone’s transmitter, found that it used a popular chipset, and worked through all the different supported protocols that used it. No dice. But the radio module did have nicely labeled SPI lines, so I reached out to Pascal. A couple of Sigrok sessions later, he’d figured out that it was trying to bind on a different channel, I’d recompiled the firmware, and was playing with the drone’s other functions.

I just love a good SPI-sniffing session. sigrok-cli -d fx2lafw -c samplerate=4000000 -P spi:clk=D0:mosi=D1:cs=D2 -A spi="mosi transfer" --continuous | grep A0 | uniq reads the SPI lines, decodes the packets, filters out the commands, and removes duplicates, in real-time. All that’s left to do is wiggle the sticks, mash buttons, and take good notes.

None of this was hard, and certainly none of it was expensive. I got my drones under the control of my fancy-schmancy remote, and have a good foothold into controlling them algorithmically later on thanks to everyone’s previous work on reverse engineering these protocols. Support for DF Drone’s SkyTumbler will be included in the next DIY Multiprotocol TX release, and I spent about four or five pleasant hours on this project. Maybe only a handful of people will stumble on this particular protocol — or maybe it will just be me. I did it mostly just to scratch my own particular itch.

But that’s one way open source works, thrives, and grows. Here’s to you all out there, from the Deviation team, who did a lot of the early drone protocol reverse engineering, to Pascal for the DIY Module, to the Sigrok folks who made the tools accessible for me to piggyback on everyone’s previous work. Keep on hacking!

In Praise Of The DT830, The Phenomenal Instrument You Probably Don’t Recognise For What It Is

If we had to make a guess at the single piece of electronic bench equipment owned by the highest proportion of Hackaday readers, it would not be a budget oscilloscope from Rigol, nor would it be a popular portable soldering iron like the TS100. Instead we’re guessing that it’s a multimeter, and not even the most accomplished one.

The DT830 is a genericised Chinese-manufactured 3.5 digit digital multimeter that can be had for an astonishingly low price. Less than a decent hamburger gets you an instantly recognisable plastic case with a chunky rotary range selector switch, and maybe a socket for some kind of transistor or component tester. Make sure that there is a 9 volt battery installed, plug in the pair of test leads, and you’re in business for almost any day-to-day electrical or electronic measurement. They’ve been available in one form or another for decades and have been the subject of innumerable give-aways and loss-leader offers, so it’s a reasonsble guess that you’ll have one somewhere. I have three as far as I know, they make great on-the-go instruments and have proved themselves surprisingly reliable for what they are. Continue reading “In Praise Of The DT830, The Phenomenal Instrument You Probably Don’t Recognise For What It Is”

Easy GUI Front Ends For Arduino, Rasberry Pi, And More With MyOpenLab

If you want to integrate a nice graphical interface with a microcontroller or single-board computer for a useful piece of custom equipment, how will you go about it? MyOpenLab is a platform that makes it easy to design virtual interfaces your electronic builds. If you want controls and readouts for Arduino, Raspberry Pi, Android, or anything with a serial port, this is worth a try.

MyOpenLab reminds me of LabView. Not so much modern LabView with all of its add-ons and extras, but LabView back when it did just a few things but did them really well. The open source MyOpenLab project has been around for a while. The website and documentation are not in English, which may have kept some people from giving it a try, but the software itself is available in German, English, and Spanish. I took the plunge and found the language barrier didn’t cause me trouble.

As an example of what you can do, image you want to build a custom bench tool. You build virtual device (they call it a “VirtualMachine”) that uses your computer as the control panel and readout, and your electronic project as the physical interface. In myOpenLab your device will consist of two parts: a diagram and a front panel. Some things only live on the diagram, like a timer or a connection to an Arduino. But some things live on both like switches, LEDs, graphs, and so on. You can connect all the little boxes together to build up applications. They can stand alone, but the power comes in being able to connect to an Arduino or Raspberry Pi (or a few other options) for I/O.

Continue reading “Easy GUI Front Ends For Arduino, Rasberry Pi, And More With MyOpenLab”

Easy Portable Serial Ports

Modern operating systems insulate us — as programmers, especially — from so much work. Depending on how far back you go, programmers had to manage their own fonts, their own allocation space on mass storage, or even their own memory allotments. Every year, though, it seems like things get easier and easier. So why is it so annoying to open a simple serial port? It isn’t hard, of course, but on every operating system it seems to be painful — probably in an attempt to be flexible. And it is even worse if you want portability. I needed to write some C code that read data from an FPGA’s embedded logic analyzer, and I was annoyed at having to write yet more serial port code. I have my own shim library, but it isn’t well tested and isn’t all that flexible — it does what I need, but I wanted something better. What I wound up with the serial library from Sigrok. You know Sigrok? The logic analyzer software.

 You might counter that the serial port is old hat, so no one wants to support it with modern systems. While the physical serial port might be on life support, there’s no shortage of equipment that connects via USB that appears to be a serial port. So while I was talking to an FTDI chip on an FPGA board, you could just as well be talking to an Arduino or a USB voltmeter or anything.

I guess the Sigrok developers had the same problem I did and they took the time to write a nice API and port it to major platforms. Although Sigrok uses it, they maintain it as a separate project and it was just what I needed. Sort of. I say sort of because the version installed with Ubuntu was old and I needed some features on the newest release, but — as usual — the Internet came to the rescue. A quick Git command, and four lines of build instructions and we were ready to go.

Continue reading “Easy Portable Serial Ports”

Reverse Engineer An X-Ray Image Sensor

If you think of a medical x-ray, it is likely that you are imagining a photographic plate as its imaging device. Clipped to your tooth by your dentist perhaps, or one of the infamous pictures of the hands of [Thomas Edison]’s assistant [Clarence Madison Dally].

As with the rest of photography, the science of x-ray imaging has benefited from digital technology, and it is now well established that your hospital x-ray is likely to be captured by an electronic imaging device. Indeed these have now been in use for so long that their first generation can even be bought by an experimenter for an affordable sum, and that is what the ever-resourceful [Lucy Fauth] with the assistance of [Jana Marie Hemsing], has done. Their Trophy DigiPan digital x-ray image sensor was theirs for around a hundred Euros, and though it’s outdated in medical terms it still has huge potential for the x-ray experimenter.

The write-up is a fascinating journey into the mechanics of an x-ray sensor, with the explanation of how earlier devices such as this one are in fact linear CCD sensors which track across the exposed area behind a scintillator layer in a similar fashion to the optical sensor in a flatbed scanner. The interface is revealed as an RS422 serial port, and the device is discovered to be a standalone unit that does not require any commands to start scanning. On power-up it sends a greyscale image, and a bit of Sigrok examination of the non-standard serial stream was able to reveal it as 12-bit data direct from the sensor. From those beginnings they progressed to an FPGA-based data processor and topped it all off with a very tidy power supply in a laser-cut box.

It’s appreciated that x-rays are a particularly hazardous medium to experiment with, and we note from their videos that they are using some form of shielding. The source is a handheld fluoroscope of the type used in sports medicine that produces a narrow beam. If you remember the discovery of an unexpected GameBoy you will be aware that medical electronics seems to be something of a speciality in those quarters, as do autonomous box carriers.

Continue reading “Reverse Engineer An X-Ray Image Sensor”