Raspberry Pi Zero Takes The Wheel In Miniature Fighting Robot

Looking to capitalize on his familiarity with the Raspberry Pi, [Sebastian Zen Tatum] decided to put the diminutive Pi Zero at the heart of his “antweight” fighting robot, $hmoney. While it sounds like there were a few bumps in the road early on, the tuxedoed bot took home awards from the recent Houston Mayhem 2021 competition, proving the year of Linux on the battle bot is truly upon us.

Compared to using traditional hobby-grade RC hardware, [Sebastian] says using the Pi represented a considerable cost savings. With Python and evdev, he was able to take input from a commercial Bluetooth game controller and translate it into commands for the GPIO-connected motor controllers. For younger competitors especially, this more familiar interface can be seen as an advantage over the classic RC transmitter.
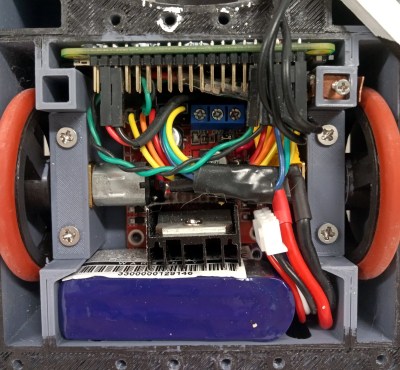
A L298N board handles the two N20 gear motors that provide locomotion, while a Tarot TL300G ESC is responsible for spinning up the brushless motor attached to the “bow tie” spinner in the front. Add in a Turnigy 500mAh 3S battery pack, and you’ve got a compact and straightforward electronics package to nestle into the robot’s 3D printed chassis.

In a Reddit thread about $hmoney, [Sebastian] goes over some of the lessons his team has learned from competing with their one pound Linux bot. An overly ambitious armor design cost them big at an event in Oklahoma, but a tweaked chassis ended up making them much more competitive.

There was also a disappointing loss that the team believes was due to somebody in the audience attempting to pair their phone with the bot’s Pi Zero during the heat of battle, knocking out controls and leaving them dead in the water. Hopefully some improved software can patch that vulnerability before their next bout, especially since everyone that reads Hackaday now knows about it…

While battles between these small-scale bots might not have the same fire and fury of the televised matches, they’re an excellent way to get the next generation of hackers and engineers excited about building their own hardware. We wish [Sebastian] and $hmoney the best of luck, and look forward to hearing more of their war stories in the future.

A 3D Printer With An Electromagnetic Tool Changer

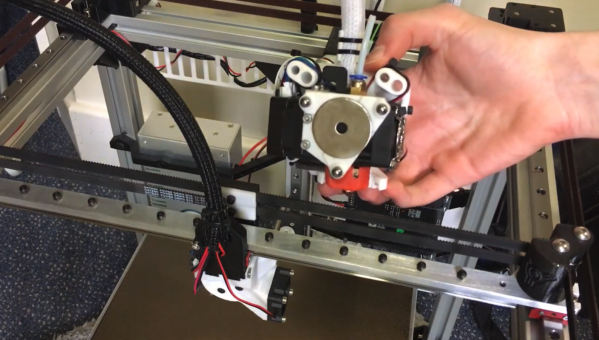
The versatility of 3D printers is simply amazing. Capable of producing a wide variety of prototypes, miscellaneous parts, artwork, and even other 3D printers, it’s an excellent addition to any shop or makerspace. The smaller, more inexpensive printers might do one type of printing well with a single tool, but if you really want to take a 3D printer’s versatility up to the next level you may want to try one with an automatic tool changing system like this one which uses magnets.

This 3D printer from [Will Hardy] uses an electromagnet to attach the tool to the printer. The arm is able to move to the tool storage area and quickly deposit and attach various tools as it runs through the prints. A failsafe mechanism keeps the tool from falling off of the head of the printer in case of a power outage, and several other design features were included to allow others to tweak this design to their own particular needs, such as enclosing the printer and increasing or decreasing the working area of the Core-XY printer as needed.

While the project looks like it works exceptionally well, [Will] notes that it is still in the prototyping phase and needs work on the software in order to refine its operation and make it suitable for more general-purpose uses. It’s an excellent design though and shows promise. It also reminds us of this other tool-changing system we featured a few months ago, albeit with a less electromagnetic twist.

Continue reading “A 3D Printer With An Electromagnetic Tool Changer”

TV Ambient Lighting Built For Awesome Performance

[AndrewMohawk] had seen all kinds of ambient lighting systems for TVs come and go over the years, and the one thing they all had in common was that they didn’t live up to his high standards. Armed with the tools of the hacker trade, he set about building an Ambilight-type system of his own that truly delivered the goods.

The development process was one full of roadblocks and dead ends, but [Andrew] persevered. After solving annoying problems with HDCP and HDMI splitters, he was finally able to get a Raspberry Pi to capture video going to his TV and use OpenCV to determine the colors of segments around the screen. From there, it was simple enough to send out data to a string of addressable RGB LEDs behind the TV to create the desired effect.

For all the hard work, [Andrew] was rewarded with an ambient lighting system that runs at a healthy 20fps and works with any HDMI video feed plugged into the TV. It even autoscales to work with video content shot in different aspect ratios so the ambient display always picks up the edge of the video content.

With 270 LEDs fitted, the result is an incredibly smooth and fluid ambient display we’d love to have at home. You can build one too, since [Andrew] shared all the code on Github. As an added bonus, he also gave the system an audio visualiser, and tested it out with some Streetlight Manifesto, the greatest third-wave ska band ever to roam the Earth. The Fourth Wave still eludes us, but we hold out hope.

We’ve seen plenty of hacks in this vein before; one of the most impressive hacked a smart TV into doing the video processing itself. Video after the break.

Continue reading “TV Ambient Lighting Built For Awesome Performance”

Balloon Antenna Doesn’t Need A Tower

What do you do with floral wire and balloons from Dollar Tree? If you are [Ham Radio Crash Course], you make a ham radio antenna. Floral wire is conductive, and using one piece as a literal sky hook and the other as a ground wire, it should do something. He did use, as you might expect, a tuner to match the random wire length.

The first attempt had too few balloons and too much wind. He eventually switched to a non-dollar store helium tank. That balloon inflates to about 36 inches and appears to have plenty of lift. It looks like by the end he was using two of them.

Continue reading “Balloon Antenna Doesn’t Need A Tower”

Open-Source Method Makes Possible Two-Layer PCBs With Through-Plating At Home

If the last year and its supply chain problems have taught us anything, it’s the value of having a Plan B, even for something as commoditized as PCB manufacturing has become. If you’re not able to get a PCB made commercially, you might have to make one yourself, and being able to DIY a dual-layer board with plated-through vias might just be a survival skill worth learning.

Granted, [Hydrogen Time]’s open-source method, which he calls “Process 01”, is something that he has been working on for years now. And it’s quite the feat of chemistry, which may require you to climb a steep learning curve, depending on how neglected the skills from high school or college chemistry are. But for as complex as Process 01 is, it’s actually pretty straightforward, and the first video below covers it in extreme detail. It starts with a drilled double-sided copper-clad board, which after cleaning is given a bath in palladium chloride. A follow-up dunk in stannous chloride leaves a thin film of palladium metal over all surfaces, even the via walls. This then acts as a catalyst for electroless copper plating in a solution of copper sulfate, followed by an actual electroplating step to thicken the copper plating.

After more washing, photoresist is applied to define the traces as well as to protect the now-plated vias, the board is etched, and a solder mask layer is applied. The boards might not be mistaken for commercial PCBs, but they’re pretty darn good, and as [Hydrogen Time] states, Process 01 is only a beginning. We expect this will be improved and streamlined as time goes by.

Fair warning, though — some steps require a fume hood to be performed safely. Luckily, we’ve got that covered. Sort of.

Continue reading “Open-Source Method Makes Possible Two-Layer PCBs With Through-Plating At Home”

Recreating The Intercom From Ferris Bueller’s Day Off

Ferris Bueller’s Day Off is a pop culture classic, and remains one of the standout teen films of the era. Notably, titular character Ferris was somewhat of a hacker himself, with the movie showcasing several contraptions the teenager used to get out of a day of school. Among them was the intercom, which [Aaron] faithfully recreated with modern technology.

For those who haven’t seen the film, the intercom was hooked up to a cassette player to feign a believable response to anyone that visited the house while Ferris was away. Rather than do things the old fashioned way, [Aaron] built his replica using an ESP32 fitted with a sound chip instead. When visitors ring the intercom, it plays back sound clips from the movie, while also signalling another ESP microcontroller inside [Aaron]’s house to let him know he has visitors.

The build is a charming tribute to the classic film, and all the more fun for [Aaron’s] efforts to make it look the part as well, choosing to build it inside a period-correct intercom housing. To avoid confusion for those who haven’t seen the film, however, he’s been careful to place a sign up to clarify the intercom is not as it seems.

We’ve seen other movie replicas in the same vein before – like this great Star Trek build. Video after the break.

Continue reading “Recreating The Intercom From Ferris Bueller’s Day Off”

Recycling A Laptop Screen Into A Portable Folding Monitor

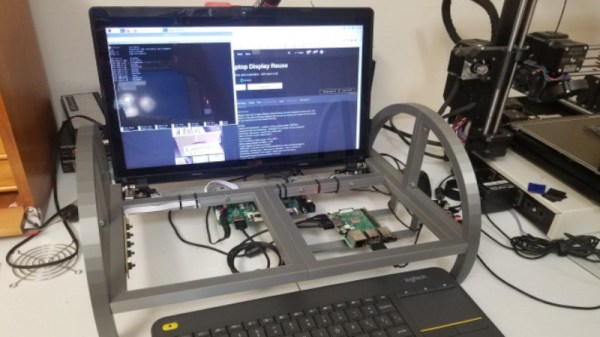
There’s plenty of times we’ve seen a laptop fail, break, or just become too slow for purpose despite the fact that it’s still packing some useful components. With all the single-board computers and other experiments lurking about the average hacker workshop, it’s often useful to have a spare screen on hand, and an old laptop is a great way to get one. This recycled display build from [Gregory Sanders] is a great example of how to reuse old hardware.

The build doesn’t simply package a laptop monitor in the same way as a regular desktop unit. Instead, [Gregory] designed a custom 3D printed frame with an arch design. The laptop screen is installed onto the frame using its original hinges, and [Gregory] designed in standoffs for an laptop LCD driver board to run the display as well as a generic frame where single-board computers can be installed.

The result is a portable monitor that can be folded up for easy transport, which is also self-supporting with its nice large base. It can also be used with other hardware, as it has a full complement of DVI, HDMI and VGA inputs on board. Of course, while you’re tinkering with laptop displays, you might also consider building yourself a dual-screen laptop as well.