While conventional safes can be a good place to put valuables, sometimes it’s even better to hide your things where nobody will even look in the first place. [Wesley Treat] has a build that will allow you to do just that, which secrets away papers, money, or small items within the body of a bolt.
There’s a surprising amount of room inside.
The build starts in a proper hacker fashion, using a power drill to turn an aluminium blank against a power sander creating an ersatz lathing setup. The outside of the blank is then threaded with the aid of a socket wrench and die, to great success. A cavity is created inside and threaded internally, and a separate head is then machined to screw on top. It’s all achieved without the use of a real lathe, with [Wesley]’s power drill doing most of the heavy lifting instead. It’s great stuff.
The end result has the appearance of a socket-head cap screw, while being lighter than a typical example due to the aluminium construction. Inside, there’s room for money, matches, and more, and [Wesley] even put in a small hole so the bolt can be used as an attractive keychain.
It’s a neat build, and one that we’d love to have as part of our own everyday carry. Video after the break.
Meet [Daniel Öster]. [Daniel] is a self-professed petrolhead. In other words, he’s a hot rodder who can’t leave well enough alone. Just because he’s driving a 2012 Nissan Leaf doesn’t mean he isn’t looking for a bit more kick. Having already upgraded the battery, [Daniel] turned his attention to upgrading the 80KW inverter. Not only was [Daniel] successful, but the work has been documented and the Open Source code made available on GitHub. Part of [Daniel]’s mission is to open up otherwise closed ecosystems and make EV hacking and repair approachable by mere mortals.
To get an extra 50hp, [Daniel] could have just swapped in the 110KW drivetrain from a 2018 or newer Leaf, but a less expensive route of swapping in only the 110KW inverter was chosen. By changing out just the inverter, the modification becomes more affordable for others to do. [Daniel] expertly documents how the new 110KW inverter has to be matched to the existing motor by setting a resolver correction value in the inverter.
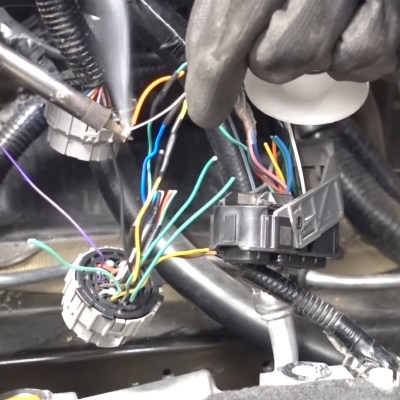
Not for the faint of heart, the inverter swap requires changing connectors to a later style.
Cutting into the wiring harness of a vehicle that one is still making payments on is an exercise reserved for only the most dedicated modders, but a change in connectors between 2012 and 2018 made it necessary. The only tools needed were wire cutters, a soldering iron, heat shrink, and perhaps some liquid courage.
Although the hack was successful, no performance gains were had initially, because the CAN bus signal going to the inverter never told it to provide more than the original 80KW. A CAN bus Man In The Middle attack was done by adding a CAN bridge device that listens to traffic on the CAN bus and bends it to [Daniel]’s will. By multiplying the KW signal by 1.3, the 80KW signal becomes 110KW, and full Ludicrous Speed is achieved! Excellent gains in 0-100kph times are seen, but [Daniel] isn’t done. His next hack will be to put in a 160KW inverter for even more go-pedal madness.
So your ally was slain. Your comrade has fallen. And somehow, that capital F coming from that tiny key is supposed to convey your respect? Please. What you need is a giant, dedicated F key that matches the size of your respect. And [Jaryd_Giesen] is gonna teach you how to build your own. Well, kind of. Between the Thingiverse build guide and the hilarious build video below, you’ll get the gist.
One of the coolest things about this build is the custom spring. Between a birthday time crunch and lockdown, there was just no way to source a giant spring in two days, so [Jaryd] printed a cylinder with a hole in it to chuck into a drill and stand in for a lathe. Ten attempts later, and the perfect spring was in there somewhere.
We love the level of detail here — making a pudding-style keycap to match the main keyboard is the icing on this clacky cake. But the best part is hidden away inside: the stem of the giant switch actuates a regular-sized key switch because it’s funnier that way. Since it’s a giant Gateron red, it doesn’t exactly clack, but it doesn’t sound linear, either, mostly because you can hear the printed pieces rubbing together. Check out the build video after the break, and hit up the second video if you just want to hear the thing.
[Olivier Gomis] did not have access to the fires of Mount Doom to forge a large replica of the One Ring, so he had to settle for patience, maple, and a wood lathe. It does have the added convenience of not needing to fire to expose its true nature, just angry pixies from a wall socket.
[Olivier] made the ring in separate inner and outer sections from 72 blocks of maple. The blocks were glued together in 12-sided rings, and stacked in layers to achieve the desired width. The surfaces were cut smooth and thinned out on a wood lathe, and an internal channel was created for LED strips. The Black Speech was cut through the walls of both the inner and outer surfaces using a manual router. Using the ring itself as a former, he made a wooden base for the router to allow it to slide across the surface without wobbling.
The inside wall was cut into sections and glued into a recess in the external portion. The inscriptions were covered with a maple veneer, which still allows it to be visible when the internal LEDs are switched on. The wiring runs from the base of the stand through an S-shaped stem that was made from layers of veneer clamped in a former. A total of 53 hours of painstaking effort went into this work of art, but the end product would make any hardcore Lord of the Rings fan envious.
We all have that one drawer or box full of random hardware. You don’t want to get rid of anything because as soon as you do, that’s the one thing you’ll need. But, honestly, you’ll be lucky to find what you need in there, anyway. Enter [Mr. Innovative’s] nut sorting machine. As you can see in the video below, it will make order out of the chaos, at least for nuts.
You might think the device would need optical recognition software or some other high-tech mechanism. But, in fact, it is nothing more than a motor with a speed controller. The sorting is done by a plastic piece built like stairs. When a nut is too tall to fit under the next step, it slides out into the output hopper. You could probably turn the whole thing with a crank and no electricity at all if you wanted to.
Drilling out the shaft required a bit of machine tool usage, so this might not be a great weekend project without a lathe. Like many of the commenters on the video mentioned, we probably wouldn’t have used a rod holder as a rotating bearing, either, but for as little as something like this would probably operate, it is likely to last a fair amount of time. It would be easy to replace it or even affix a shaft to the motor with a coupler, sidestepping several issues.
Apparently, the device isn’t perfect. You do get some missorts. We imagine that’s from a larger nut pushing a smaller nut on the way to the hopper. The Thingiverse files seem to be missing, but this is something you’d probably adapt to your own design, anyway.
Since the very beginning, the prevailing wisdom regarding consumer desktop 3D printers was that they were excellent tools for producing prototypes or one-off creations, but anything more than that was simply asking too much. After all, they were too slow, expensive, and finicky to be useful in a production setting. Once you needed more than a few copies of a plastic part, you were better off biting the bullet and moving over to injection molding.
But of course, things have changed a lot since then. Who could have imagined that one day you’d be able to buy five 3D printers for the cost of the crappiest Harbor Freight mini lathe? Modern 3D printers aren’t just cheaper either, they’re also more reliable and produce higher quality parts. Plus with software like OctoPrint, managing them is a breeze. Today, setting up a small print farm and affordably producing parts in mass quantities is well within the means of the average hobbyist.
Flickering LEDs provide a sense of motion
So perhaps I shouldn’t have been so surprised when I started seeing listings for these 3D printed rocket lamps popping up on eBay. Available from various sellers at a wide array of price points depending on how long you’re willing to wait for shipping, the lamps come in several shapes and sizes, and usually feature either the Space Shuttle or mighty Saturn V perched atop a “exhaust plume” of white PLA plastic. With a few orange LEDs blinking away on the inside, the lamp promises to produce an impressive flame effect that will delight space enthusiasts both young and old.
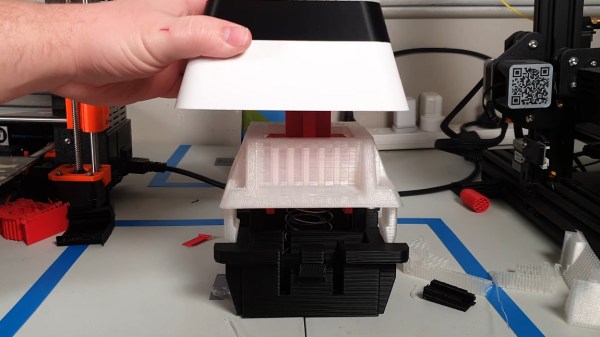
As a space enthusiast that fits somewhere in between those extremes, I decided it was worth risking $30 USD to see what one of these things looked like in real life. After waiting a month, a crushed up box arrived at my door which I was positive would contain a tiny mangled version of the majestic lamp I was promised — like the sad excuse for a hamburger that McBurgerLand actually gives you compared to what they advertise on TV.
But in person, it really does look fantastic. Using internally lit 3D printed structures to simulate smoke and flame is something we’ve seen done in the DIY scene, but pulling it off in a comparatively cheap production piece is impressive enough that I thought it deserved a closer look.
Now it’s always been my opinion that the best way to see how something was built is to take it apart, so I’ll admit that the following deviates a bit from the rest of the teardowns in this series. There’s no great mystery around flickering a couple LEDs among Hackaday readers, so we already know the electronics will be simplistic in the extreme. This time around the interesting part isn’t what’s on the inside, but how the object itself was produced in the first place.
The geometric chuck was a device that stacked up multiple rotating wheels that could vary their speed and their offset to a central shaft, in order to machine ornate designs using a lathe. It’s this piece of machining obscura from the 19th century that inspired this light painting build from [Ted Kinsman].
Rather than the complicated gears and wheels used in the distant past, [Ted] instead elected to use stepper motors. Three stepper motors are stacked on top of each other, each one able to rotate at an independent rate. The design only implements three steppers as the slip rings needed to send power and control signals to each stepper are prohibitively expensive.
An Arduino is programmed to run the show, changing the speed of each motor and thus the patterns the system generates. Put LEDs on the spinning plates, or install a pen to mark a piece of paper, and it’s possible to generate all manner of beautiful spirograph-like patterns. Vary the motor speeds or the positioning of the lights, and the patterns vary in turn.
It’s a fun build for light painting, with some great visuals produced. We also appreciate the use of the Arduino which makes varying the parameters far easier than having to change out gearsets in classical designs.