We’ve seen quite a few retro gaming consoles physically modded to house modern emulation hardware, but the NUC-64 by [RetroModder] stands out as one of the most impressive Nintendo 64 guttings that we’ve seen to date.
Observed from the front, the NUC-64 almost resembles a stock Nintendo console. The project’s name is printed across the vestigial cartridge slot, and two suspiciously modern wireless networking antennas can be seen poking out from the back. The console’s modifications are fully revealed when looking at it from the rear – gone is the power brick socket, which now houses the I/O for the replacement motherboard. A custom 3D printed I/O shield keeps everything looking neat and tidy.
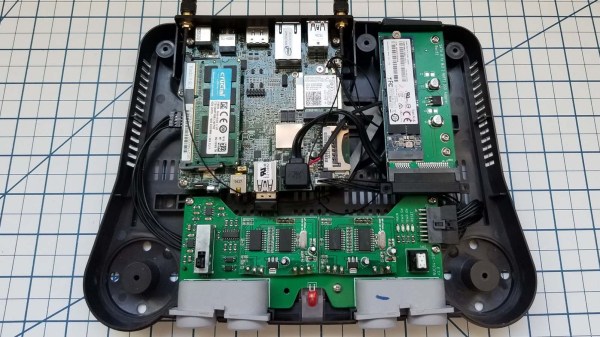
Internally, the new hardware is no slouch. The Intel NUC is a small-form-factor PC, and this miniature battlestation sports an 1.6GHz Intel N3700 Pentium processor, 4GB of DDR3 RAM, WiFi/Bluetooth connectivity and an M.2 SSD. This hardware runs circles around the original Nintendo 64, and is more than capable of emulating games from that system.
Most total conversions would call it a day here, however [RetroModder] has taken it a step further by producing a custom PCB that neatly ties together the console’s front I/O. Most importantly, two Mayflash N64-to-USB converters means that your favorite 1990s games can be enjoyed with the original controllers. The original power LED and reset switch are present, as is the sliding power switch which retains its original purpose, thanks to a simple 555 circuit that sends the expected power-on and power-off signals to the motherboard with each slide of the power switch. Additionally, a system of 3D printed mounts and brackets keeps everything secure inside the case.
All the build details can be found here. The NUC-64 follows on from last month’s GamecubePC. The build quality and attention to detail makes this conversion rather special, and it’s clear that a lot of care and planning was taken to pull this off. Hopefully the original N64 hardware can be repurposed as well, perhaps as a new portable console?
Continue reading “N64 Mini PC Conversion Includes All The Trimmings” →