A Digital Magic 8-Ball? Signs Point To Yes

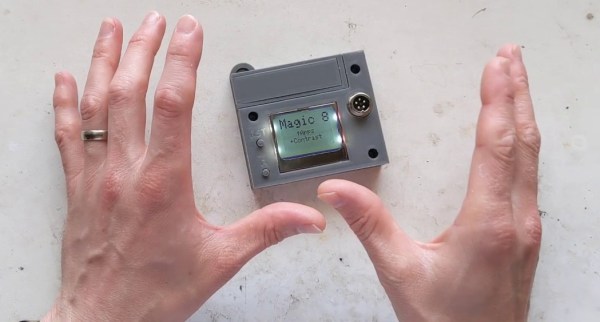
[FacelessTech] was recently charmed by one of our prized possessions as a kid — the Magic 8-Ball — and decided to have a go at making a digital version. Though there is no icosahedron or mysterious fluid inside, the end result is still without a doubt quite cool, especially for a project made on a whim with parts on hand.

It’s not just an 8-ball, it also functions as a 6-sided die and a direct decider of yes/no questions. Underneath that Nokia 5110 screen there’s an Arduino Pro Mini and a 3-axis gyro. Almost everything is done through the gyro, including setting the screen contrast when the eight ball is first powered on. As much we as love that aspect, we really like that [FacelessTech] included a GX-12 connector for easy FTDI programming. It’s a tidy, completely open-source build, and there’s even a PCB. What’s not to like? Be sure to check out the video after the break to see it in action.

Believe it or not, this isn’t the smallest Magic 8-Ball build we’ve seen. Have you met the business card version?

Continue reading “A Digital Magic 8-Ball? Signs Point To Yes”

Paying It Forward

It’s all those little things. A month ago, I was working on the axes for a foam-cutting machine. (Project stalled, will pick back up soon!) A week ago, somewhere else on the Internet, people were working on sliders that would ride directly on aluminum rails, a problem I was personally experiencing, and recommended using drawer-glide tape — a strip of PTFE or UHMW PE with adhesive backing on one side. Slippery plastic tape solves the metal-on-metal problem. It’s brilliant, it’s cheap, and it’s just a quick trip to the hardware store.

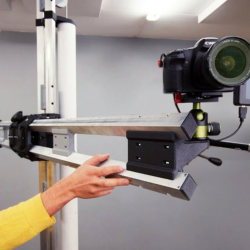
Just a few days ago, we covered another awesome linear-motion mechanical build in the form of a DIY camera rig that uses a very similar linear motion system to the one I had built as well: a printed trolley that slides on skate bearings over two rails of square-profile extruded aluminum. He had a very nice system of anchoring the spacers that hold the two rails apart, one of the sticking points in my build. I thought I’d glue things together, but his internal triangle nut holders are a much better solution because epoxy doesn’t like to stick to anodized aluminum. (And Alexandre, if you’re reading, that UHMW PE tape is just what you need to prevent bearing wear on your aluminum axes.)

Between these events, I got a message thanking me for an article that I wrote four years ago on debugging SPI busses. Apparently, it helped a small company to debug a problem and get their product out the door. Hooray!

So in one week, I got help from two different random strangers on a project that neither of them knew I was working on, and I somehow saved a startup. What kind of crazy marvelous world is this? It’s become so normal to share our ideas and experience, at least in our little corner of the Internet, that I sometimes fail to be amazed. But it’s entirely amazing. I know we’ve said it before, but we are living in the golden era of sharing ideas.

Thanks to all of you out there, and Read More Hackaday!

Electric Volkspod Takes You On An Eco-friendly Beetle Cruise

The Volkswagen Beetle is a true automobile icon, and while it may not be the fastest or most breathtaking looking car ever built, its unmistakable shape with those elegant curvy fenders and bulgy lights holds a special place in many people’s hearts. And then it inspires them to build minibikes from those same parts.

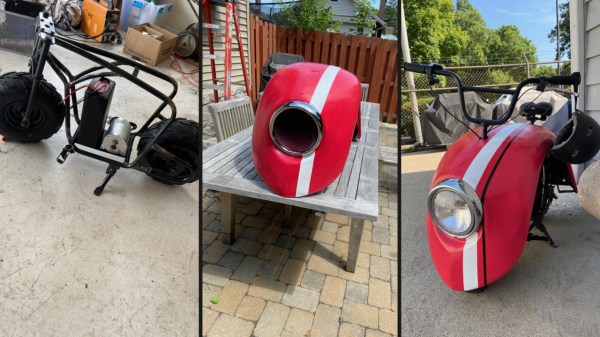
[Brent Walter] is well know as an originator of the hobby, starting a little while ago with his Volkspod. Inspired by [Brent’s] work, [Jonah Mikesell] decided to give it his own try, but unlike the original design that uses an actual minibike under the hood, he built an electric version of it, and painstakingly documented every step along the way.

The idea of the Volkspod is to take the Beetle’s two front fenders, weld them together to one symmetric body, and turn it into a small motorcycle. [Jonah]’s version does all that, but instead of taking a whole minibike as core of the project, he only uses a minibike frame and substitutes the engine with a 2000 Watt e-bike motor along with an e-bike battery pack. Fitting the frame within the dimensions of the fender construct required some extra welding work, but in the end, it all came nicely together, and with its red paint job, it kinda looks like something from a vintage post-apocalyptic sci-fi cross-genre movie. Watch him taking it for a spin in the video after the break.

Unfortunately, neither the original Volkspod nor this one has the roaring engine sound of an actual Beetle — which is akin to what the wings of a real-life beetle of similar size would probably sound like. But well, it’s always an option to fake that. And if [Jonah] ever feels the urge of a bigger engine, maybe a washing machine can help.

Continue reading “Electric Volkspod Takes You On An Eco-friendly Beetle Cruise”

The Amazing Technicolor Parts Organizer

It wouldn’t be much of an exaggeration to say that anyone reading these words has struggled at one time or another to keep an ever growing collection of electronic bits and bobs from descending into absolute chaos. Tossing them all into plastic bins is at least a start down the road to long-term organization, but they still needed to be sorted and inventoried if you want to avoid the wasted time and money of buying parts you forgot you already had.

For his latest project, [Zack Freedman] decided to finally tackle the personal parts collection that he’s ended up lugging around for the last several years. The first half of the battle was just figuring out what he actually had, what he was likely to need down the line, and getting it all sorted out so he didn’t have to keep rummaging through a big pile to find what he needed. But it’s not enough to get organized, you also need to stay organized.

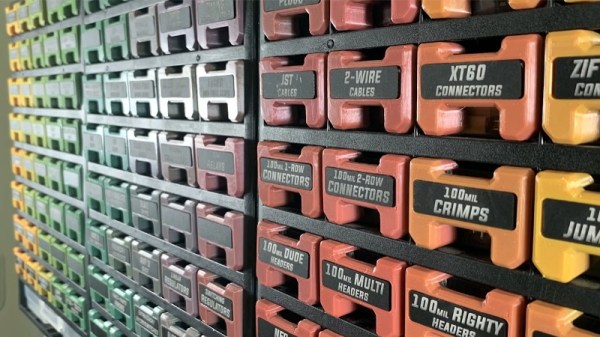
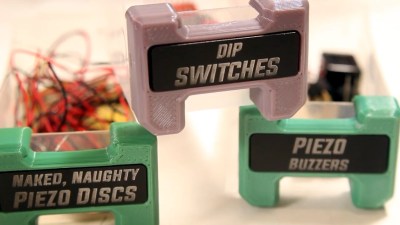
Which is why he then turned his attention to how all these newly sorted components would actually be stored going forward. He already had a trio of Harbor Freight bin organizers, but as one expects from that fine retailer, they were only marginally suitable for the task at hand. So [Zack] designed a 3D printed faceplate that could snap onto the original plastic bin. The new fronts made them easier to grab and featured an opening to accept a laser-etched plastic label.

To give them a little visual flair, he decided to print the faceplates using rainbow gradient filament. To prevent them from being random colors, he used the relatively obscure sequential slicing option so his Prusa i3 would print each faceplate in its entirety before moving over to the next one on the bed. This took far longer than doing them in parallel (especially since he had access to multiple printers), but makes for a much nicer aesthetic as the color smoothly transitions between each bin on the wall. It also has a practical benefit, as you can tell at a glance if any of the bins have found themselves in the wrong spot.

If you really want to go off the deep end, we’ve seen hackers light individual bins with RGB LEDs tied into a searchable inventory system. But for most hobbyists, simply learning when to purge would be more practical.

Continue reading “The Amazing Technicolor Parts Organizer”

Retrotechtacular: The $5,000 40 Pound HP Classroom Computer

See if you can talk your local school district into buying a computer that costs about $5,000 and weighs 40 pounds. That was HP’s proposition to schools back in 1968 so really it is more like $35,000 today. The calculator had a CRT display for the RPN stack that you could mirror on a big screen. You could also get a printer or plotter add-on. Pretty hot stuff for the ’60s.

The 1970 videos promoting the HP 9100, posted by the [Computer History Archive Project], shows something we’d think of as a clunky calculator, although by the standards of the day it was a pretty good one with trig functions and a crude programming capability.

Continue reading “Retrotechtacular: The $5,000 40 Pound HP Classroom Computer”

M17 Aims To Replace Proprietary Ham Radio Protocols

While M17 might sound like a new kind of automatic rifle (as actually, it is), we were referring to an open source project to create a ham radio transceiver. Instead of paraphrasing the project’s goals, we’ll simply quote them:

The goal here should be to kick the proprietary protocols off the airwaves, replace DMR, Fusion, D-Star, etc. To do that, it’s not just good enough to be open, it has to be legitimately competitive.

Like some other commercial protocols, M17 uses 4FSK along with error correction. The protocol allows for encryption, streaming, and the encoding of callsigns in messages. There are also provisions for framing IP packets to carry data. The protocol can handle voice and data in a point-to-point or broadcast topology.

Continue reading “M17 Aims To Replace Proprietary Ham Radio Protocols”

Flywheel Trebuchet Spins Right Round

Most of us gained a familiarity with siege weapons from Age of Empires, and the march of technology has meant these relics aren’t typically seen on modern battlefields. However, development continues apace in the enthusiast community, and [Tom Stanton]’s latest trebuchet design puts a different spin on launching projectiles at speed.

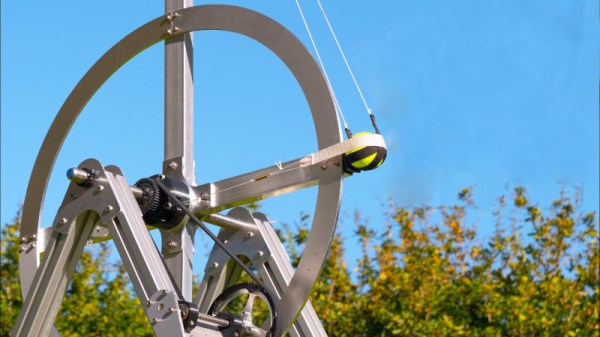
The design takes advantage of the flywheel as an energy storage device. The flywheel is spun up to speed using a hand crank, through a timing belt and a set of hybrid 3D printed and CNC aluminium gears. Once spun up to sufficient angular velocity, a trigger releases the tennis ball payload from a sling, flinging it forth at speeds over 180 miles per hour.

Moving on from classical materials such as wood and nails, [Tom]’s latest design relies on aluminium in an effort to build something that won’t rot when left outside in the rain. The use of aluminium profiles also makes adjustment and redesigns easy, while providing the necessary adjustments to dial in things like release point and belt tension. We’ve featured a few different designs over the years; the walking-arm trebuchet is perhaps the most oddball of all. Video after the break.

Continue reading “Flywheel Trebuchet Spins Right Round”