Voice Controlled RGB LEDs Go Big

When we see RGB LEDs used in a project, they’re often used more for aesthetic purposes than as a practical source of light. It’s an easy way to throw some color around, but certainly not the sort of thing you’d try to light up anything larger than a desk with. Apparently nobody explained the rules to [Brian Harms] before he built Light[s]well.

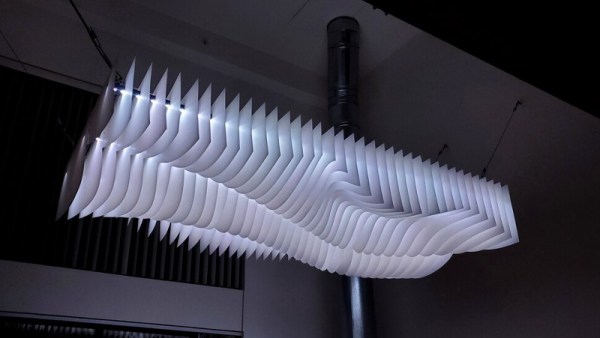
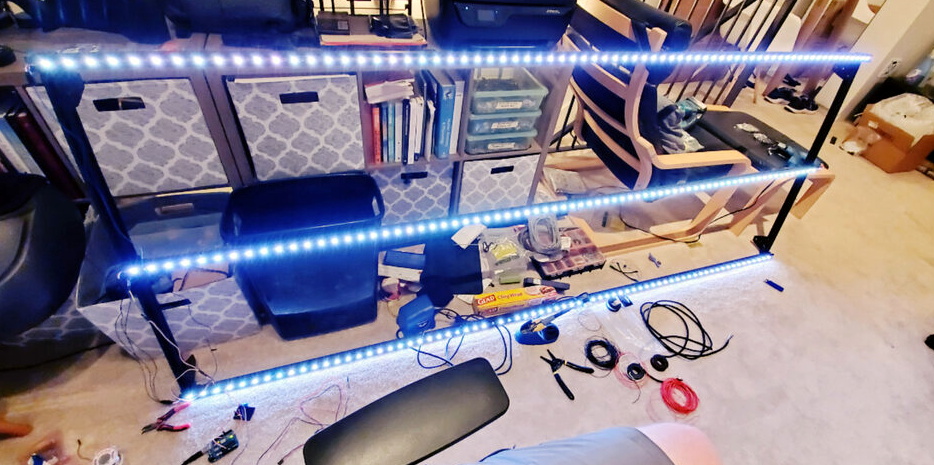
Believe it or not, this supersized light installation doesn’t use any exotic hardware you aren’t already familiar with. Fundamentally, what we’re looking at is a WiFi enabled Arduino MKR1000 driving strips of NeoPixel LEDs. It’s just on a far larger scale than we’re used to, with a massive 4 x 8 aluminum extrusion frame suspended over the living room.

Onto that frame, [Brian] has mounted an undulating diffuser made of 74 pieces of laser-cut cardstock. Invoking ideas of waves or clouds, the light looks like its of natural or even biological origin while at the same time having a distinctively otherworldly quality to it.

The effect is even more pronounced when the RGB LEDs kick in, thanks to the smooth transitions between colors. In the video after the break, you can see Light[s]well work its way from bright white to an animated rainbow. As an added touch, he added Alexa voice control through Arduino’s IoT Cloud service.

While LED home lighting is increasingly becoming the norm, projects like Light[s]well remind us that we aren’t really embracing the possibilities offered by the technology. The industry has tried so hard to make LEDs fit into the traditional role of incandescent bulbs, but perhaps its time to rethink things.

Continue reading “Voice Controlled RGB LEDs Go Big”

Seek And Ye Shall Command

If we count all the screens in our lives, it takes a hot minute. Some of them are touchscreens, some need a mouse or keyboard, but we are accustomed to all the input devices. Not everyone can use the various methods, like cerebral palsy patients who rely on eye-tracking hardware. Traditionally, that only works on the connected computer, so switching from a chair-mounted screen to a tablet on the desk is not an option. To give folks the ability to control different computers effortlessly [Zack Freedman] is developing a head-mounted eye-tracker that is not tied to one computer. In a way, this is like a KVM switch, but way more futuristic. [Tony Stark] would be proud.

An infrared detector on the headset identifies compatible screens in line of sight and synchs up with its associated HID dongle. A headset-mounted color camera tracks the head position in relation to the screen while an IR camera scans the eye to calculate where the user is focusing. All the technology here is proven, but this new recipe could be a game-changer to anyone who has trouble with the traditional keyboard, mouse, and touchscreen. Maybe QR codes could assist the screen identification and orientation like how a Wii remote and sensor bar work together.

How To Get Into Cars: Hypermiling Mods

While we’re currently in an era of comparatively low gas prices, the last few decades have seen much volatility in the oil market. This can hit the hip pocket hard, particularly for those driving thirstier vehicles. Thankfully, modifications can help squeeze a few extra miles out of each gallon of dinosaur juice if you know what you’re doing.

The art of striving for the best fuel economy is known as hypermiling, and involves a broad spectrum of tricks and techniques to get the most out of a drop of fuel. Let’s dive in to how you can build a more efficient cruiser for getting around town.

Step 1: Know Thine Enemy

The MPGuino is a great solution for monitoring fuel consumption in older cars without a trip computer.

If you want to improve your fuel economy, the first step is to measure it. Without accurate measurement, it’s impossible to quantify any gains made or optimise for the best performance. For those with modern cars, it’s likely that there’s already a trip computer built into the dash. Using this to track your fuel economy is the easiest solution. Instantaneous modes are useful to help improve driving habits, while average modes are great for determining the car’s economy over time.

However, many older vehicles don’t have such features installed as stock. Thankfully, there’s a few ways to work around this. For those driving post-1996 vehicles outfitted with an OBD-II port, tools like Kiwi or Scangauge can often track fuel economy. Failing this, most fuel injected cars can be fitted with a device like the MPGuino that monitors fuel injection to calculate consumption. Fundamentally, all of these tools involve tracking the amount of fuel used per distance travelled. Factory tools and OBD-II gauges do it by using the car’s standard hardware, while the MPGuino splices in to speedometer signals and injector triggers to do the same thing with an Arduino. If you do decide to install a custom device, make sure you calibrate it properly, else your figures won’t bear much resemblance to what’s going on in reality.

Of course, as long as your car has a working odometer and a fuel tank that doesn’t leak, there’s always the pen-and-paper method. Simply reset the trip odometer to zero after filling the tank to the brim. Then, when refilling the tank, fill all the way to the top, and divide the miles driven by the gallons of fuel added back to the tank. This isn’t the most accurate method, as the nature of gas station pumps and automotive fuel tanks mean that tanks aren’t always accurately filled to the brim, due to air pockets and devices used to prevent overfilling. Despite this, it’s a handy way of getting some ballpark figures of your car’s performance over time.

Continue reading “How To Get Into Cars: Hypermiling Mods”

Hackaday Podcast 087: Sound-Shattering Gliders, Pressing Dashcam Buttons, And Ratcheting Up Time

Hackaday editors Mike Szczys and Elliot Williams dish up a hot slice of the week’s hardware hacks. We feature a lot of clocks on Hackaday, but few can compare to the mechanical engineering elegance of the band-saw-blade-based ratcheting clock we swoon over on this week’s show. We’ve found a superb use of a six-pin microcontroller, peek in on tire (or is that tyre) wear particles, and hear the sounds of 500 mph RC gliders. It turns out that 3D printers are the primordial ooze for both pumping water and positioning cameras. This episode comes to a close by getting stressed out over concrete.

Take a look at the links below if you want to follow along, and as always, tell us what you think about this episode in the comments!

Take a look at the links below if you want to follow along, and as always, tell us what you think about this episode in the comments!

Direct download (60 MB or so.)

Continue reading “Hackaday Podcast 087: Sound-Shattering Gliders, Pressing Dashcam Buttons, And Ratcheting Up Time”

Shadow Lamp Moves Delibrately Slowly

Inspired by the famous lava lamp, [Mojoptix] wanted to build a creation of his own with a similarly organic, changing lighting effect. However, rather than flowing heated wax, he created a lamp with pseudo-random effects his own way. 

The lamp itself is built around a shadow-puppet concept, using a pair of rotating apetures that [Mojoptix] 3D printed. The apetures turn, one in front of the other, and are lit from behind by an IKEA LED light. As the apetures rotate, they present a slowly varying path for the light from the LED, which is projected onto a paper screen placed in in front of the assembly. To generate the long-period rotation, the rotating assembly is turned by the minute hand of a common clock movement. It’s a great way to get a slow-rotating motor and gearbox setup on the cheap, as long as your torque requirements are absolutely miniscule.

It’s a neat way to produce a slowly-varying lighting effect; we’ve featured other discussions on the topic before, too. Video after the break.

Continue reading “Shadow Lamp Moves Delibrately Slowly”

This Week In Security: PunkBuster, NAT, NAS And MP3s

Ah, the ever-present PDF, and our love-hate relationship with the format. We’ve lost count of how many vulnerabilities have been fixed in PDF software, but it’s been a bunch over the years. This week, we’re reminded that Adobe isn’t the only player in PDF-land, as Foxit released a round of updates, and there were a couple serious problems fixed. Among the vulnerabilities, a handful could lead to RCE, so if you use or support Foxit users, be sure to go get them updated.

PunkBuster

Remember PunkBuster? It’s one of the original anti-cheat solutions, from way back in 2000. The now-classic Return to Castle Wolfenstein was the first game to support PunkBuster to prevent cheating. It’s not the latest or greatest, but PunkBuster is still running on a bunch of game servers even today. [Daniel Prizmant] and [Mauricio Sandt] decided to do a deep dive project on PunkBuster, and happened to find an arbitrary file-write vulnerability, that could easily compromise a PB enabled server.

One of the functions of PunkBuster is a remote screenshot capture. If a server admin thinks a player is behaving strangely, a screenshot request is sent. I assume this targets so-called wallhack cheats — making textures transparent, so the player can see through walls. The problem is that the server logic that handles the incoming image has a loophole. If the filename ends in .png as expected, some traversal attack checks are done, and the png file is saved to the server. However, if the incoming file isn’t a png, no transversal detection is done, and the file is naively written to disk. This weakness, combined with the stateless nature of screenshot requests, means that any connected client can write any file to any location on the server at any time. To their credit, even Balance, the creators of PunkBuster, quickly acknowledged the issue, and have released an update to fix it.

Continue reading “This Week In Security: PunkBuster, NAT, NAS And MP3s”

Bullet Time On A Budget With The Raspberry Pi

Bullet time became the hottest new cinema effect after it burst on the scene in The Matrix (1999). Back then, the cutting edge special effects required serious hardware and serious processing power to do the job. These days, of course, things have moved along somewhat. [Eric Paré] is no stranger to a high-end setup, but wanted to see what could be done at the lower end of the market. (Video, embedded below.)

Rather then relying on a bank of expensive DSLRs, [Eric] decided to try building a bullet-time camera rig out of 15 Raspberry Pis, and the standard Raspberry Pi Camera. Whereas just one camera in one of his professional setups may cost well over $1000, this entire rig was likely built for less than that in its entirety.

Initial results were jerky and unappealing, but [Eric] persevered. One of the biggest problems was inaccuracy in the camera assemblies, as they were stuck on with thermal paste. With some custom mods and tweaks, [Eric] was eventually able to get things to a passable state. It also has the benefit, compared to a DSLR rig, that the cameras can be mounted much more closely together due to their small size.

Work is already underway to upgrade the rig to the new Raspberry Pi HQ Camera, which we’ve discussed before.

Continue reading “Bullet Time On A Budget With The Raspberry Pi”