ARM And X86 Team Up In No Compromise Cyberdeck

Over the last couple of years the cyberdeck community has absolutely exploded. Among those who design and build these truly personal computers there are no hard rules, save perhaps making sure the final result looks as unconventional as possible. But one thing that’s remained fairly consistent is the fact that these machines are almost exclusively powered by the Raspberry Pi. Unfortunately, that means they often leave something to be desired in terms of raw performance.

But [MSG] had a different idea. His cyberdeck still has the customary Raspberry Pi inside, but it also has an i7 Intel NUC that can be fired up at the touch of a button. He says it’s the best of both worlds: an energy efficient ARM Linux platform for mobile experimentation, and a powerful x86 Windows box for playing games working from home. It’s the hacker equivalent of business in the front, party in the back.

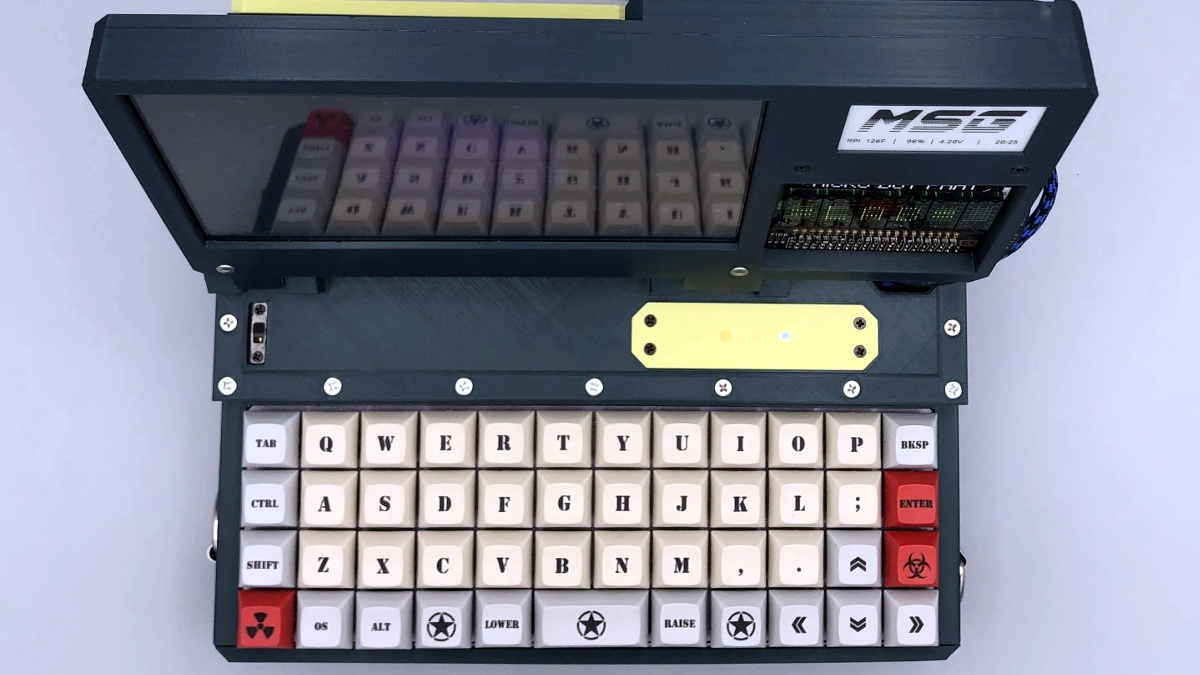
With a KVM connected to the custom Planck 40% mechanical keyboard and seven inch LCD, [MSG] can switch between both systems on the fly. Assuming he’s got the juice anyway; while the Raspberry Pi 4 and LCD is able to run on a pair of 18650 batteries, the cyberdeck needs to be plugged in if he wants to use the power-hungry NUC. If he ditched the Pi he could potentially load up the case with enough batteries to get the Intel box spun up, but that would be getting a little too close to a conventional laptop.

The whole plurality theme doesn’t stop at the computing devices, either. In addition to the primary LCD, there’s also a 2.13 inch e-paper display and a retro-style LED matrix courtesy of a Pimoroni Micro Dot pHAT. With a little Python magic behind the scenes, [MSG] is able to display things like the system temperature, time, and battery percentage even when the LCD is powered down.

In a post on the aptly-named Cyberdeck Cafe, [MSG] talks about how seeing the VirtuScope built by [bootdsc] inspired him to start working towards his own personal deck, and where he hopes to take the idea from here. The unique USB expansion bay behind the screen holds particular promise, and it sounds like a few add-on modules are already in the works. But of course, it wouldn’t be a true cyberdeck if it wasn’t constantly being improved and redesigned. Come to think of it, that makes at least two rules to live by in this community.

Fans Add Reality To Virtual Driving

A few decades ago you might have been satisfied with a crude wireframe flight simulator or driving a race car with the WASD keys. Today, gamers expect more realism, and [600,000 milliliters] is no different. At first, he upgraded his race car driving chair and put on VR goggles. But watching the world whiz by in VR is you can’t feel the wind on your face. Armed with a 3D printer, some software, and some repurposed PC fans, he can now feel the real wind in virtual reality. You can see the build in the video, below.

The electronics are relatively straightforward and there is already software available. The key, though, is the giant 3D printed ducts that direct the airflow. These are big prints, so probably not for some printers, but printers are getting bigger every day. The fan parts are from Thingiverse, but the enclosures are custom and you can download them from the blog post.

Continue reading “Fans Add Reality To Virtual Driving”

Sierpinski PCB Christmas Tree

It’s holiday time again! And that means it’s time to break out the soldering iron and the RGB LEDs! If you’re going to make a custom PCB to put those LEDs on, you’ll notice that you get few copies of your PCB in your order, so, might as well design it such that you can combine them all together into a single Sierpinski Christmas Tree, just like [Landon Carter] did.

Each PCB “tree” has three connections which can be used as either inputs or outputs by soldering one of two bridge connections on the PCB. The power and signal goes up and down through the tree, rather than across, so the connections go one on the top of the tree and two on the bottom. This way, each tree in the triangle can easily be connected, and each triangle can be easily connected to another. Each individual tree has three WS2812b-mini addressable RGB LEDs and the tree is controlled by an external Arduino.

The first order of 10 PCBs came in, which makes a 9 member tree – next up is a 27 member tree. After that, you’re going to need some pretty high vaulted ceilings in order to put these on the wall. On the upside, though, once the holidays are over, everything can be easily disconnected and packed away with the rest of the decorations. If you, too, are interested in RGB LED decorations, there are a few on the site for your perusal.

The Protein Folding Break-Through

Researchers at DeepMind have proudly announced a major break-through in predicting static folded protein structures with a new program known as AlphaFold 2. Protein folding has been an ongoing problem for researchers since 1972. Christian Anfinsen speculated in his Nobel Prize acceptance speech in that year that the three-dimensional structure of a given protein should be algorithm determined by the one-dimensional DNA sequence that describes it. When you hear protein, you might think of muscles and whey powder, but the proteins mentioned here are chains of amino acids that fold into complex shapes. Cells use these proteins for almost everything. Many of the enzymes, antibodies, and hormones inside your body are folded proteins. We’ve discussed why protein folding is important as well covered recent advancements in cryo-electron microscopy used to experimentally determine the structure of folded proteins.

The shape of proteins largely controls their function, and if we can predict their shape then we get much closer to predicting how they interact. While AlphaFold 2 just predicts the static state, the sheer number of interactions that can change a protein, dynamic protein structures are still out of reach. The technical achievement of DeepMind is not to be understated. For a typical protein, there are an estimated 10^300 different configurations.

Out of the 180 million protein sequences in the Protein database, only 170,000 have had their structures identified. Technologies like the cryo-electron microscope make the process of mapping their structure easier, but it is still complex and tedious to go from sequence to structure. AlphaFold 2 and other folding algorithms are tested against this 170,000 member corpus to determine their accuracy. The previous highest-scoring algorithm of 2016 had a median global distance test (GDT) of 40 (0-100, with 100 being the best) in the most difficult category (free-modeling). In 2018, AlphaFold made waves by pushing that up to the high 50’s. AlphaFold 2 brings that GDT up to 87.

At this point in time, it is hard to determine what sort of effects this will have on the drug industry, healthcare, and society in general. Research has always been done to create the protein, identify what it does, then figure out its structure. AlphaFold 2 represents an avenue towards doing that whole process completely backward. Whether the next goal is to map all the proteins encoded in the human genome or find new, more effective drug treatments, we’re quite excited to see what becomes of this landmark breakthrough.

Continue reading “The Protein Folding Break-Through”

FM Radio From Scratch Using An Arduino

Building radio receivers from scratch is still a popular project since it can be done largely with off-the-shelf discrete components and a wire long enough for the bands that the radio will receive. That’s good enough for AM radio, anyway, but you’ll need to try this DIY FM receiver if you want to listen to something more culturally relevant.

Receiving frequency-modulated radio waves is typically more difficult than their amplitude-modulated cousins because the circuitry necessary to demodulate an FM signal needs a frequency-to-voltage conversion that isn’t necessary with AM. For this build, [hesam.moshiri] uses a TEA5767 FM chip because of its ability to communicate over I2C. He also integrated a 3W amplifier into this build, and everything is controlled by an Arduino including a small LCD screen which displays the current tuned frequency. With the addition of a small 5V power supply, it’s a tidy and compact build as well.

While the FM receiver in this project wasn’t built from scratch like some AM receivers we’ve seen, it’s still an interesting build because of the small size, I2C capability, and also because all of the circuit schematics are available for all of the components in the build. For those reasons, it could be a great gateway project into more complex FM builds.

Continue reading “FM Radio From Scratch Using An Arduino”

Transforming Work Light Is More Than Meets The Eye

While it does use the same M12 batteries, this impeccably engineered work light isn’t an official Milwaukee product. It’s the latest creation from [Chris Chimienti], who’s spent enough time in the garage and under the hood to know a thing or two about what makes a good work light. The modular design not only allows you to add or subtract LED panels as needed, but each section is able to rotate independently so it points exactly where you need it.

Magnets embedded in the 3D printed parts mean the light modules not only firmly attach to one another, but can be stuck to whatever you’re working on. Or you could just stack all the lights up vertically and use the rocket-inspired “landing legs” of the base module keep it vertical. Even if the light gets knocked around, the tension provided by rubber bands attached to each fold-out leg means it will resist falling over. In the video after the break [Chris] says the little nosecone on top is just for fun and you don’t have to print it, but we don’t see how you can possibly resist.

The same PCB is used on both ends of the light modules.

Of course, 3D printed parts and magnets don’t self-illuminate. The LED panels and switches are salvaged from cheap lights that [Chris] found locally for a few bucks, and a common voltage regulator board is used to step the 12 volts coming from the Milwaukee battery down to something the LEDs can use. He’s designed a very slick reversible PCB that’s used on either end of each light module to transfer power between them courtesy of semi-circular traces on one side and and matching pogo pins on the other.

As we saw in his recent Dremel 3D20 rebuild, [Chris] isn’t afraid to go all in during the design phase. The amount of CAD work that went into this project is astounding, and serves as fantastic example of the benefits to be had by designing the whole assembly at once rather than doing it piecemeal. It might take longer early on, but the final results really speak for themselves.

Continue reading “Transforming Work Light Is More Than Meets The Eye”

Remoticon Video: How To Use Machine Learning With Microcontrollers

Going from a microcontroller blinking an LED, to one that blinks the LED using voice commands based on a data set that you trained on a neural net work is a “now draw the rest of the owl” problem. Lucky for us, Shawn Hymel walks us through the entire process during his Tiny ML workshop from the 2020 Hackaday Remoticon. The video has just now been published and can be viewed below.

This is truly an end-to-end Hello World for getting machine learning up and running on a microcontroller. Shawn covers the process of collecting and preparing the audio samples, training the data set, and getting it all onto the microcontroller. At the end of two hours, he’s able to show the STM32 recognizing and responding to two different spoken words. Along the way he pauses to discuss the context of what’s happening in every step, which will help you go back and expand in those areas later to suit your own project needs.

Continue reading “Remoticon Video: How To Use Machine Learning With Microcontrollers”