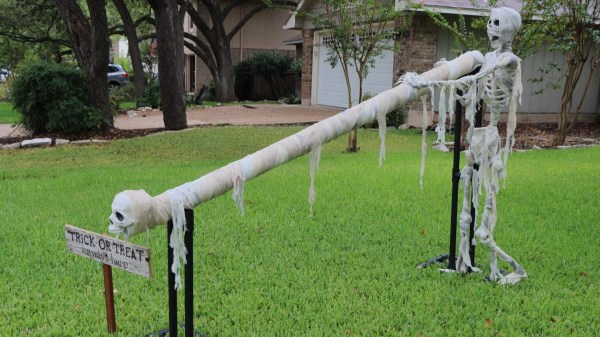
AI Knows If The Pitch Is On Target Before You Do

Pitching a baseball is about accuracy and speed. A swift ball on target is the goal, allowing the pitcher to strike out the batter. [Nick Bild] created an AI system that can determine a ball’s trajectory in mid-flight, based on a camera feed.

The system uses an NVIDIA Jetson AGX Xavier, fitted with a USB camera running at 100FPS. A Nerf tennis ball launcher is used to fire a ball towards the batter. Once triggered, the AI uses the camera to capture two successive images of the ball in flight. These images are fed into a convolutional neural network (CNN), and the software determines whether the ball is heading for the strike zone, or moving off-target. It uses this information to light a green or red LED respectively to alert the batter.

While such a system is unlikely to appear in professional baseball anytime soon, it shows the sheer capability of neural network systems to quickly and effectively analyse data in ways simply impossible for mere humans. [Nick]’s future goals involve running the system on faster hardware, and expanding it to determine effects like spin and more accurate positioning within the strike zone.

We’ve seen CNNs do everything from naming tomatoes to finding parking spaces. Video after the break.

Continue reading “AI Knows If The Pitch Is On Target Before You Do”

Tracking Wasted Time With A Ferrofluid Clock

We know this project is supposed to be about developing a fine-looking ferrofluid clock, and not about the value of procrastination. But after watching the video below, see if you don’t think that procrastination has taken these two students further than expected.

We first ran into [Simen] and [Amund] several months ago when they launched their ferrofluid project in a fit of “There’s got to be more to life than studying.” It seemed then that building a good-looking, functional ferrofluid display would be a temporary distraction, but the problems posed proved to be far deeper and thornier than either of the electrical engineering students expected. The idea is simple: contain a magnetic fluid between two transparent panels and create pixels using an array of electromagnets to move dots of the fluid around. The implementation, however, was another matter, with the ferrofluid itself proved to be the biggest obstacle. All the formulas they tried seemed to coagulate or degrade over time and tended to stain the glass. While the degradation was never fully sorted, they managed to work around the staining by careful cleaning of the glass and using a saturated brine solution to fill the container.

Backed by 252 electromagnets and drivers on ten custom PCBs, the video below shows the (mostly) finished panel in action as a clock. We’re impressed by the smoothness of the movements of each pixel, even if there’s a bit of drooping at the bottom thanks to gravity. As for the future of the project, that’s unclear since [Simen] is headed off for a NASA internship. We’re not sure if that was despite or because of this procrastination-driven project, but we congratulate him either way and look forward to hearing more from both of them in the future.

Continue reading “Tracking Wasted Time With A Ferrofluid Clock”

Chaining Together A 16×2 Bubble LED Display

We’ve recently noticed an uptick of interest in so-called “bubble displays”: vintage alphanumeric LEDs which are probably best remembered as being used in watches and calculators before the LCD took over. Today they’re available as surplus or even salvage for literally pennies, but unfortunately they only provide four or five characters to work with. Or rather they did, until [sjm4306] built a board that chains them into a 16×2 array.

For the princely sum of 71 cents each, [sjm4306] picked up ten HPDL-1414 displays, each capable of showing four characters. He then designed a PCB that would accept eight of the displays at once, and even thought ahead to use headers so they could be pulled out and swapped as needed. Of course mounting them is only half the battle, you still need to drive the things.

Each display has its own dedicated driver chip on board, but trying to address each one individually would take far too many pins. So [sjm4306] opted to use a trio of 74HC595 shift registers, allowing him to toggle the three dozen pins necessary over SPI from a microcontroller. He’s even written up a little library and some example code that you can grab on the project’s Hackaday.io page.

Unfortunately, after all his hard work, tragedy struck. As these displays were a couple decades old given their date code, [sjm4306] thought he would clean them up with a bit of alcohol before their big video debut. But whatever plastic the clear panels are made of didn’t take kindly to the IPA, and they all shattered. They still work, but it’s definitely a quirk to keep in mind if you pick up some of these vintage displays to play with yourself.

In the past we’ve seen a much smaller PCB that allowed similar displays to more easily be interfaced with modern microcontrollers; perfect if you just want to bang out a few retro LED characters with a minimum of fuss.

Continue reading “Chaining Together A 16×2 Bubble LED Display”

With PowerCore And FluxLamp, Reflow Is Possible

[nathan] sends in this combo of projects which combine to make a very interesting reflow oven.

First is PowerCore which has two microcontrollers, an ATmega and a ESP8366 working in tandem to turn the AC on and off at set intervals. A GLCD displays the current profiles and WiFi allows for remote control as well. Input is handled by a momentary switch rotary controller. He decided to go this route after reading forums on the commercial controllers and deciding they needed too much fiddling and weren’t hacker friendly enough.

The PowerCore then attaches to a halogen work light. He took the front glass off the halogen light and covered it in aluminum foil. This becomes the base of the oven. The PowerCore and a sensor are attached to the back. Using the lighting element as a heating one makes sense and, as we can see from the curves, appears to provide a very accurate response.

On top of all this [nathan] has documented the project beautifully. The small size and great control bump it way up in our list of reflow builds to recommend.

Weird Substances: Hagfish Slime

In the cold, dark recesses of ocean floors around the world, hagfish slither around like sea snakes, searching for food. When a hagfish finds a suitable carcass, it devours the dead fish in two different ways. As it burrows face-first through the tissue, eating with its jaw-less, tentacled mouth, the hagfish also absorbs nutrients through its skin.

Hagfish are not the unholy result of dumping toxic waste in the ocean. They’re one of the oldest creatures on Earth, having been around for more than 300 million years. How have they lasted this long?

A coiled hagfish reveals its slime ports. Image via Oregon Coast Aquarium

These ancient creatures have no eyes, no backbones, and no scales. They are often misidentified as eel, and often called ‘slime eels’, but they are definitely fish. They just don’t look like conventional fish. In fact, when conventional, gill-faced fish come after hagfish, those guys are in for a surprise, because hagfish have a disgusting but ingenious defense mechanism.

Whenever hagfish are attacked or even just stressed by nearby fish or curious grabby humans, they immediately emit amazing amounts of mucus at an alarming rate. At the same time, the hagfish shoots out silky strands of protein that hold the slime together in a cohesive blob. Any predator that tries to bite down on one of these velvety frankfurters of the deep sea will find its mouth and gills covered in a wad of suffocating slime.

How is it that hagfish haven’t slimed themselves out of existence? Whenever they get get a taste of their own medicine, these boneless noodles quickly twist themselves into a pretzel. In the same motion, they use their paddle-shaped tails to squeegee off the slime.

Continue reading “Weird Substances: Hagfish Slime”

New Contest: Tell Time

Clocks. You love ’em, we certainly love ’em. So you hardly need a reason to take on a new clock build, but it makes it much sweeter when you know there’s a horde of people waiting to fawn over your creation. Hackaday’s Tell Time Contest is a celebration of interesting timepieces. Show off a clever way to mark the passage of time and gain the adoration of your peers, and maybe even score a prize!

The Rotating Moon Clock is an interesting take on a timepiece

From now until January 24th, you can enter your Hackaday.io project by using the “Submit project to…” menu on the left sidebar of your project page. There is only one main constraint: it needs to somehow represent time. Microseconds or millennia, minutes until the next bus arrival or centuries until Pluto completes its next orbit, we don’t care as long as you find it interesting.

Document your timepiece with pictures, a description, and all of the technical details. Three outstanding entries will each receive a $100 cash prize, based on craftsmanship, function, and creativity.

Tick-tock… don’t delay. Time’s slipping away to have your quirky clock immortalized on Hackaday.

Don’t Hang Christmas Lights, Embed Them

Finding it hard to get into the holiday spirit this year? Maybe you just need a timely project to light up the evenings until Santa (or Krampus) pays your house a visit. Whoever visits this season, delight or distract them with a 3D printed tree featuring embedded RGB LEDs.

[MakeTVee] printed this tree in four stages to make it a little bit easier to wire everything up. Each stage has six LEDs embedded in a 5mm transparent layer at the bottom. The top stage has a second color change to make a tree topper that holds a single LED. The color change feature in PrusaSlicer 2.0 made it easy to pause the print, insert the wired-up LEDs, and resume seamlessly in green filament. There’s a hidden base of what appears to be appropriately delicious cinnamon filament that holds the Trinket M0 and the power switch.

This lil’ tree looks great, especially considering how fiddly and nerve-wracking the wiring and assembly must have been. [MakeTVee] made it easier on himself with a printed wiring stencil that holds the LEDs in their star formation while he solders them up with magnet wire (a solid choice in our book). He thoughtfully included that stencil in the files which are up on the Prusa site. Dim the lights, grab a hot beverage, and check out [MakeTVee]’s build video after the break.

If you want a holiday hack that people can play with, invite them to paint your addressable tree.

Continue reading “Don’t Hang Christmas Lights, Embed Them”