How Low Can An ESP8266 Go?

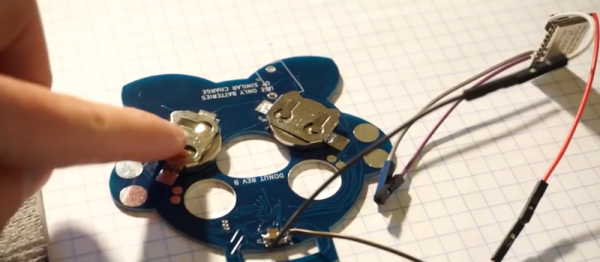
We’ve been tuned into coin cell designs lately given the coin cell challenge, so we were interested in [CNLohr]’s latest video about pushing the ESP8266 into the lowest-possible battery drain with coin cells. The result is a series of hacks, based on a reverse-engineered library and depends on a modified router, but that gets the power consumption down by more than a factor of ten!

Although the ESP8266 has a deep sleep mode that draws only 20 microamps or so, that isn’t as rosy as it seems. If you could go to sleep for a while, wake up for just a moment, send your data, and then go back to sleep, that might be one thing. But when you use conventional techniques, the device wakes up and has to do about ten seconds of work (at high power) to connect to a nearby access point. Then it can do what you want and go back to sleep. That ten-second hit is a killer on small batteries.

Since that’s all you can do with the standard libraries, the next step was to find [pvvx] who has reverse engineered a great deal of the libraries and provides a library with no WiFi capability. That’s a two-edged sword. The pro is you get a 30 ms startup from a deep sleep. The downside is — well — you don’t have WiFi.

Continue reading “How Low Can An ESP8266 Go?”

Hunting Rogue Access Points With The ESP8266

Cantennas outperform every consumer-grade Wi-Fi antenna I’ve had the bad luck of purchasing. Cantenna is a mashup of ‘can’ and ‘antenna’ creating the nickname for a directional waveguide antenna built from re-purposed steel cans. For anyone who has yet to build one, it makes an excellent afternoon project. Here are some build instructions and technical details. I went beyond that, and ended up catching a rogue WiFi access point in the process.

When I needed to extend the range of some ESP8266-based sensors, cantennas were right at the top of my list of things to try. It was easy enough to build one, attach it to a Wemos Mini D1 Pro, and call the job done… leaving me with plenty of time to over-engineer it, and I ended up down a bit of a rabbit hole.

The first thing I did was stop using cans. Canned goods are not only expensive in my corner of the world, but more importantly don’t lend themselves that well to making a standardized antenna in volume. I can also only eat so many beans! The latter reason alone is enough to consider an alternative design like a modular dish reflector.

Continue reading “Hunting Rogue Access Points With The ESP8266”

Using Gmail With OAUTH2 In Linux And On An ESP8266

One of the tasks I dread is configuring a web server to send email correctly via Gmail. The simplest way of sending emails is SMTP, and there are a number of scripts out there that provide a simple method to send mail that way with a minimum of configuration. There’s even PHP mail(), although it’s less than reliable.

Out of the box, Gmail requires OAUTH2 for authentication and to share user data, which has the major advantage of not requiring that you store your username and password in the application that requires access to your account. While they have an ‘allow less secure apps’ option that allows SMTP access for legacy products like Microsoft Outlook, it just doesn’t seem like the right way forward. Google documents how to interact with their API with OAUTH2, so why not just use that instead of putting my username and password in plaintext in a bunch of prototypes and test scripts?

Those are the thoughts that run through my head every time this comes up for a project, and each time I’ve somehow forgotten the steps to do it, also forgotten to write it down, and end up wasting quite a bit of time due to my own foolishness. As penance, I’ve decided to document the process and share it with all of you, and then also make it work on an ESP8266 board running the Arduino development environment.

Continue reading “Using Gmail With OAUTH2 In Linux And On An ESP8266”

Practical IoT Cryptography On The Espressif ESP8266

The Espressif ESP8266 chipset makes three-dollar ‘Internet of Things’ development boards an economic reality. According to the popular automatic firmware-building site nodeMCU-builds, in the last 60 days there have been 13,341 custom firmware builds for that platform. Of those, only 19% have SSL support, and 10% include the cryptography module.

We’re often critical of the lack of security in the IoT sector, and frequently cover botnets and other attacks, but will we hold our projects to the same standards we demand? Will we stop at identifying the problem, or can we be part of the solution?

This article will focus on applying AES encryption and hash authorization functions to the MQTT protocol using the popular ESP8266 chip running NodeMCU firmware. Our purpose is not to provide a copy/paste panacea, but to go through the process step by step, identifying challenges and solutions along the way. The result is a system that’s end-to-end encrypted and authenticated, preventing eavesdropping along the way, and spoofing of valid data, without relying on SSL.

We’re aware that there are also more powerful platforms that can easily support SSL (e.g. Raspberry Pi, Orange Pi, FriendlyARM), but let’s start with the cheapest hardware most of us have lying around, and a protocol suitable for many of our projects. AES is something you could implement on an AVR if you needed to.

Continue reading “Practical IoT Cryptography On The Espressif ESP8266”

ESP-ing A Philips Sound System.

IoT-ifying old stuff is cool. Or even new, offline stuff. It seems to be a trend. And it’s sexy. Yes, it is. Why are people doing this, you may ask: we say why not? Why shouldn’t a toaster be on the IoT? Or a drill press? Or a radio? Yes, a radio.

[Dr. Wummi] just added another device to the IoT, the Internet of Thongs as he calls it. It’s a Philips MCM205 Micro Sound System radio. He wanted to automate his radio but his original idea of building a setup with an infrared LED to remotely control it failed. He blamed it to “some funky IR voodoo”.  So he decided to go for an ESP8266 based solution with a NodeMCU. ESP8266 IR remotes have been known to work before but maybe those were just not voodoo grade.

After opening the radio up, he quickly found that the actual AM/FM Radio was a separate module. The manufacturer was kind enough to leave the pins nicely labelled on the mainboard. Pins labelled SCL/SDA hinted that AM/FM module spoke I²C. He tapped in the protocol via Bus Pirate and it was clear that the radio had an EEPROM somewhere on the main PCB. A search revealed a 24C02 IC in the board, which is a 2K I²C EEPROM. So far so good but there were other functionalities left to control, like volume or CD playing. For that, he planned to tap into the front push button knob. The push button had different resistors and were wired in series so they generated different voltages at the main board radio ADC Pins. He tried to PWM with the NodeMCU to simulate this but it just didn’t work.

Continue reading “ESP-ing A Philips Sound System.”

Seeed Studio’s ReSpeaker Speaks All The Voice Recognition Languages

Seeed Studio recently launched its third Kickstarter campaign: ReSpeaker, an open hardware voice interface. After their previous Kickstarted IoT hardware, such as the RePhone, mostly focused on connectivity, the electronics manufacturer from Shenzhen now tackles another highly contested area of IoT: Voice recognition.

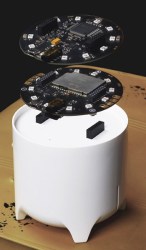
The ReSpeaker Core is a capable development board based on Mediatek’s MT7688 WiFi module and runs OpenWrt. Onboard is a WM8960 stereo audio codec with integrated 1W speaker/headphone driver, a microphone, an ATMega32U4 coprocessor, 12 addressable RGB LEDs and 8 touch sensors. There are also two expansion headers with GPIOs, I2S, I2C, analog audio and USB 2.0 and an onboard microSD card slot.

The latter is especially useful to feed the ReSpeaker’s integrated speech recognition engine PocketSphinx with a vocabulary and audio file library, enabling it to respond to keywords and commands even when it’s not hooked up to the internet. Once it’s online, ReSpeaker also supports most of the available cloud based cognitive speech recognition services, such as Microsoft Cognitive Service, Amazon Alexa Voice Service, Google Speech API, Wit.ai and Houndify. It also comes with an SDK and Python API, supports JavaScript, Lua and C/C++, and it looks like the coprocessor features an Arduino-compatible bootloader.

The expansion header accepts shield-like hardware add-ons. Some of them are also available through the campaign. The most important one is the circular, far-field microphone array. Based on 7 XVSM-2000 respeaker_meow2digital microphones, the extension board enhances the device’s hearing with sound localization, beam forming, reverb and noise suppression. A Grove extension board connects the ReSpeaker to the Seeed’s current lineup on ready-to-use sensors, actuators and other peripherals.

Seeed also cooperates with the Meow King Audio Electronic Company to develop a nice tower-shaped enclosure with built-in speaker, 5W amplifier and battery. As a portable speaker, the Meow King Drive Unit (shown on the right) certainly doesn’t knock your socks off, but it practically turns the ReSpeaker into an open source version of the Amazon Echo — including the ability to run offline instead of piping everything you say to Big Brother.

According to Seeed, the freshly baked hardware will ship to backers in November 2016, and they do have a track-record of on-schedule shipped Kickstarter rewards. At the time of writing, some of the Crazy Early Birds are still available for $39. Enjoy the campaign video below and let us know what you think of think hardware in the comments!

DIY Smartwatch Based On ESP8266 Needs Classification

Building your own smartwatch is a fun challenge for the DIY hobbyist. You need to downsize your electronics, work with SMD components, etch your own PCBs and eventually squeeze it all into a cool enclosure. [Igor] has built his own ESP8266-based smartwatch, and even though he calls it a wrist display – we think the result totally sells as a smartwatch.

His design is based on a PCB for a wireless display notifier he designed earlier this year. The design uses the ESP-12E module and features an OLED display, LEDs, tactile switches and an FT232R USB/UART interface. Our beloved TP4056 charging regulator takes care of the Lithium-ion cell and a voltage divider lets the ESP8266’s ADC read back the battery voltage. [Igor] makes his own PCBs using the toner transfer method, and he’s getting impressive results from his hacked laminator.

Together with a hand-made plastic front, everything fits perfectly into the rubber enclosure from a Jelly Watch. A few bits of Lua later, the watch happily connects to a WiFi network and displays its IP configuration. Why wouldn’t this be a watch? Well, it lacks the mandatory RTC, although that’s easy to make up for by polling an NTP time server once in a while. How would our readers classify this well-done DIY build? Let us know in the comments!