Does Your Programmer Know How Fast You Were Going?

News reports were everywhere that an autonomous taxi operated by a company called Cruise was driving through San Francisco with no headlights. The local constabulary tried to stop the vehicle and were a bit thrown that there was no driver. Then the car moved beyond an intersection and pulled over, further bemusing the officers.

The company says the headlights were due to human error and that the car had stopped at a light and then moved to a safe stop by design. This leads to the question of how people including police officers will interact with robot vehicles.

Continue reading “Does Your Programmer Know How Fast You Were Going?”

Teaching A USBasp Programmer To Speak TPI

Last Fall [Kevin] wanted to program some newer TPI-only AVRs using an old USBasp he had kicking around his lab. Finding an “odd famine of information” and “forums filled with incorrect information and schematics”, he decided to set the record straight and document things correctly. He sleuthed out the details and succeeded in reprogramming the USBasp, although he did end up buying a second one in the process.

Designers who use AVR microcontrollers have no shortage of programming interfaces — we count at least five different methods: ISP/SPI, JTAG, TPI, PDI, and UPDI. We’re not sure whether this is variety is good or bad, but it is what it is. [Kevin] discovers that for the particular family of Attiny devices he is using, the ATtiny20, TPI is the only option available.

While he normally builds his designs around ARM Cortex-M chips, [Kevin] needed some glue logic and decided to go with an ATtiny20 despite its unique programming requirements. He observes that the price of the ATtiny20, $0.53 last Fall, was cheaper than the equivalent logic gates he needed. This particular chip is also quite small — only 3 mm square (a 20-pin VQFN). We would prefer not to use different MCUs and tool chains on a single board, but sometimes the convenience and economics steer the design in that direction.

If you’re not familiar with the USBasp, our own [Mike Szczys] covered the breaking story over ten years ago. And if you have a lot of free time on your hands, ditch all these nicely packaged solutions and program your chips using an old USB Hub and a 74HCT00 NAND gate as described in this bizarre hack by Teensy developer [Paul Stoffregen].

Turning The Raspberry Pi Into A MCU Programmer

Once you graduate beyond development boards like the Arduino or Wemos D1, you’ll find yourself in the market for a dedicated programmer. In most cases, your needs can be met with a cheap USB to serial adapter that’s not much bigger than a flash drive. The only downside is that you’ve got to manually wire it up to your microcontroller of choice.

Unless you’re [Roey Benamotz], that is. He’s recently created the LEan Mean Programming mAchine (LEMPA), an add-on board for the Raspberry Pi that includes all the sockets, jumpers, and indicator LEDs you need to successfully flash a whole suite of popular MCUs. What’s more, he’s written a Python tool that handles all the nuances of getting the firmware written out.

After you’ve configured the JSON file with the information about your hardware targets and firmware files, they can easily be called up again by providing a user-defined ID name. This might seem overkill if you’re just burning the occasional hex, but if you’re doing small scale production and need to flash dozens of chips, you’ll quickly appreciate a little automation in your process.

Of course, if you’re just trying to flash some code in a pinch, there are some more expedient options out there. We’re particularly fond of using a development board to program the bare MCU.

Continue reading “Turning The Raspberry Pi Into A MCU Programmer”

Simple Pogo Programmer For ESP8266 Modules

ESP8266 development boards like the Wemos D1 Mini and NodeMCU are an excellent way to get a one-off project up and rolling quickly, but their size and relative complexity mean they aren’t necessarily a good choice for even short-run production hardware. On the other hand, programming the bare ESP modules can be something of a pain. But thanks to [Greg Frost], flashing those tiny little boards just got a lot easier.

His 3D printed design uses pogo pins to securely connect to the board’s castellated edges, which also holds it in place during the programming process. On the back side there’s just a few jumper wires and a couple of resistors, which ultimately lead to the FT232R FTDI board that actually connects the chip to the computer so you can program it.

We’d like to see a back panel that encloses the wiring, and perhaps an alternate version that deletes the space for the FTDI board in favor of a row of header pins. Both easy enough modifications to the basic design should [Greg] or anyone else feel so inclined. But even as it is, this is a great little programmer that can be sourced and assembled easily and cheaply.

This isn’t the first 3D printed ESP8266 programmer we’ve seen, and there are some improvised versions which are even cheaper to put together, but this design has a certain professional look that we think will be right at home on your bench.

Breakout Board Becomes Pogo Pin Programmer

Making a programming jig becomes exponentially more difficult after two pins and who would even consider building one if they were not setting up more than twenty boards? If it were easy for novices to construct jigs, we might all have a quiver of them on the shelf next to our microprocessors. Honestly, a tackle box full of homemade programming fixtures sounds pretty chic. The next advantage to ditching the demo boards is that bare processors take up less room and don’t draw power for unnecessary components like unused voltage regulators and LEDs. [Albert David] improves the return-on-time-investment factor by showing us how to repurpose a WeMos board to program a bare ESP8266 module.

[Albert]’s concept can apply to many other surface-mount chips and modules. The first step is to buy a demo board which hosts a programmable part and remove that part. Since you’ve exposed some solder pads in the process, put pogo pins in their place. Pogo pins are small spring-loaded probes that can be surface mounted or through-hole. We’ve used them for programming gorgeous badges and places where the ESP8266 has already been installed. When you are ready to install your software, clamp your Franken-porcupine to the controller and upload like normal. Rinse, wash, repeat. We even get a view of the clamp [Albert] uses.

Vintage Programmer Gets Modern Chip Adapter

While trying to revive a Donkey Kong Jr arcade board, [Jelmer Bruijn] found himself in the market for an EPROM programmer and became the proud owner of a 1990’s era Dataman S4. Despite its age, it’s a fairly nice tool which allows you to read and write a laundry list of different EPROM types, all without being tied to a computer. The only catch is that a few types of chips need an adapter to work in the Dataman S4, some of which are unsurprisingly no longer available.

After some above and beyond support from the current crew at Dataman set him on the right track, [Jelmer] decided to try his hand at reverse engineering how the old adapters worked so he could build his own. His ultimate goal was to read 40 pin EPROMs on the 32 pin Dataman S4, but in the end he says the information he gathered should be applicable for building other adapters if you ever find yourself in need of such things.

As you might expect, there’s a bit more to the project than a simple pin adapter. [Jelmer] assumed some kind of shift register or latching arrangement would be required to make up for the shortage of pins on the Dataman S4’s ZIF socket. It was just a matter of figuring out how it all went together.

Luckily, [Jelmer] found that the programmer would happily attempt to perform operations on a 16 bit EPROM even though no adapter was physically present. This gave him a chance to probe around with a logic analyzer to figure out what it was trying to accomplish. The trick turned out to be splitting the 16 bit bus into two 8 bit buses which are requested sequentially.

With careful observation, close studying of 16 bit chip datasheets, and much brow furrowing, he was eventually able to come up a design that used five 74xx573 latches and put a schematic together in Eagle. There were a few kinks to iron out when the boards finally arrived, but ultimately the design worked on the first try. [Jelmer] says the same technique should work for 42 pin EPROMs, but as Dataman still actually sell adapters for those he decided not to supply schematics for it.

[Jelmer] tells us that he was inspired to send this success story our way after reading how our very own [Elliot Williams] took the long away around to erase a couple UV EPROMs recently While this isn’t the first time we’ve seen somebody have to hack support for 16 bit EPROMs into their programmer, it’s good to see that the manufacturer at least had the customer’s back in this case.

Flash Your Libre Firmware With A Libre Programmer

Whether or not you personally agree with all the ideals of the Free Software Foundation (FSF), you’ve got to give them credit: they don’t mess around. They started by laying the groundwork for a free and open source operating system, then once that dream was realized, started pushing the idea of replacing proprietary BIOS firmware with an open alternative such as Libreboot. But apparently, even that’s not enough, as there’s still more freedom to be had. We’re playing 4D Libre Chess now, folks.

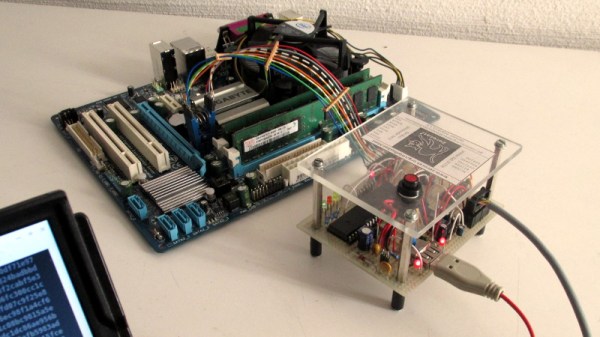
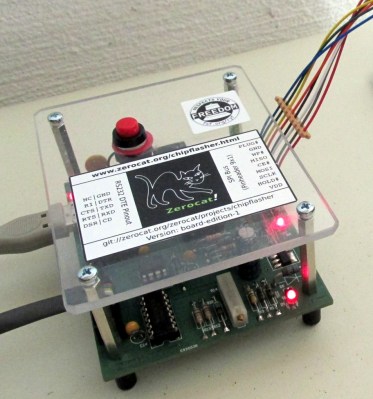
To flash your libre boot firmware on your libre OS running computer without any proprietary funny business, you’re going to need a libre chip programmer. Luckily, the FSF has just awarded the Zerocat Chipflasher their “Respects Your Freedom” certification, meaning every element of the product is released under a free license for your hacking enjoyment. According to the FSF, this is a major milestone towards their goal of providing users a truly free and open source computer, from the browser all the way down to the BIOS.

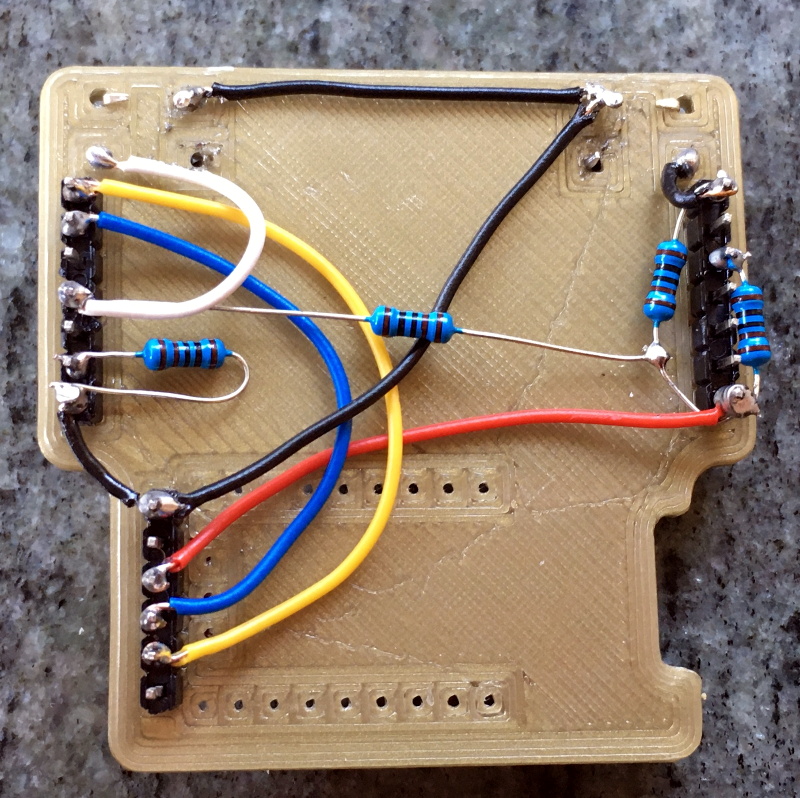
Of course, you don’t need to be Richard Stallman to appreciate a fully open chip programmer. With the software, wiring diagrams, and PCB files available on the Chipflasher’s website, the project is an excellent educational reference. Is also means that with a clone the Chipflasher’s Git repository, you’re well on the way to spinning up your own build of the device.

Given the roughly $350 USD price tag on the first generation Zerocat Chipflasher, it seems fairly likely we’ll be seeing some DIY builds of this device before too long. Not that we want to deprive Zerocat commercial success for this very neat piece of gear, but for many it’s a mighty steep price; even if you do get all the Freedoms.

It may use a device of slightly more nebulous morality than the Zerocat Chipflasher, but our own [Bryan Cockfield] documented the saga of getting Libreboot installed on a Thinkpad X200 if you’d like to know more about the high stakes world of BIOS replacement. Whatever it takes to get that Intel Management Engine off your penguin-powered box.